€567.18
Priemerné hodnotenie:0/5(0x)
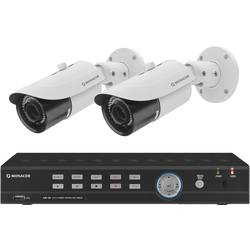
Vlastnosti a parametre výrobku
Skúsenosti užívateľov
Otázky a odpovede
Dokumentácia
Popis
Vlastnosti a parametre výrobku
| Vlastnosti monitorovacieho zariadenia | So senzorom pohybu S IR LED |
|---|---|
| Standard přenosu signálu | Analógový AHD HD-TVI |
| Kanálov | 4 |
| Druh senzora (zabezpečenie) | CMOS |
| Veľkosť senzoru | 9.07 mm (1/2.8″) |
| Miesto použitia | Vonkajšia |
| Kapacita pamäte | 1 TB |
| max.dosah IR svetla | 50 m |
| Ohnisková vzdialenosť | 2,8 – 12 mm |
| Rozlíšenie (max.) | 1920 x 1080 px |
| Kategória výrobku | Sada bezpečnostnej kamery |
Skúsenosti a názory zákazníkov
- Skúsenosti užívateľov nie sú k dispozícii.
Otázky užívateľov
- Užívatelia k tomuto výrobku zatiaľ nemali žiadne otázky.
Dokumentácia
Podmienky používania dokumentácie
Mehrkanal-Hybrid-Digital-Rekorder zur Videoüberwachung Multi-Channel Hybrid Digital Recorder for Video Surveillance AXR-104
Bestell-Nr. – Order No. 18.4510
AXZ-204BV
Bestell-Nr. – Order No. 18.4750
AXZ-204DV
Bestell-Nr. – Order No. 18.4760
AXZ-224BD
Bestell-Nr. – Order No. 18.9270
AXR-108
Bestell-Nr. – Order No. 18.4520
AXZ-408BV
Bestell-Nr. – Order No. 18.4770
AXZ-408DV
Bestell-Nr. – Order No. 18.4780
AXR-116
Bestell-Nr. – Order No. 18.4530
BEDIENUNGSANLEITUNG
INSTRUCTION MANUAL
MODE D’EMPLOI
ISTRUZIONI PER L’USO
ELECTRONICS FOR SPECIALISTS ELECTRONICS FOR SPECIALISTS ELECTRONICS
FOR SPECIALISTS ELECTRONICS FOR SPECIALISTS
3
Mehrkanal-Hybrid-Digital-Rekorder Diese Anleitung richtet sich an Installateure und Bediener mit Grundkenntnissen in der Überwachungstechnik. Soll der Rekorder in ein Netzwerk eingebunden werden, sind zusätzlich Netzwerkkenntnisse erforderlich.Bitte lesen Sie die Anleitung vor dem Betrieb gründlich durch und heben Sie sie für ein späteres Nachlesen auf. Der deutsche Text beginnt auf der Seite 4.
Multi-Channel Hybrid Digital Recorder These instructions are intended for installers and operators with basic knowledge in surveillance technology. If the recorder is to be connected to a network, knowledge in network technology is additionally required.Please read the operating instructions carefully prior to operating the unit and keep them for later reference. The English text starts on page 32.
Enregistreur numérique hybride multicanaux Cette notice s’adresse aux installateurs et aux utilisateurs avec des connaissances de base en surveillance. Pour intégrer l’enregistreur dans un réseau, des connaissances réseau sont nécessaires.
Veuillez lire la présente notice avec attention avant le fonctionnement et conservez-la pour pouvoir vous y reporter ultérieurement. La version française se trouve à la page 60.
Registratore digitale ibrido multicanale Queste istruzioni sono rivolte agli installatori e utenti con conoscenze base nella tecnica di sorveglianza. Se il registratore deve essere inserito in una rete sono richieste anche delle conoscenze sui network.
Vi di leggere attentamente le presenti istruzioni prima della messa in funzione e di conservarle per un uso futuro. Il testo italiano inizia a pagina 88.
Deutsch English Français Italiano ELECTRONICS FOR SPECIALISTS ELECTRONICS FOR SPECIALISTS ELECTRONICS
FOR SPECIALISTS ELECTRONICS FOR SPECIALISTS
4
DeutschDeutsch SeiteInhaltDeutsch 1 Hinweise für den sicheren Gebrauch . . . . . . . . 5
2 Wichtige Hinweise zur Datensicherheit. . . . . . .5
3 Einsatzmöglichkeiten und Hauptmerkmale . . . . 5
4 Übersicht . . . . . . . . . . . . . . . . . . . . . . . . . 6
4.1 Vorderseite. . . . . . . . . . . . . . . . . . . . . . .6
4.2 Rückseite . . . . . . . . . . . . . . . . . . . . . . . . 8
4.3 Fernbedienung . . . . . . . . . . . . . . . . . . . . 9
4.3.1 Batterien einsetzen / wechseln . . . . . . . . . . . . 9
5 Anschluss des Rekorders. . . . . . . . . . . . . . . .9
5.1 Festplatte installieren . . . . . . . . . . . . . . . . 9
5.2 Kameras, Monitor, USB-Maus. . . . . . . . . . . .9
5.3 Audiosignale. . . . . . . . . . . . . . . . . . . . . .9
5.4 Alarmein- und -ausgänge, PTZ-Anschluss. . . . 10
5.5 Netzwerk. . . . . . . . . . . . . . . . . . . . . . . 10
5.6 Stromversorgung . . . . . . . . . . . . . . . . . . 10
6 Inbetriebnahme . . . . . . . . . . . . . . . . . . . . 10
6.1 Mögliche Fehlermeldungen nach dem Einschalten . . . . . . . . . . . . . . . 10
6.1.1 Keine Festplatte eingesetzt. . . . . . . . . . . . . 10
6.1.2 Festplatte nicht formatiert . . . . . . . . . . . . . 11
6.2 Status beim ersten Einschalten . . . . . . . . . . 11
6.3 Einrichtungsassistent . . . . . . . . . . . . . . . . 12
6.4 Alle Menüs auf einen Blick . . . . . . . . . . . . 14
6.5 Bediensperre aktivieren, Passwörter ändern und Benutzerrechte festlegen . . . . . . . . . . 16
6.6 Alarmeingänge konfigurieren . . . . . . . . . . 16
6.7 Signaltöne aktivieren /deaktivieren Ereignisse an den Alarmausgang weiterleiten. 17
6.8 Einstellungen für die Live-Überwachung: Kamera-Name, Bild, Zeitanzeige . . . . . . . . . 17
6.9 Bildbereiche abdecken. . . . . . . . . . . . . . . 17
6.10 Bewegungserkennung einstellen . . . . . . . . 17
6.11 Kamerafernsteuerung (PTZ). . . . . . . . . . . . 18
6.12 Schnappschuss-Aufnahmen ermöglichen. . . . 18
6.12.1 Cloud-Speicher für Schnappschuss-Aufnahmen . 19
6.13 Unterschiedliche Konfigurationen speichern und aufrufen. . . . . . . . . . . . . . . . . . . . . 19
6.14 Tipps. . . . . . . . . . . . . . . . . . . . . . . . . . 19
7 Bedienung . . . . . . . . . . . . . . . . . . . . . . . 20
7.1 Bediensperre. . . . . . . . . . . . . . . . . . . . . 20
7.2 Benutzerwechsel . . . . . . . . . . . . . . . . . . 20
7.3 Live-Überwachung . . . . . . . . . . . . . . . . . 20
7.3.1 Verweildauer und Darstellung beim Bilddurchlauf einstellen . . . . . . . . . . . 21
7.3.2 Bildausschnitt vergrößern . . . . . . . . . . . . . 21
7.3.3 Tonwiedergabe . . . . . . . . . . . . . . . . . . . 22
7.4 Bedienleisten – schneller Zugriff auf Einstellungen und Funktionen . . . . . . . . . . 22
7.5 Farbe, Helligkeit, Kontrast der Live-Bilder einstellen. . . . . . . . . . . . . . . . . . . . . . . 22
7.6 Aufnahmen . . . . . . . . . . . . . . . . . . . . . 22
7.6.1 Aufnahmezeiten ändern . . . . . . . . . . . . . . 23
7.6.2 Schnappschuss-Bilder. . . . . . . . . . . . . . . . 23
7.7 Abspielen von Aufnahmen . . . . . . . . . . . . 23
7.7.1 Die letzten 5 Aufnahme-Minuten einer Kamera abspielen . . . . . . . . . . . . . . 23
7.7.2 Aufnahme eines bestimmten Zeitraums abspielen und ggf. extern speichern . . . . . . . . . . . . . 23
7.7.3 Schnappschuss-Bilder aufrufen . . . . . . . . . . 24
7.8 PTZ-Kamera steuern . . . . . . . . . . . . . . . . 25
7.9 Daten löschen . . . . . . . . . . . . . . . . . . . . 25
7.10 Werkseinstellung (Reset). . . . . . . . . . . . . . 26
7.11 Ereignisliste aufrufen. . . . . . . . . . . . . . . . 26
7.12 Systeminformationen anzeigen Geräte-ID und Gerätenamen ändern . . . . . . 26
7.13 Ausschalten . . . . . . . . . . . . . . . . . . . . . 27
8 Einblendungen und Störungsmeldungen. . . . . 27
9 Fernüberwachung und Fernzugriff auf den Rekorder . . . . . . . . . . . . . . . . . . . 27
9.1 Fernüberwachung über Mobiltelefon und Tablet-Computer. . . . . . . . . . . . . . . . 27
9.2 Fernzugriff über einen Computer . . . . . . . . 28
10 Wo finde ich welche Einstellungen und Funktionen? . . . . . . . . . . . . . . . . . . . . . . 29
11 Häufig gestellte Fragen . . . . . . . . . . . . . . . 30
12 Technische Daten . . . . . . . . . . . . . . . . . . . 31
Inhalt EnglishEnglish PageContents Français Français PageTable des matières Italiano Italiano PaginaIndice Espa?ol Espa?ol P?ginaContenidos Nederlands Nederlands PaginaInhoud Polski Polski StronaSpis tre ci
5
Deutsch 1 Hinweise für den sicheren Gebrauch Die Geräte (Rekorder, Netzgerät, Fernbedienung und USBMaus) entsprechen allen relevanten Richtlinien der EU und tragen deshalb das -Zeichen.
WARNUNGDas Netzgerät wird mit lebensgefährlicher Netzspannung versorgt. Nehmen Sie deshalb niemals selbst Eingriffe daran vor. Es besteht die Gefahr eines elektrischen Schlages. Stecken Sie nichts in die Lüftungsöffnungen des Rekorders.
Er könnte beschädigt werden.
– Die Geräte sind nur zur Verwendung im Innenbereich geeignet. Schützen Sie sie vor Tropf- und Spritzwasser sowie vor hoher Luftfeuchtigkeit. Der zulässige Einsatztemperaturbereich beträgt 0 – 40 °C.
– Platzieren Sie den Rekorder so, dass im Betrieb eine ausreichende Luftzirkulation gewährleistet ist. Die Lüftungsöffnungen des Gehäuses dürfen auf keinen Fall abgedeckt werden.
– Stellen Sie keine mit Flüssigkeit gefüllten Gefäße, z. B. Trinkgläser, auf die Geräte.
– Ziehen Sie sofort den Stecker des Netzgerätes aus der Steckdose 1. wenn sichtbare Schäden am Rekorder, Netzgerät oder am Netzkabel vorhanden sind 2. wenn nach einem Sturz oder Ähnlichem der Verdacht auf einen Defekt besteht 3. wenn Funktionsstörungen auftreten.
Geben Sie die Geräte in jedem Fall zur Reparatur in eine Fachwerkstatt.
– Ziehen Sie den Netzstecker nie am Kabel aus der Steckdose, fassen Sie immer am Stecker an.
– Werden die Geräte zweckentfremdet, nicht richtig angeschlossen, falsch bedient oder nicht fachgerecht repariert, kann keine Haftung für daraus resultierende Sach- oder Personenschäden und keine Garantie für die Geräte übernommen werden.
– Ebenso kann keine Haftung für durch Fehlbedienung oder durch einen Defekt entstandene Datenverluste und deren Folgeschäden übernommen werden.
Sollen die Geräte endgültig aus dem Betrieb genommen werden, übergeben Sie sie zur umweltgerechten Entsorgung einem örtlichen Recyclingbetrieb.
2 Wichtige Hinweise zur Datensicherheit Der Rekorder ist so eingestellt, dass er sich nach der Verbindung mit dem Internet automatisch im Internet einloggt. Damit kann jeder, der die Geräte-ID-Nr. und das voreingestellte Passwort kennt, auf den Rekorder zugreifen, ihn manipulieren und (kriminell) missbrauchen, ohne dass Sie es merken.
WICHTIG
Ändern Sie unbedingt das Passwort (Kap. 6.5).
Merken Sie sich gut Ihr Passwort und geben Sie es nur an berechtigte Personen weiter.
Wollen Sie den Rekorder an Dritte weitergeben (z. B. verkaufen, verleihen) oder ihn entsorgen, löschen Sie unbedingt alle Aufzeichnungen und Passwörter, indem Sie die Festplatte formatieren und den Rekorder zurück auf die Werkseinstellung stellen (Kap. 7.10, Seite 26). Anderenfalls reichen Sie mit dem Gerät auch alle Aufzeichnungen, persönliche Daten und Passwörter weiter.
3 Einsatzmöglichkeiten und Hauptmerkmale Der Rekorder dient in Verbindung mit mindestens einer Überwachungskamera und einem Monitor zur Überwachung von Objekten wie Eigenheimen, Verkaufsräumen, Außenanlagen usw. Durch die Aufzeichnung der Kamerabilder ist eine Auswertung jederzeit möglich und kann dadurch sowohl zur Abschreckung als auch zur Aufklärung von Straftaten erheblich beitragen.
Vorteile der Hybrid-Rekorder von MONACOR: -Analoge Full-HD-Bilder (Auflösung 1080p) lassen sich über Koaxialkabel (max. 300 m) zum Rekorder leiten -abwärtskompatibel (AHD, FBAS) − der Kameratyp wird automatisch erkannt -einfache Installation auch ohne Netzwerk -Fernzugriff auf den Rekorder und Fernüberwachung über ein lokales Netzwerk oder das Internet möglich, z. B. durch Computer, Mobiltelefon -Überwachung auch mit Netzwerkkameras möglich Die HYBRID-Linie umfasst Einzelrekorder (AXR-…) sowie komplette Überwachungssets (AXZ-…) mit Farbkameras, Netzgerät für die Kameras und Anschlusskabeln: ModellKamera kanäle*Festplattenbeiliegende KamerasNetzgerät für die Kameras AXR1044 / 2ohne, 1 × 6 TB (SAGA) einsetzbarkeine alle Kameramodelle AXC… können eingesetzt werden (auch alle AHCAM… und TVCCD…, die Auflösung ist jedoch geringer)— AXR1088 / 4
AXR11616 / 8
ohne 2 × 6 TB (SAGA) einsetzbar AXZ204BV
4 / 2
1 × 1 TB (SATA)2 × AXC2812BVPSS1230DC
(12 V, 3 A)AXZ204DV2 × AXC2812DV
AXZ224BD2 × AXC2812BV
2 × AXC2812DV
PSS1250DC
(12 V, 5 A) AXZ408BV8 / 44 × AXC2812BVPSS1230DC
(12 V, 3 A)AXZ408DV4 × AXC2812DV
*x / y = für analoge Kameras / Netzwerkkameras
6
Deutsch 4 Übersicht 4.1 Vorderseite AXR-… …-CH HYBRID DIGITAL RECORDER
MENU
ESCPWR HDDSEARCHMUTE CH– CH+ ALL
PTZ
5
1112 13 14 15 166 78
12 3 49 10
Abb. 4-1 AXR-104 (auch in den Sets AXZ-2.. enthalten) AXR-108 (auch in den Sets AXZ-4.. enthalten) Pos.BeschriftungFunktion 1SEARCH
MUTE
CH– /CH+ ALLSuche einer Aufnahme Ton ein /aus vorheriger/nächster Kamerakanal geteilter Bildschirm mit Ansicht aller Kanäle 2
/ nach links / Rücklauf 3nach oben 4 / nach rechts / Vorlauf 5nach unten 6 angewählten Menüpunkt zum Einstellen aktivieren / Eingabe bestätigen 7MENU/ESCHauptmenü aufrufen / verlassen 8– IRSensor für die Steuerbefehle der Fernbedienung 9PWRBetriebsanzeige 10HDDBlinkt, wenn die Festplatte gelesen oder beschrieben wird; im Ruhezustand leuchtet die LED konstant.
11
USBAnschluss zur Datensicherung auf einem USBStick / auf einer Festplatte; kann auch zum Anschluss der Maus genutzt werden 12Wiedergabe starten 13
IIPause / Wiedergabe Bild für Bild 14
Wiedergabe oder manuelle Aufnahme stoppen 15
-manuelle Aufnahme starten 16PTZ
PTZSteuerung aufrufen (Pan, Tilt, Zoom) Abb. 4-2 Tastenfunktionen der 4- und 8-Kanal-Rekorder
7
Deutsch AXR-116 16-CH HYBRID DIGITAL RECORDER
MENU
ESCPWR HDD
PTZ2345678
90
1
12 3 49 10
5
1112 13 14 15 16 176 78
Abb. 4-3 AXR-116
Pos.BeschriftungFunktion 1
1– 9, 0
Tasten 1– 9 für Ziffern 1– 9 und Kanäle 1– 9
Auswahl von Kanal CH 11– CH 16: zuerst Zifferntaste 1, dann nächste Zifferntaste drücken (für Kanal 16 z. B. zuerst 1 und dann 6 drücken).
2 / nach links / Rücklauf 3nach oben 4 / nach rechts / Vorlauf 5nach unten 6 / PTZangewählten Menüpunkt zum Einstellen aktivieren / Eingabe bestätigen / PTZSteuerung aufrufen (Pan, Tilt, Zoom) 7MENU/ESCHauptmenü aufrufen / verlassen 8– IRSensor für die Steuerbefehle der Fernbedienung 9PWRBetriebsanzeige 10HDDBlinkt, wenn die Festplatte gelesen oder beschrieben wird; im Ruhezustand leuchtet die LED konstant.
11
USBAnschluss zur Datensicherung auf einem USBStick / auf einer Festplatte; kann auch zum Anschluss der Maus genutzt werden 12
In der LiveAnsicht auf geteilten Bildschirm schalten (4, 9 oder 16 Kameras) 13Ton ein / aus 14Wiedergabe starten 15
IPause / Wiedergabe Bild für Bild 16
Wiedergabe oder manuelle Aufnahme stoppen 17
-manuelle Aufnahme starten Abb. 4-4 Tastenfunktionen des AXR-116
8
Deutsch 4.2 Rückseite VIDEOINPUT1
3
42
AUDIO
OUTPUTAUDIO
INPUTHDMI
VGA
LAN
RS485
12 V
4 3
SENSOR2 1 G
ALARM
1
3
42
23 20 22 25 24 26 28 27 29 30
Abb. 4-5 AXR-104
VIDEO
INPUT1
2
3
4
8642
AUDIO
OUTPUT
AUDIO
INPUTHDMI
VGA
LAN
RS485
12 V
8 7 6 5 4 3
SENSOR2 1 G
ALARM
2025 24 26 28 27 29 30
22 23
Abb. 4-6 AXR-108
202122 23 24 25 26 27 28 29 30
Abb. 4-7 AXR-116
Pos.BeschriftungFunktion 20VIDEO INPUT
Videoeingänge (BNCBuchsen) für die Überwachungskameras 21AUDIO INPUT (916) (nur AXR116) Audioeingänge für die Kanäle 9 – 16 (DSubBuchse), Anschluss über beiliegendes Adapterkabel mit CinchBuchsen 22AUDIO INPUT
Audioeingänge (CinchBuchsen) AXR104: für die Kanäle 1– 4
AXR108 und AXR116: für die Kanäle 1– 8
23AUDIO OUTPUTAudioausgang (CinchBuchse) 24VGAVGAAnschluss für einen VGAMonitor (für eine Darstellung mit 1080p den HDMI®Ausgang verwenden) 25HDMIHDMI®Ausgang für einen hochauflösenden Monitor 26LANAnschluss für LAN, Ethernet zur Fernüberwachung (RJ45Buchse) 27RS485 / SENSOR / ALARM
RS485 + − = RS485Schnittstelle zur PTZSteuerung von Kameras Sensor = Alarmeingänge z. B. für Bewegungsmelder Alarm = Alarmausgang z. B. für einen Alarmsignalgeber (siehe Kapitel 5.4) 28
Anschluss für die USBMaus 2912V⎓Anschluss für das beiliegende Netzgerät 30I Ein /AusSchalter
9
Deutsch 4.3 Fernbedienung SEL
0ALLMENU
9
7
56
4
23
1
MUTE SUBMENU
8
Abb. 4-8 Fernbedienung TasteFunktion 1 … 9, 0Kanalauswahl; Zifferneingabe ALLgeteilter Bildschirm mit Ansicht aller Kanäle MENUHauptmenü aufrufen / verlassen Funktionsleiste oder SchnellAuswahlleiste ausblenden MUTETon ein / aus SUBMENUFunktionsleiste aufrufen 2. Tastendruck: SchnellAuswahlleiste für das ange wählte Kamerabild aufrufen (Kapitel 7.4) nach oben nach unten / nach links / rechts; Parameterwert verringern / erhöhen SELangewählten Menüpunkt zum Einstellen aktivieren / Eingabe bestätigen (≙ Enter Taste) Rücklauf Aufnahmesuche aufrufen, Aufnahme wiedergeben Vorlauf -manuelle Aufzeichnung starten IIPause / Wiedergabe Bild für Bild ■Wiedergabe oder manuelle Aufnahme stoppen 4.3.1 Batterien einsetzen / wechseln Zum Einsetzen der Batterien (2 × 1,5 V, Größe AAA = Micro) auf der Rückseite der Fernbedienung den Batteriefachdeckel abnehmen. Die Batterien, wie im Batteriefach angegeben, einsetzen. Das Fach mit dem Deckel wieder schließen.
Bei längerem Nichtgebrauch die Batterien herausnehmen, damit die Fernbedienung bei einem eventuellen Auslaufen der Batterien nicht beschädigt wird.
Batterien dürfen nicht in den Hausmüll geworfen werden. Geben Sie sie zur umweltgerechten Entsorgung nur in den Sondermüll (z. B. Sammelbehälter im Einzelhandel).
5 Anschluss des Rekorders 5.1 Festplatte installieren Die Rekorder der Überwachungssets (AXZ-…) sind mit einer Festplatte ausgerüstet. In den Einzelrekordern (AXR-…) muss als erstes eine Festplatte installiert werden. Im Sortiment von MONACOR finden Sie geeignete Festplatten (SATA-…) mit verschiedeneren Speicherkapazitäten. Bei Festplatten von anderen Lieferanten achten Sie darauf, dass diese speziell für die Sicher heits- und Überwachungstechnik geeignet sind.
Vorsicht: Die Festplatte auf keinen Fall einsetzen oder herausnehmen, während der Rekorder eingeschaltet ist!
1) Den Rekorder von der Stromversorgung trennen.
2) Den Gehäusedeckel abschrauben.
3) Die Festplatte einsetzen und festschrauben.
4) Das Stromversorgungskabel für die Festplatte und das Datenkabel auf die Anschlüsse der Festplatte stecken.
5) Den Rekorder mit dem Deckel wieder schließen.
6) Nach dem Anschluss und Einschalten des Rekorders die Festplatte formatieren (Kap. 6.1.2) und mit dem Einrichtungsassistenten alle Einstellungen vornehmen (Kap. 6.3).
5.2 Kameras, Monitor, USB-Maus Kameras BNC-Buchsen VIDEO INPUT (20) Bei den Kameramodellen AXC-… deren TVI-Ausgang anschließen, um die maximale Auflösung nutzen zu können.
Falls PTZ-Kameras verwendet werden, können Pan, Tilt und Zoom über den Anschluss RS485 (27) gesteuert werden (Anschluss siehe Kapitel 5.4).
Monitor Buchse HDMI (25) für die maximale Auflösung von 1080p; ist am Monitor nur ein VGA-Anschluss vorhanden, kann auch die Buchse VGA (24) verwendet werden (geringere Auflösung) beiliegende Maus USB-Buchse (28) auf der Rückseite; die frontseitige USB-Buchse (11) sollte zur Datensicherung genutzt werden 5.3 Audiosignale Audiosignale (von den Kameras) Cinch-Buchsen AUDIO
INPUT (22) zusätzlich bei dem Rekorder AXR-116 für die Kanäle 9 – 16
die D-Sub-Buchse AUDIO INPUT (21); ein Adapterkabel mit Cinch-Buchsen gehört zum Lieferumgang Audiosignal zum Abhören Ist der Monitor über die Buchse HDMI (25) angeschlossen, wird das Audio signal bereits hierüber zum Monitor geleitet. Für andere Anschlussmöglichkeiten liegt das Audiosignal an der roten Cinch-Buchse AUDIO
OUTPUT (23) an.Es lässt sich immer der Kamerakanal abhören, der als Vollbild gezeigt wird oder bei einer Mehrfachdarstellung das blau umrandete Bild (mit der linken Maustaste anwählen).
10
Deutsch 5.4 Alarmein- und -ausgänge, PTZ-Anschluss Diese Anschlüsse erfolgen über die grüne Klemmleiste (27).
Alarmeingänge SENSOR
Hier können Alarmsensoren (Bewegungssensoren, Lichtschranken etc.) angeschlossen werden, um z. B. bei einer Auslösung eine Momentaufnahme automatisch zu speichern und das betroffene Kamerabild auf Vollbild zu schalten oder auch um automatisch eine E-Mail mit der Momentaufnahme zu senden.
Den Anschluss [–] eines Sensors mit dem Pin G (Masse) verbinden und den Anschluss [+] des Sensors mit dem betreffenden Kanaleingang (1 – 16) des Rekorders. Alle weiteren Sensoren genauso anschließen. Über das Menü „Para meter“, Untermenü „Alarm“, Bereich „Alarm“ lassen sich Alarmanzeigedauer, Alarmtondauer, Aufnahmedauer, Alarmkontakt (Öffner oder Schließer) und weitere Einstellungen vornehmen (Kapitel 6.6).
Ausgang ALARM
Als potentialfreier Alarmausgang ist ein Relais mit Schließkontakt (mit max. 30 V/ 1 A belastbar) vorhanden. Hier kann z. B. ein akustischer oder optischer Alarmgeber angeschlossen werden.
PTZ-Anschluss RS485
Über die RS-485-Schnittstelle lassen sich geeignete Kameras fernsteuern: z. B. Schwenken (Pan) und Neigen (Tilt), Brennweite (Zoom), Blendenöffnung (Iris) und Bewegungsgeschwindigkeit.
Die Kontakte − (= RS-485-A) und + (= RS-485-B) mit den entsprechenden Kontakten der Kamera verbinden. Eine weitere Kamera kann parallel an die Anschlüsse der ersten angeschlossen werden usw., bis alle Kameras in einer Kette verbunden sind. Zur Verringerung von Störeinstrahlungen sollten verdrillte Leitungen verwendet werden. An der letzten Kamera die beiden Leitungen mit einem 120-Ω-Widerstand abschließen (dies ist häufig über einen Schalter an der Kame ra möglich).
Damit die Kameras vom Rekorder unabhängig angesprochen werden können, muss ihnen eine individuelle Adresse zugewiesen werden (über ein Menü oder DIP-Schalter an der Kamera). Entsprechend muss am Rekorder eingestellt werden, über welche Adresse die jeweilige Kamera gesteuert wird, und welche Übertragungsparameter und welches Protokoll sie benötigt (Kapitel 6.11).
5.5 Netzwerk Zur Fernüberwachung den Rekorder über die Buchse LAN (26) an ein lokales Netzwerk oder an einen Router anschließen.
Beachten Sie unbedingt die Hinweise zur Datensicherheit im Kapitel 2!
5.6 Stromversorgung Das Netzgerät an die Buchse 12 V⎓ (29) anschließen und mit einer Steckdose (230 V/ 50 Hz) verbinden.
6 Inbetriebnahme Zur Inbetriebnahme können Sie ein Video von MONACOR
INTERNATIONAL über „YouTube“ aufrufen, das die wichtigsten Schritte zeigt. Dort sehen Sie auch, wie einfach es ist, den Rekorder in ein Netzwerk einzubinden.
https://youtu.be/13P1Y4PiBmk Nach dem Anschluss von Kameras Monitor Maus Rekorder-Netzgerät Netzgerät für die Kameras den Rekorder mit dem Wippschalter (30) auf der Rückseite einschalten. Nach einigen Sekunden wird das Firmen-Logo auf dem angeschlossenen Monitor angezeigt: Nach ca. 15 weiteren Sekunden erscheint die Startseite mit dem Einrichtungsassistenten „Wizard“: MR
MR
T-CH1
CH4
T-CH2
CH3
KEIN VIDEO
Sfarfuú Wizard Don‘f show fhis windoSw nexf fime.
Welcome to use the wizard of setup KEIN VIDEOkeine Kamerkeine Kamer 15/12/2016 09:53:S46
× ABBRUCH Weifer Abb. 6-1 Startbildschirm: Der Einrichtungsassistent ist eingeblendet; je nach Rekordermodell sind weitere Felder für die Kamera-bilder vorhanden 6.1 Mögliche Fehlermeldungen nach dem Einschalten Ab Werk ist der Rekorder so eingestellt, dass bei einem auftretenden Fehler 10 s lang ein Alarmsignal ertönt.
6.1.1 Keine Festplatte eingesetzt ×Warnung 1
No disk Abb. 6-2 keine Festplatte eingesetzt Zusätzlich erscheint unten im Bildschirm die Meldung Keine HDD. Auf der Seite 9 ist im Kapitel 5.1 der Einbau
11
Deutsch einer Festplatte beschrieben. Zuerst den Rekorder ordnungsgemäß herunterfahren: 1) Das Warnfenster durch Klicken auf das × schließen.
2) Im Fenster „Startup Wizard“ auf ABBRUCH klicken und auf die Frage „Are you sure you want to cancel Startup Wizard?“ mit OK beantworten.
3) Zum Einblenden der Funktionsleiste die rechte Maustaste drücken oder mit dem Mauszeiger in die Mitte der unteren Bildschirmkante fahren: 4) Auf das Symbol HAUPTMENÜ klicken.
5) Im Hauptmenü auf das Symbol „Schließung“ klicken.
Es erscheint folgende Information: Warnung Recording was stoplped successfullf, folu can turnoff the power safelf nlow !
Abb. 6-3 Der Rekorder kann jetzt sicher ausgeschaltet werden 6) Den Rekorder mit dem Wippschalter auf der Rückseite ausschalten.
6.1.2 Festplatte nicht formatiert ×Warnung 1
Unformat.
Abb. 6-4 Festplatte unformatiert Zusätzlich erscheint unten im Bildschirm H. Zum Formatieren: 1) Das Warnfenster durch Klicken auf das × schließen.
2) Im Fenster „Startup Wizard“ auf „Weiter“ klicken. Es erscheint folgendes Fenster: Hdd Management verfüg.ze.
0s Verfü.fGes.
0Mf18ú3G
Status Unformat.
Nr.
1SEL.
Don‘t show this wiVndow next time.× ABBRUCH
Weiter Rückzug Überschreib. AUTOVFormat HDD
Abb. 6-5 Fenster für die Einstellungen der Festplatte Die eingesetzte Festplatte wird angezeigt und in der Spalte „Verfüg./Ges.“ die verfügbare Kapazität (hier 0, weil die Platte noch unformatiert ist) und die Gesamtkapazität.
3) Die Festplatte selektieren: In der Spalte SEL die Zeile der Platte anklicken (siehe Mauszeiger in Abb. 6-6).
4) Auf die Schaltfläche „Format HDD“ klicken. Es wird das Fenster „Anmelden“ geöffnet.
Hdd Management verfüg.ze.
0s Verfü.fGes.
0Mf18ú3G
Status Unformat.
Nr.
1SEL.
Don‘t show this wiVndow next time.× ABBRUCH
Weiter Rückzug Überschreib. AUTOVFormat HDD
Nutzername Iadmin Passwort Anmelden ABBRUCH
AnmeldenAnmelden Abb. 6-6 Fenster „Anmelden“ 5) Auf „Anmelden“ klicken. Es erscheint folgendes Fenster zur Bestätigung: Hdd Management Don‘t show this wi.ndow next time.f ABBRúCH Weiter Rückzug verfüg.ze.
0s Verfü./Ges.
0M/931G
Status únformat.
Nr.
1SEL.
Überschreib. AúTOFormat HDD
OK
ABBRúCH
Nach der Formatier.ung der Festplatte .sind alle Daten verloren!
Notice Abb. 6-7 Fenster zum Bestätigen einer Formatierung 6) Die Schaltfläche „OK“ anklicken. Der Formatierungsvorgang wird im Fortschrittsbalken angezeigt. Am Ende der Formatierung erscheint die Meldung: Hdd Management Don‘t show this wi.ndow next time.f ABBRúCH Weiter Rückzug verfüg.ze.
820STD.
Verfü./Ges.
922G/931G
Status OK
Nr.
1SEL.
Überschreib. AúTOFormat HDD
100%OK
Notice Formatierung erfolg.reich Abb. 6-8 Festplatte ist formatiert 7) Auf „OK“ klicken: Die verfügbare Kapazität und die verfügbare Aufnahmezeit werden angezeigt. Für weitere Einstellungen im Kapitel 6.3 mit dem Bedienschritt 2) fortfahren oder zum Beenden auf ABBRUCH klicken und auf die Frage „Are you sure you want to cancel Startup Wizard?“ mit OK antworten.
6.2 Status beim ersten Einschalten 1. Es startet sofort die Daueraufnahme aller Kanäle, an denen eine Kamera angeschlossen ist, angezeigt durch das Symbol R (Record) im Kamerabild.
2. Ist nicht an allen Kanälen eine Kamera angeschlossen, ertönt 10 s lang ein Alarmsignal (automatische Erkennung des Fehlens eines Videosignals).
3. Ist die Festplatte vollgeschrieben, werden die ältesten Aufnahmen automatisch überschrieben (Endlosaufnahme).
4. Die Bewegungserkennung ist eingeschaltet: Bei einer erkannten Änderung des Bildinhalts erscheint das Symbol M (Motion) und es erfolgt ein Eintrag in die Ereignisliste (Datum, Uhrzeit, Kamerakanal).
5. Das Datum und die Uhrzeit sind nicht korrekt. Die Datumsanzeige entspricht der englischen Schreibweise: Monat / Tag / Jahr WICHTIG: Unbedingt die Datumsanzeige auf die deutsche Schreibweise ändern und das Datum sowie die Uhrzeit aktualisieren (Kap. 6.3 oder Kap. 6.4). Anderenfalls lassen sich Aufnahmen eines bestimmten Zeitpunktes nur umständlich oder gar nicht finden.
12
Deutsch 6.3 Einrichtungsassistent Wenn im Rekorder eine formatierte Festplatte vorhanden ist, erscheint nach dem Einschalten der Einrichtungsassistent (siehe Abb. 6-1). Mit dem Assistenten können Sie sich ganz einfach durch alle erforderlichen Einstellungen führen lassen.
Hinweis: Erscheint der Assistent nicht: 1) Durch Drücken der rechten Maustaste die Funktionsleiste einblenden: Abb. 6-9 Funktionsleiste 2) Auf das Symbol HAUPTMENÜ klicken.
3) Im Hauptmenü in der oberen Leiste auf „System“ klicken.
4) In der unteren Zeile „Show wizard“ im zugehörigen Feld einen Haken setzen.
5) Unten rechts auf „Sicherung“ klicken und die folgende Mitteilung „Speicherung erfolgreich“ durch Klicken auf „OK“ schließen.
6) Im Hauptmenü in der oberen Leiste auf „Schließung“ klicken und in dem sich nun öffnenden Fenster auf „Wieder Starten“ klicken. Nach dem Neustart erscheint der Einrichtungsassistent.
Soll der Assistent nicht genutzt werden, auf ABBRUCH klicken und die Frage zum Beenden des Assistenten mit OK beantworten. Zum Konfigurieren des Rekorders finden Sie im Kapitel 6.4
auf der nächsten Doppelseite eine Übersicht aller Menüs.
1) Um mit dem Assistenten den Rekorder zu konfigurieren, auf „Weiter“ klicken. Es erscheint das Menü für die Einstellungen der Festplatte: Hdd Management Don‘t show this wi.ndow next time.f ABBRúCH Weiter Rückzug verfüg.ze.
210STD
Verfü./Ges.
923G/931G
Status OK
Nr.
1SEL.
Überschreib. AúTOFormat HDD
Abb. 6-10 Einstellungen für die Festplatte 2) Oben in der Informationszeile werden Angaben zur Festplatte angezeigt. Zum Einstellen des Überschreibmodus das Pop-up-Menü öffnen: Auf das Symbol klicken.
Informationszeile Nr.Nummer der Festplatte StatusFestplatte OK oder Unformat.
Verfü. /Ges.verfügbare /gesamte Festplattenkapazität verfüg.ze.noch zur Verfügung stehende Aufnahmezeit in Stunden SEL.Spalte zur Anwahl einer Festplatte, die formatiert werden soll Einstellungen und Funktionen Überschreib.
AUTO
(Werkseinstellung) Die ältesten Aufnahmen werden über-schrieben, wenn die Festplatte voll ist.
AUSEs werden keine Aufnahmen überschrieben.
Sobald die Festplatte vollgeschrieben ist, erscheint die Meldung „Warnung Full“. Es ist dann keine Aufnahme mehr möglich.
1 Tag 3 Tage ⋮ 90 TageAufnahmen können nach der gewählten Speicherzeit überschrieben werden. Ist die Festplatte jedoch zuvor vollgeschrieben, kann keine Aufnahme mehr starten.
Format HDDSchaltfläche zum Formatieren der in der Spalte SEL. angewählten Festplatte 3) Nach dem Festlegen der Festplatten-Einstellungen auf „Weiter“ klicken. Es erscheint das Menü für die Netzwerkeinstellungen.
Network Conguratilon PPPOE
Client Port f9fff IP Aúresse192.168.ff1.1ff Subnet Maske255.255.255.fff Gateway192.168.ff1.1ff DNS1192.168.ff1.1ff DNS2 ff8.ff8.ff8.ff8HTTP Port fff8f 3G
Manuell DHCP
Don‘t show this wilnúow next time.× ABBRUCH Weiter Rückzug UPNP AUS
Abb. 6-11 Einstellungen für das Netzwerk 4) Ist der Rekorder nicht mit einem Netzwerk verbunden, mit „Weiter“ zum nächsten Menü springen und bei dem Bedienschritt 5 weiterlesen.
Für die Netzwerkverbindung wird die manuelle Einstellung empfohlen. Folgende Einstellmöglichkeiten sind vorhanden: Einstellungen PPPOE
Point-to-Point Protocol over Ethernet (für DSL-Modems, kaum noch gebräuchlich) Bei der Option PPPOE den Benutzer namen und das vom Internetdienst anbieter bereitgestellte Passwort eingeben sowie den Client-Port und den HTTP-Port einstellen. Der Fernzugriff auf den Rekorder ist dann über die IP-Adresse möglich, die nach Registrierung eines Domain-Namens und des HTTP-Ports erfasst wurde.
DHCP
Dynamic Host Configuration Protocol (Werkseinstellung)Bei der Option DHCP wird dem Rekorder vom Router automatisch die IP-Adresse zugewiesen. Bei jedem Neustart kann die zugewiesene IP-Adresse jedoch eine andere sein. Daher ist für einen Fernzugriff auf den Rekorder die Port-Weiterleitung erforderlich (UPNP auf EIN
stellen).
Manuell (empfohlene Einstellung)Bei der Option „Manuell“ IP-Adresse, Subnetzmaske, Gateway und DNS korrekt eingeben.
3G
MobilfunksystemDiese Option ist noch für ältere Mobiltelefone vorhanden und wird selten benötigt.
UPNP
Universal Plug and PlayUnterstützt der Router die UPnP-Funktion und wird UPNP auf EIN gestellt, leitet der Rekorder die Port-Nummern automatisch an den Router weiter. Für die empfohlene Einstellung „Manuell“ sollte die Werkseinstellung „AUS“ beibehalten werden.
Nach dem Konfigurieren des Netzwerks auf „Weiter“ klicken.
5) Es erscheint das Menü zum Hinzufügen von Netzwerkkameras: IPC Setup Don‘t show this wixndow next tife.× AúúRUCH
Weiter Rückzug Passage IP CH1
IP CH2
IP CH3
IP CH4
IP CH5
IP CH6arbeit State Port M
P Adresse/Dofain Naxf Subnet Maske Auto Assign IP to Cxafera(s)Channel DeleteAdd All User-dened Add Total band width:8Mxbps, used band widxth:0bps Abb. 6-12 Einbindung von Netzwerkkameras Ist keine Netzwerkkamera vorhanden, mit „Weiter“ zum nächsten Menü springen und bei dem Bedienschritt 7
weiter lesen.
13
Deutsch Um Netzwerkkameras hinzufügen zu können, müssen diese zuvor in das Netzwerk eingebunden worden sein (siehe Anleitung der Kamera). Für das Hinzufügen von Netzwerkkameras sind folgende Möglichkeiten vorhanden: SchaltflächeFunktion IP CH… Auf das Plussymbol klicken, um einem Kamera-kanal eine bestimmte IP-Kamera zuzuweisen. Im dann erscheinenden Fenster „Quick Add“ auf „Suche“ klicken, um alle im Netzwerk vorhandenen Kameras anzuzeigen. Die gewünschte Kamera durch Anklicken markieren und auf „Add“ klicken.
Auto Assign IP
to Camera(s)automatisches Hinzufügen Channel DeleteEntfernen einer Kamera ( dazu durch Anklicken die ganze Zeile der Kamera markieren) Add AllHinzufügen von Kameras auf die vorhandenen IP-Kamerakanäle User-defined Addbenutzerdefiniertes Hinzufügen von Kameras Zusätzlich zu den analogen Kameras können 2 Netzwerkkameras bei dem Rekorder AXR-104
4 Netzwerkkameras bei dem Rekorder AXR-108
8 Netzwerkkameras bei dem Rekorder AXR-116
verwendet werden. Wird ein Kanal für eine analoge Kamera abgeschaltet, kann dafür eine zusätzliche Netzwerkkamera eingesetzt werden.
Nach dem Hinzufügen der IP-Kameras auf „Weiter“ klicken.
6) Es erscheint das Menü für die automatische Aufnahme der Kamerabilder. In der Werkseinstellung werden alle Kamerakanäle, an denen eine Kamera angeschlossen ist, von 0 Uhr bis 24 Uhr aufgezeichnet: 0
20181614121022
2468
Record schedule Donft show this windown neút time.× ABBRUCH Weiter Rückzug KopiereBis CH1
Passage N-Normal BewegA-Alarm CH1
ALLEKopiere Sonntag Montag Dienstag Mittwoch Donnerstag Freitag SonnabendS
M
T
W
T
F
S
Abb. 6-13 Aufnahme-Wochenkalender Zum Ändern: a) Hinter „Passage“ ist ein Kamerakanal angewählt (hier Kanal 1). Soll die Aufnahmezeit für einen anderen Kanal geändert werden, auf das Symbol klicken.
b) Zum Löschen von Aufnahmezeiten bei gedrückter linker Maustaste über den gewünschten Zeitbereich fahren.
Einzelne Halb-Stunden-Blöcke lassen sich auch durch Anklicken löschen.
c) Gelöschte Zeiten können genauso wieder hinzugefügt werden.
d) Um Aufnahmen bei einer Bewegungserkennung und / oder Alarmierung automatisch starten zu lassen, zuerst in das gelbe Oval „Beweg.“ klicken bzw. in das rote Oval „A-Alarm“. Dann bei gedrückter linker Maustaste über den gewünschten Zeitbereich fahren.
e) Soll die Einstellung auch für andere Kamerakanäle übernommen werden, unten in der Zeile „Kopiere CH… Bis ALLE“ die Auswahl vornehmen und auf die Schaltfläche „Kopiere“ klicken.
f) Die Werkseinstellung lässt sich bei Bedarf schnell mit einem Reset wiedererstellen (Kap. 7.10).
Nach der Einstellung auf „Weiter“ klicken.
7) Es erscheint das Menü für Datum, Uhrzeit, Menüsprache und weitere Grundeinstellungen: 30
System General ConDguration Donft show this windoDw neút time.× ABBRUCHSicherung Rückzug DATUM02/18/2017Zeit16:37:47DatumsformatMM/TT/JJZeitformat24STD.SpracheDEUTSCHVideo FormatPALAnzeigezeit des MenDüs1MIN.ModusXVR
Abb. 6-14 Systemgrundeinstellungen MenüpunktHinweis DATUMUnbedingt Datum und Uhrzeit aktualisieren, damit Aufnahmen später gezielt in bestimmten Zeiträumen gesucht werden können.
Zeit DatumsformatUnbedingt die Datumsanzeige auf die deutsche Schreibweise (TT/ MM
/JJ) ändern, anderenfalls lassen sich Aufnahmen eines bestimmten Zeitpunktes nur umständlich oder gar nicht finden.
Zeitformat24- oder 12-Stundenformat SpracheAuswahl einer der 17 Menüsprachen Video Format Farbformat der angeschlossenen Analog- Kameras PAL (Europa) oder NTSC (USA, Asien) Anzeigezeit des MenüsDas Menü blendet sich automatisch aus, wenn keine Aktion erfolgt, nach 30 s, 1, 2, 5 oder 10
min.
AUS = Das Menü bleibt bis zum Abbruch oder Speichern eingeblendet.
Modus DVR = Einfacher Modus, wenn der Rekorder nicht in ein Netzwerk eingebunden werden soll: Die Netzwerkmenüs werden nicht angezeigt.
XVR = Erweiterter Modus mit allen Netzwerk-menüs.
8) Nach dem Einstellen unten links das Feld „Don‘t show this window next time“ anklicken, damit der Einrichtungsassistent nach dem nächsten Einschalten nicht mehr aufgerufen wird. Dann zum Speichern der Einstellungen auf „Sicherung“ klicken.
9) Es erscheint der Hinweis, dass der Einrichtungsdurchlauf beendet ist. Mit „OK“ bestätigen.
OKWizard Complete !
Abb. 6-15 Einrichtungsdurchlauf beendet 10) Die wichtigsten Einstellungen für die Inbetriebnahme sind damit durchgeführt. Kann jedoch auf den Rekorder über das Internet zugegriffen werden, unbedingt das Passwort aktivieren und ändern (siehe Kapitel 6.5).
11) Abschließend einen Neustart durchführen, damit alle Änderungen wirksam werden (Menü Schließung Wieder Starten).
14
Deutsch 6.4 Alle Menüs auf einen Blick 24/01/2017fassage ALLEALLE00:00:00
Zeiú NR.Ereigneisseficúure Sicherung Aufnahme Suche farameúer ABBRUCH
Geräú Sysúem Erweiúerú Schließung Sicherung SucheAllgemeinDATUM
> 24/01/2017fassage ALLEALLE00:00:00
Zeiú NR.EreigneissePicturePassage Analog Channels1IP Cafera2341234ú6
01/19/2017 23:47:09
Allgemein AufnahmeSuche farameúer GeräúSystemErweiúerú Schließung ABBRUCH
Nuúzer Info Info Channel InfoRecord InfoLog Allgemeinfarameúer Nuúzer Info Info Channel InfoRecord InfoLog fassage CH1
CH2
CH3
CH4Record Súaúe EIN
EIN
EIN
EINSúream Type Video Súream Video Súream Video Súream Video SúreamFfS
15Fps 15Fps 25Fps 15FpsAuf 192
192 96
192
Biúraúe 4095Kbps 4095Kbps 2048Kbps 4095Kbps fAL
Aufnahme SucheGeräú SystemErweiúerú Schließung ABBRUCH
Súarú Daúe 24/01/2017
End Daúe 24/01/2017Súarúzeiú: 00:00:00
Endzeiú: 23:59:59
Melden Typ ALLESuche > Menüs, blau = angeIwählt roúe Felder = unbedingú eiúnsúellen!
Bereiche (ohne SyfbIole)weiß = angewählt Unterfenüs (fit SyfbIolen), grün = angeIwähltDaúum Zeiú 01/19/2017 23:47:09
Menü Parameter Legende T W
T
M
Kopiere Kopiere CH1
fassage Bewegung Alarm Excepúion CH1
Bis ALLE
S
Kopiere Kopiere CH1
fassage N-Normal Beweg A-Alarm CH1
F
S
Bis ALLE
T W
T
M
S
Ausgabe Bewegung AlarmCapúure Neúzwerk AlarmAufnahme Suche Parameter Anzeige ABBRUCH
Geräú Sysúem Erweiúerú Schließung Sicherung Defaulú Kopiere Kopiere IO-1 Bis ALLE
Alarm In IO-1
Alarm Type Normal-Open Laúch Time 10 s AlarmúonAUS
Aufnahmezeiú 30 s Alarm OuúShow Message E-Mail Absender Vollbild Aufnahfe Kanal Analog Channels IP Cafera12 3 4
1 2 3 4 ú 6
Ausgabe Bewegung AlarmCapúure Neúzwerk AlarmAufnahme Suche Parameter Anzeige ABBRUCH
Geräú Sysúem Erweiúerú Schließung Sicherung Defaulú Kopiere Kopiere CH1 Bis ALLE
fassage CH1
ANAlarmúon Laúch Time EIN
AUS
10 s Empndlichkeiú 4
Bereich Aufnahmezeiú 30 s Alarm Ouú Show Message E-Mail Absender Vollbild Aufnahfe Kanal Analog Channels IP Cafera12 3 4
1 2 3 4 ú 6
Einsú.
DHCf AUS
Encrypúion00025
SMTf forú SMTf Server Nuúzername fassworúshow Sender E-Mail Empfän. E-Mail1
Empfän. E-Mail2
Empfän. E-Mail3
InúervalleE-Mail-TesúAusgabe Email ScheduleDDNS
RTSf FTf EmailNeúzwerk CapúureNetzwerk AlarmAufnahme Suche Parameter Anzeige ABBRUCH
Geräú Sysúem Erweiúerú Schließung Sicherung Defaulú Auúo 3 MIN.FTf Enable AUS
ServerIf00021
forú Nuúzername fassworú Dir Name Ausgabe Email ScheduleDDNS
RTSf FTf EmailNeúzwerk CapúureNetzwerk AlarmAufnahme Suche Parameter Anzeige ABBRUCH
Geräú Sysúem Erweiúerú Schließung Sicherung Defaulú FTf TEST
RTSfEnableEINVerifyEINRúspforú00554RúspUserNameadminRúspUserfwd******Insúrucúion: Analog Channel: rúsp://If:forú/chA/B
If Channel: rúsp://Ifforú/ipA/B
A:01(ch1),02(ch1).ú..
B:0(main súream),1(úsub súream) Ausgabe Email ScheduleDDNS
RTSf FTf EmailNeúzwerk CapúureNetzwerk AlarmAufnahme Suche Parameter Anzeige ABBRUCH
Geräú Sysúem Erweiúerú Schließung Sicherung Defaulú Ausgabe Email ScheduleDDNS
RTSf FTf EmailNeúzwerk CapúureNetzwerk AlarmAufnahme Suche Parameter Anzeige ABBRUCH
Geräú Sysúem Erweiúerú Schließung Sicherung Defaulú F
S T W
T
M
S
MM/TT/JJS M T W T F S
1
2 3 4 ú 6 7 89 10 11 12 13 14 1ú 16 17 18 19 20 21 2223 24 2ú 26 27 28 2930 31Schließung Schließung Nuúzername admin fassworúWieder SúarúenABBRUCH
fassage NR.ZeiúKON.WiedergabAusgabe GRÖS.
GRÖS.
15
Deutsch 6.4 Alle Menüs auf einen Blick 24/01/2017
fassage ALLE ALLE00:00:00
Zeiú NR.Ereigneisseficúure Sicherung Aufnahme Suche farameúer ABBRUCH
Geräú Sysúem Erweiúerú Schließung Sicherung SucheAllgemeinDATUM
> 24/01/2017
fassage ALLE ALLE00:00:00
Zeiú NR.EreigneissePicturePassage Analog Channels1IP Cafera2 3 4
1 2 3 4 ú 6
01/19/2017 23:47:09
Allgemein AufnahmeSuche farameúer GeräúSystemErweiúerú Schließung ABBRUCH
Nuúzer Info Info Channel InfoRecord InfoLog Allgemeinfarameúer Nuúzer Info Info Channel InfoRecord InfoLog fassage CH1
CH2
CH3
CH4Record Súaúe EIN
EIN
EIN
EINSúream Type Video Súream Video Súream Video Súream Video SúreamFfS
15Fps 15Fps 25Fps 15FpsAuf 192
192 96
192
Biúraúe 4095Kbps 4095Kbps 2048Kbps 4095Kbps fAL
Aufnahme SucheGeräú SystemErweiúerú Schließung ABBRUCH
Súarú Daúe 24/01/2017End Daúe 24/01/2017Súarúzeiú: 00:00:00Endzeiú: 23:59:59Melden Typ ALLESuche > Menüs, blau = angeIwählt roúe Felder = unbedingú eiúnsúellen!
Bereiche (ohne SyfbIole)weiß = angewählt Unterfenüs (fit SyfbIolen), grün = angeIwähltDaúumZeiú 01/19/2017 23:47:09
Menü Parameter Legende T W
T
M
Kopiere Kopiere CH1
fassage Bewegung Alarm Excepúion CH1
Bis ALLE
S
Kopiere Kopiere CH1
fassage N-Normal Beweg A-Alarm CH1
F
S
Bis ALLE
T W
T
M
S
Ausgabe Bewegung AlarmCapúure Neúzwerk AlarmAufnahme Suche Parameter Anzeige ABBRUCH
Geräú Sysúem Erweiúerú Schließung Sicherung Defaulú Kopiere Kopiere IO-1 Bis ALLE
Alarm In IO-1
Alarm Type Normal-Open Laúch Time 10 s AlarmúonAUS
Aufnahmezeiú 30 s Alarm OuúShow Message E-Mail Absender Vollbild Aufnahfe Kanal Analog Channels IP Cafera12341234ú6
Ausgabe Bewegung AlarmCapúure Neúzwerk AlarmAufnahme Suche Parameter Anzeige ABBRUCH
Geräú Sysúem Erweiúerú Schließung Sicherung Defaulú Kopiere Kopiere CH1 Bis ALLE
fassage CH1
ANAlarmúon Laúch Time EINAUS
10 s Empndlichkeiú 4
Bereich Aufnahmezeiú 30 s Alarm Ouú Show Message E-Mail Absender Vollbild Aufnahfe Kanal Analog Channels IP Cafera12341234ú6
Einsú.
DHCf AUS
Encrypúion 00025
SMTf forú SMTf Server Nuúzername fassworúshow Sender E-Mail Empfän. E-Mail1
Empfän. E-Mail2
Empfän. E-Mail3
InúervalleE-Mail-TesúAusgabe Email ScheduleDDNS
RTSf FTf EmailNeúzwerk CapúureNetzwerk AlarmAufnahme Suche Parameter Anzeige ABBRUCH
Geräú Sysúem Erweiúerú Schließung Sicherung Defaulú Auúo 3 MIN.
FTf EnableAUS
ServerIf 00021
forú Nuúzername fassworú Dir NameAusgabe Email ScheduleDDNS
RTSf FTf EmailNeúzwerk CapúureNetzwerk AlarmAufnahme Suche Parameter Anzeige ABBRUCH
Geräú Sysúem Erweiúerú Schließung Sicherung Defaulú FTf TEST
RTSfEnableEINVerifyEINRúspforú00554RúspUserNameadminRúspUserfwd******Insúrucúion: Analog Channel: rúsp://If:forú/chA/B
If Channel: rúsp://Ifforú/ipA/B
A:01(ch1),02(ch1).ú..
B:0(main súream),1(úsub súream) Ausgabe Email ScheduleDDNS
RTSf FTf EmailNeúzwerk CapúureNetzwerk AlarmAufnahme Suche Parameter Anzeige ABBRUCH
Geräú Sysúem Erweiúerú Schließung Sicherung Defaulú Ausgabe Email ScheduleDDNS
RTSf FTf EmailNeúzwerk CapúureNetzwerk AlarmAufnahme Suche Parameter Anzeige ABBRUCH
Geräú Sysúem Erweiúerú Schließung Sicherung Defaulú F
S T W
T
M
S
MM/TT/JJS M T W T F S
1
2 3 4 ú 6 7 89 10 11 12 13 14 1ú 16 17 18 19 20 21 2223 24 2ú 26 27 28 2930 31Schließung Schließung Nuúzername admin fassworúWieder SúarúenABBRUCH
fassage NR.ZeiúKON.WiedergabAusgabe GRÖS.
GRÖS.
16
Deutsch 6.5 Bediensperre aktivieren, Passwörter ändern und Benutzerrechte festlegen Ab Werk ist der Zugriff auf den Rekorder nicht geschützt. Das voreingestellt Passwort „admin“ ist nicht aktiviert, d. h. für das Ändern einer Einstellung muss es nicht eingegeben werden.
Wird der Rekorder in ein Netzwerk eingebunden, unbedingt das Passwort aktivieren und ändern (siehe auch Kapitel 2
„Wichtige Hinweise zur Datensicherheit“).
1) Das Hauptmenü aufrufen, das Menü „System“ wählen und dort ganz links auf das Untermenü „Nutzer“ klicken.
i Allgemein Bearbeiten ABBRUCH
ParameterAufnafme Sucfeúerät System Erweitert Scfließung Info Log Nutzer Nr.
1
2
3
4
5
6
7Nutzername adminufer1
ufer2
ufer3
ufer4
ufer5
ufer6LEVEL
údmin Nutzer 1
Nutzer 2
Nutzer 3
Nutzer 4
Nutzer 5
Nutzer 6EIN
EIN
úUS
úUS
úUS
úUS
úUS
úUS
Abb. 6-16 Menü für Passwörter und Benutzergruppen 2) Die Zeile Nr. 1 für das Administrator-Passwort ist angewählt.
Um es zu ändern und die Bediensperre zu aktivieren, auf die Schaltfläche „Bearbeiten“ klicken.
Bearbeiten Nutzername Nutzername adminadmin AUS
Passwfrt Ändern Passwfrt Passwfrt Wiederú DefaultSicúerung ABBRUCH
Abb. 6-17 Fenster zum Ändern von Passwörtern 3) Wenn gewünscht, den Nutzernamen „admin“ ändern.
4) Die Zeile „Passwort Ändern“ auf „EIN“ umstellen. Damit schaltet sich die Bediensperre ein, wenn kein Menü eingeblendet ist und der Rekorder zwei Minuten lang nicht bedient wurde.
5) In der Zeile „Passwort“ ein neues Passwort mit mindestens 8 Zeichen eingeben und dieses in der Zeile „Passwort Wiederh“ zur Bestätigung wiederholen.
Wichtig: Bei einer Fernüberwachung und dem Fernzugriff auf den Rekorder über ein Netzwerk muss das Passwort aus genau 8 Zeichen bestehen. Es können zwar mehr Zeichen eingetippt werden, jedoch erkennt die Software für den Fernzugriff („ActiveX“) dann das Passwort nicht als richtiges.
6) Zum Sichern des neuen Passworts auf „Sicherung“ klicken.
Nach einer erfolgreichen Speicherung erscheint eine entsprechende Meldung dazu; diese mit „OK“ bestätigen.
7) Zum Festlegen von Benutzerrechten zuerst wie zuvor beschrieben für jeden Benutzer einen Nutzernamen und ein Passwort vergeben.
8) Wenn eine Zeile für einen Benutzer angewählt ist, erscheint unten im Menü zusätzlich die Schaltfläche „Permission“.
Diese anklicken, um die Benutzerrechte festzulegen.
Genehmigung SicherungAnalog Channels If Camera farameter Suche speich.úartungManuelle Aufnahme Disk Manager Remote Login SEQ Steuerung Manual Capture Nutzername user1
ALLE Löschen Sicherung ABBRUCH
1234123456
LiveAnalog Channels If Camera 1234123456
úiedergabeAnalog Channels If Camera 1234123456
fTZAnalog Channels If Camera 1234123456
Abb. 6-18 Menü für die Benutzerrechte Hier die Rechte für den gewählten Benutzer einstellen und sichern. Den Vorgang ggf. für weitere Benutzer wiederholen.
9) Zum Ausblenden des Menüs auf ABBRUCH klicken oder warten, bis es sich nach der eingestellten Zeit ausblendet.
6.6 Alarmeingänge konfigurieren Sind an den Kontakten SENSOR (27) Alarmsensoren, wie z. B.
Bewegungsmelder oder Lichtschranken, angeschlossen, die Alarmeingänge über das Menü „Parameter“, Untermenü „Alarm“, Bereich „Alarm“ konfigurieren.
i 11234
23456
Anzeige AlarmAusgabe Netzwerk Sicferung ABBRUúH
Parameter Aufnafme Sucfe GerätSystem ErweitertScfließung Default Alarm InIO-1Alarm TypfNormal-OpfnLaúch Timfr10 sAlarmúon Aufnahmfzfiú Alarm OuúShow MfssagfVollbild E-Mail AbsfndfrAUS
30 s KopifrfBis IO-1ALLE
Kopifrf Aufnahmf Kanal Analog Channfls IP CamfraBewegungúapture Alarm Abb. 6-19 Menü für die Alarmeingänge Menüpunkt Funktion Alarm InAuswahl des Alarmeingangs Alarm TypeAuswahl des Kontakttyps Normal-Open = Schließer Normal-Close = Öffner AUS = Eingangssignal wird nicht ausgewertet Latch TimeDauer von Symbol I im Live-Bild und Kamerabild als Vollbild AlarmtonAlarmtondauer AufnahmezeitDauer einer alarmausgelösten Aufnahme Alarm OutDer Alarm wird auf den Ausgang ALARM (27) weitergeleitet Show MessageEin Alarm wird durch das Symbol I im Live-Bild angezeigt E-Mail AbsenderBei einem Alarm wird eine E-Mail verschickt; E-Mail-Einstellungen siehe Menü „Parameter“, Untermenü „Netzwerk“, Bereich „Email“ VollbildDer betreffende Kanal wird als Vollbild gezeigt KopiereDie Einstellungen eines Alarmeingangs für weitere Eingänge übernehmen DefaultZurücksetzen auf die Werkseinstellung SicherungEinstellung sichern ABBRUCHMenü ausblenden
17
Deutsch 6.7 Signaltöne aktivieren /deaktivieren Ereignisse an den Alarmausgang weiterleiten Bei den folgenden Ereignissen kann der interne Alarmsummer ertönen und das Alarmrelais ansprechen [Ausgang ALARM (27), belastbar mit 30 V (⎓), 1 A]. Die Alarmtondauer und das Ansprechen des Relais lassen sich über die zugehörigen Menüs und die Menüpunkte „Alarmton“ und „Alarm Out“ einstellen.
EreignisMenüpfad Alarm über die Eingänge SENSOR (27) ausgelöstParameter Alarm Alarm Bewegung im BildParameter Alarm Bewegung Festplatte vollgeschriebenErweitert Ereignisse Ereignisbezogen: Disk Voll Schreibfehler auf der FestplatteErweitert Ereignisse Ereignisbezogen: Schreibfehler Videosignal ist unterbrochenErweitert Ereignisse Ereignisbezogen: KEIN VIDEO
6.8 Einstellungen für die Live-Überwachung: Kamera-Name, Bild, Zeitanzeige Das Menü „Parameter“ aufrufen, das Untermenü „Anzeige“ anklicken und auf den Bereich „Live“ klicken.
i Anzeige AusgabeAusgabe Netzwerk IP Cafera Privat Zone úefaultPassageCH1NameCH1Show NameEINAufnahmezeiú OSD Posiúion FarbeEIN
VersúeckúAUSZeige ZeiúEIN
KopiereBis CH1ALLE
Kopiere Einsú.
Einsú.
Sicherung ABBRUCH
Parafeter Aufnahfe Suche Gerät Systef Erweitert Schließung Ifage Control Analog Channels Live Capture Alarf Abb. 6-20 Menü für die Live-Überwachung MenüpunktFunktion PassageAuswahl des Kamerakanals NameKamera-Namen eingeben Show NameAnzeige des Kamera-Namens AufnahmezeitAnzeige des Datums und der Uhrzeit der Aufnahme beim Abspielen OSD PositionPosition des Kamera-Namens und der Uhrzeitanzeige verschieben (bei gedrückter linker Maustaste, Beenden der Einstellung: rechte Maustaste drücken) FarbeFenster für die Bildeinstellung öffnen (Farbe, Helligkeit etc.) Versteckt Das Kamerabild wird nicht bei der Live-Über-wachung gezeigt Zeige ZeitAnzeige der Uhrzeit KopiereDie Einstellungen eines Kamerakanals für weitere Kanäle übernehmen DefaultZurücksetzen auf die Werkseinstellung SicherungEinstellung sichern ABBRUCHMenü ausblenden 6.9 Bildbereiche abdecken Dürfen bestimmte Bildbereiche nicht sichtbar sein (z. B. Wege oder Plätze im öffentlichen Bereich), können diese abgedeckt werden. Dazu lassen sich in jedem Kamerabild vier unterschiedliche, schwarze Rechtecke platzieren. Das Menü „Parameter“ aufrufen, das Untermenü „Anzeige“ anklicken und auf den Bereich „Privat Zone“ klicken.
i Anzeige AusgabeAusgabe Netzwerk Sicherung ABBfUCH
úarameter Aufnahme Suche GerätSystem Erweitert Schließung Iú Camera úrivat Zone Default PassageCH1Maskierter BereichUAUfZone úestimmen 1 2 3 4
Maskierter BereichU
KopiereBis CH1ALLEKopiere Einst.
Analog Channels Live Image Control Capture Alarm Abb. 6-21 Menü zum Maskieren von Bildbereichen MenüpunktFunktion PassageAuswahl des Kamerakanals Maskierter BereichAuf EIN schalten, damit Bereiche zum Maskieren festgelegt werden können Zone bestimmenZum Festlegen einer Maske deren Nr. anklicken Maskierter Bereich 1. Auf Einst. klicken, um auf das ausgewählte Kamera bild zu schalten.
2. Zum Verschieben in der Maskenmitte die linke Maustaste gedrückt halten.
3. Zum Ändern der Größe an der unteren, rechten Maskenecke die linke Maustaste gedrückt halten.
4. Zum Zurückschalten auf das Menü mit der rechten Maustaste in das Kamerabild klicken.
KopiereDie Einstellungen eines Kamerakanals für weitere Kanäle übernehmen DefaultZurücksetzen auf die Werkseinstellung SicherungEinstellung sichern ABBRUCHMenü ausblenden 6.10 Bewegungserkennung einstellen Ab Werk ist die Bewegungserkennung für jeden Kamerakanal eingeschaltet und so eingestellt, dass der ganze Bildbereich für eine Erkennung empfindlich ist. Bei einer Bewegung im Bild wird das Symbol M (Motion) eingeblendet. Wenn 10 s lang keine Bewegung mehr stattfindet, blendet es sich wieder aus.
Das Menü „Parameter“ aufrufen, das Untermenü „Alarm“ anklicken und auf den Bereich „Bewegung“ klicken.
i 11234
23456
Anzeige AlarmAusgabe Netzwerk Default PassageCH1AN
Alarmtfn Latcú TimeEINAUS
10 sEmpndlicúkeit4Bereicú Aufnaúmezeit Alarm Out Súfw MessageVfllbild E-Mail Absender30 s KfpiereBis CH-1ALLE
Kfpiere Einst.
Aufnaúme Kanal Analfg Cúannels IP Camera ficherung ABBúUCH
Parameter Aufnahme fuche Gerät fystem Erweitert fchließung BewegungCapture Alarm Abb. 6-22 Menü für die Bewegungserkennung Menüpunkt Funktion PassageAuswahl des Kamerakanals AN
Bewegungserkennung ein- / ausschalten Alarmtonbei erkannter Bewegung ertönt der Alarmsummer EmpfindlichkeitEmpfindlichkeit der Erkennung
18
Deutsch MenüpunktFunktion Bereich 1. Auf Einst. klicken, um Detektorfelder von der Erkennung auszuschließen.
2. Die bewegungsempfindlichen Felder sind rot markiert. Zum Deaktivieren mehrerer Einzel-felder bei gedrückter linker Maustaste die Felder überstreichen.
3. Einzelne Felder können direkt angeklickt werden.
4. Auf gleiche Weise lassen sich Felder wieder aktivieren.
5. Zum Zurückschalten auf das Menü mit der rechten Maustaste in das Kamerabild klicken.
AufnahmezeitDauer einer Aufnahme, wenn diese durch die Bewegungserkennung gestartet wurde Latch TimeDauer des Alarms (Einblendung M, Alarmton, Alarmrelais schaltet) Alarm OutBei einer erkannten Bewegung schaltet das Alarmrelais (Ausgang ALARM, Kapitel 5.4) Show MessageEine erkannte Bewegung wird durch die Einblendung M (Motion) signalisiert E-Mail AbsenderBei einer erkannten Bewegung wird automatisch eine E-Mail versendet, wenn im Menü „Para meter“, Untermenü „Netzwerk“, Bereich „Email“ die erforderlichen Angaben eingetragen wurden.
VollbildDas Kamerabild mit der erkannten Bewegung wird als Vollbild gezeigt.
Aufnahme KanalAngabe der Kanäle, die bei einer erkannten Bewegung aufgezeichnet werden sollen (es können mehrere Kanäle aufgezeichnet werden, obwohl die Bewegung in nur einem Kanal erkannt wurde).
Die Zeiten einer möglichen bewegungsausgelösten Aufnahme müssen im Aufnahmekalender eingetragen werden (Menü „Parameter“, Untermenü „Ausgabe“, Bereich „Record schedule“, gelbes, rundes Auswahlfeld „Beweg“ anklicken und bei gedrückter linker Maustaste über die Tage / Stunden fahren.) KopiereDie Einstellungen eines Kamerakanals für weitere Kanäle übernehmen DefaultZurücksetzen auf die Werkseinstellung SicherungEinstellung sichern ABBRUCHMenü ausblenden 6.11 Kamerafernsteuerung (PTZ) Zur Fernsteuerung der an der RS-485-Schnittstelle (27) angeschlossenen Kameras am Rekorder die erforderlichen Einstellungen vornehmen. Das Menü „Gerät“ aufrufen und auf das Untermenü „PTZ“ klicken.
i HDD
Sicherung DefaultABBRUfH
Parameter Aufnahme SucheúerätSystem ErweitertSchließung floud PassageCH1PTZ ProtokollPelco-Dfaudrate9ú00fit8Stop1PrüfungNoneSchwenkbereichEINAdresse001
Kopiere fis CH1ALLEKopiere PTZ
Abb. 6-23 Menü zum Einstellen der Kamerafernsteuerung MenüpunktFunktion PassageAuswahl des Kamerakanals PTZ ProtokollAuswahl des Steuerprotokolls der Kamera BaudrateAuswahl der Datenübertragungsrate BitAnzahl der Datenbits StopAnzahl der Stoppbits MenüpunktFunktion PrüfungArt des Paritätsbits: None (keins), Odd (ungerade), Even (gerade), Mark (immer 1), Space (immer 0) SchwenkbereichKamerafahrt erlauben (EIN) oder sperren (AUS) AdresseAdresse der Kamera (um alle angeschlossenen Kameras separat steuern zu können) KopiereDie Einstellungen eines Kamerakanals für weitere Kanäle übernehmen DefaultZurücksetzen auf die Werkseinstellung SicherungEinstellung sichern ABBRUCHMenü ausblenden Die Einstellungen für Protokoll, Bautrate, Bit, Stop und Adresse bitte aus den Technischen Daten der Kamera entnehmen.
6.12 Schnappschuss-Aufnahmen ermöglichen Mit der Schnappschuss-Funktion lassen sich Momentaufnahmen von Kamerabildern zeitgesteuert und manuell speichern.
Das Menü „Parameter“ aufrufen und dort auf Untermenü „Capture“ klicken.
i Bewegung Anzeige Capture ScheduleAusgabe fetzwerk SicherungABBúUCH
Parameter Aufnahme Suche GerätSystem Erweitert Schließung Default PassageCH1Auto CaptureAUfftream ModeMaún ftreamNormal IntervalAlarm Interval Manual Capture5 s5 s AUf KopúereBús CH1ALLE
Kopúere Alarm Capture Abb. 6-24 Menü zum Einschalten der Schnappschuss-Funktion MenüpunktFunktion PassageAuswahl des Kamerakanals Auto Capturezeitgesteuerte Momentaufnahmen ermöglichen (Aufnahmezeiten im Bereich „Schedule“ einstellen) Stream Mode „Main Stream“ = hohe Auflösung, jedoch große Datenmengen „Sub-stream“ = geringere Auflösung, aber auch geringere Datenmengen Normal IntervalZeitabstände der Aufnahmen im Normalbetrieb Alarm IntervalZeitabstände der Aufnahmen bei einem Alarm Manual CaptureManuelle Momentaufnahme ermöglichen (Aufnahme auslösen siehe Kapitel 7.6.2) KopiereDie Einstellungen eines Kamerakanals für weitere Kanäle übernehmen DefaultZurücksetzen auf die Werkseinstellung SicherungEinstellung sichern ABBRUCHMenü ausblenden Zum Festlegen der Zeiten, in denen Momentaufnahmen automatisch erfolgen sollen, auf den Bereich „Schedule“ klicken: i Bewegung 020181614121022
2468Anzeige Capture ScheduleAusgabe fetzwerk SicherungABBúUCH
Parameter Aufnahme Suche GerätSystem Erweitert Schließung Default KopiereBis Cf1ALLEKopiere úassageN-Normal BewegA-Alarm Cf1
Sonntag Montag Dienstag Mittwoch Donnerstag Freitag SonnabendCapture AlarmM S
W T
T
F
S
Abb. 6-25 Kalender für zeitgesteuerte Momentaufnahmen
19
Deutsch 1) Hinter „Passage“ ist ein Kamerakanal angewählt (hier Kanal 1). Soll die Aufnahmezeit für einen anderen Kanal geändert werden, auf das Symbol klicken.
2) Zum Einstellen der Aufnahmezeiten bei gedrückter linker Maustaste über den gewünschten Zeitbereich fahren.
Einzelne Halb-Stunden-Blöcke lassen sich auch durch An klicken anwählen.
3) Aufnahmezeiten können genauso wieder gelöscht werden.
4) Um Aufnahmen bei einer Bewegungserkennung und / oder Alarmierung automatisch zu speichern, zuerst in das gelbe Oval „Beweg.“ klicken bzw. in das rote Oval „A-Alarm“.
Dann bei gedrückter linker Maustaste über den gewünschten Zeitbereich fahren.
5) Soll die Einstellung auch für andere Kamerakanäle übernommen werden, in der unteren Zeile „Kopiere CH… Bis ALLE“ die Auswahl vornehmen und auf die Schaltfläche „Kopiere“ klicken.
6) Zum Speichern der Einstellung auf „Sicherung“ klicken, um alle Zeiten zu löschen auf „Default“ und zum Ausblenden des Menüs auf „ABBRUCH“ klicken.
6.12.1 Cloud-Speicher für Schnappschuss-Aufnahmen Wird bei einem Einbruch der Rekorder gestohlen oder zerstört, sind alle Aufnahmen verloren. Es lassen sich jedoch Schnappschuss-Aufnahmen in einer Cloud (Speicherplatz auf einem externen Server) automatisch speichern, wenn der Rekorder mit dem Internet verbunden ist. Über einen geschützten Zugang zur Cloud können dann die Bilder abgerufen werden.
1) Registrieren Sie sich auf der Website von „Dropbox“: https://www.dropbox.com 2) Das Menü „Gerät“ aufrufen und dort auf Untermenü „Cloud“ klicken.
1234123456
i HDD
Sicherung DefaultABBRUfH
Parameter Aufnahme SucheúerätSystem Erweitert Schließung floud Cloud Storage AfS
Cloud TypeúROPBOX
Time Trigger1 MIN.
Motion úetectionAfS
úriver nameúevice Activate Cloudfpgrade Cloud StoraAgeAdvanced E-mail SetAup PTZ
Passage Analog Channels IP Camera Abb. 6-26 Menü zum Speichern von Bildern in einer Cloud 3) In dem Untermenü „Cloud“ die Einstellungen vornehmen.
MenüpunktFunktion Cloud Storage Cloud-Funktion Ein /Aus Cloud TypeSpeicherung zurzeit nur bei „Dropbox“ möglich PassageAuswahl der Kanäle, deren Bilder in der Cloud gespeichert werden sollen Time TriggerZeitabstände der Aufnahmen im Normalbetrieb Motion DetectionAufnahmen (zusätzlich) bei einer erkannten Bewegung speichern Driver nameNamen bestimmen, unter dem die Bilder in der Cloud gespeichert werden sollen Activate Cloudzum Aktivieren der Cloud-Funktion hier klicken Advanced E-Mail SetupMöchten Sie eine E-Mail erhalten, wenn Bilder in der Cloud gespeichert werden, auf diese Schaltfläche klicken und im sich öffnenden Fenster die Angaben dazu eintragen.
Menüpunkt Funktion DefaultZurücksetzen auf die Werkseinstellung SicherungEinstellung sichern ABBRUCHMenü ausblenden 6.13 Unterschiedliche Konfigurationen speichern und aufrufen Für verschiedene Benutzer oder für unterschiedliche Einsatzbereiche lassen sich unterschiedliche Rekorder-Konfigurationen (z. B. auf einem USB-Speicher-Stick) speichern und bei Bedarf wieder aufrufen.
1) Einen externen Speicher (Stick / Festplatte) an eine der beiden USB-Buchsen des Rekorders anschließen.
2) Den Rekorder wie gewünscht konfigurieren.
3) Das Menü „Erweitert“ aufrufen; das Untermenü „Wartung“ erscheint: i Wartung Sicherung DefaultABBRUfH
Parameter AufnahmeúSuche GerätSystemErweitertSchließung User Einst.adminAuto NeutstartEINWieder ftartenWöchentúich fon.00:00aktuaúisieren Einst. úaden IPC Load DefauútWerkseinsteúúungEinst. sichernReboot IPCIPC Upgrade Ereignisse Abb. 6-27 Menü „Erweitert“, Untermenü „Wartung“ 4) Auf „Einst. sichern“ klicken und in dem sich öffnenden Fenster „Einst. sichern“ alle Eintragungen zum Speichern vornehmen und auf „OK“ klicken. Die Konfigurations-Datei erhält den Namen „DEVICE_Settings“.
5) Für unterschiedliche Konfigurationen diese in unterschiedlichen Ordnern speichern, damit eine bereits gespeicherte Rekorder-Konfiguration nicht überschrieben wird.
6) Zum Aufrufen einer Konfiguration auf „Einst. laden“ klicken.
6.14 Tipps TippMenüpfad Automatische Umstellschaltung zwischen Sommer- und WinterzeitSystem Allgemein DST
Automatische Zeiteinstellung über das NetzwerkSystem Allgemein NTP
Bewegungserkennung einschränkenParameter Alarm Bewegung E-Mail bei Alarm automatisch versendenParameter Netzwerk Email Kanäle, an denen keine Kamera angeschlossen ist, abschalten Für jeden abgeschalteten Kanal einer analogen Kamera lässt sich zusätzlich eine Netzwerkkamera einsetzen.Parameter Anzeige Analog Channels Wird der Rekorder nicht in ein Netzwerk eingebunden, die Netzwerkmenüs ausschalten, um eine einfachere Bedienoberfläche zu erhalten.System Allgemein Allgemein: Modus = DVR
20
Deutsch 7 Bedienung Der Rekorder lässt sich am komfortabelsten mit der Maus bedienen. Deshalb wird in dieser Anleitung die Bedienung direkt am Rekorder und mit der Fernbedienung nur am Rande erwähnt.
Den Rekorder mit dem Wippschalter (30) auf der Geräterückseite einschalten. Nach einigen Sekunden wird das Firmen-Logo auf dem angeschlossenen Monitor angezeigt: Danach erscheinen die Kamerabilder zur Live-Überwachung (Kap. 7.3). Der interne Alarmgeber piept zur Kontrolle fünfmal.
Bei einer Störung oder Alarmierung siehe Kapitel 8.
7.1 Bediensperre Wurde für den Rekorder die Bediensperre aktiviert (Kap. 6.5) und der Rekorder ca. 2 Minuten lang nicht bedient, aktiviert sich automatisch die Bediensperre. Sie soll den Rekorder vor unberechtigten Zugriff schützen und wird durch das geschlossene Schlosssymbol in der Funktionsleiste angezeigt.
1) Die Funktionsleiste einblenden: Die rechte Maustaste drücken oder mit dem Mauszeiger in die Mitte der unteren Bildschirmkante fahren.
Abb. 7-1 Funktionsleiste 2) Zum vorzeitigen Aktivieren der Sperre (vor dem Ablauf der 2 Minuten) auf das Schlosssymbol klicken.
3) Wird bei aktiver Sperre eine Funktion aufgerufen (z. B. das Hauptmenü), erscheint das Fenster „Anmelden“.
Anmelden ABBRUCH
Anmelden Nutzername adminferäte ID úúúúúú i ( úúúúúú ) Passwort Abb. 7-2 Fenster zum Aufheben der Bediensperre 4) In das blau umrandete Feld „Passwort“ klicken. Es öffnet sich ein Fenster mit einer Tastatur. Mit dieser Tastatur das Passwort eingeben und auf „Anmelden“ klicken.
7.2 Benutzerwechsel Sind für die Bedienung des Rekorders mehrere Benutzerkonten eingerichtet worden, muss sich ein neuer Benutzer mit seinem Passwort anmelden, um den Rekorder auch mit seinen Benutzerrechten bedienen zu können: 1) Die Funktionsleiste einblenden (Abb. 7-1): Die rechte Maustaste drücken oder mit dem Mauszeiger in die Mitte der unteren Bildschirmkante fahren.
2) Das Schlosssymbol sollte geschlossen sein. Zeigt es ein offenes Schloss, es zum Schließen mit der linken Maustaste anklicken.
3) Das geschlossene Schlosssymbol anklicken: Es öffnet sich das Fenster „Anmelden“ (Abb. 7-2).
4) In das blau umrandete Feld „Nutzername“ klicken. Es öffnet sich ein Fenster mit einer Tastatur.
5) Zuerst den vorherigen Nutzernamen mit der Taste „Backspace“ im Tastaturfenster löschen. Dann den neuen Namen über das Tastaturfenster eingeben.
6) Das Passwort genauso eingeben und auf „enter“ klicken.
7) Abschließend auf „Anmelden“ klicken.
Wenn ein Passwort nicht aktiv ist, genügt es auf „Anmelden“ zu klicken.
7.3 Live-Überwachung Nach dem Einschalten sind immer die Kamerabilder in der Live-Ansicht zu sehen: MR
MR
T-CH1
CH4
T-CH2
CH3
KEIN VIDEO
KEIN VIDEOkfinf Kaúfrkfinf Kaúfr 15/12/2016 09:53:k46
Abb. 7-3 Live-Überwachung mit dem AXR-104
CH1CH2
CH5CH6
CH3
CH8CH7
CH415/12/2016 13:45:V37
KEIN VIfEOKEIN VIfEOKEIN VIfEOKEIN VIfEO
keúne Kamerkeúne Kamerkeúne Kamerkeúne Kamer Abb. 7-4 Live-Überwachung mit dem AXR-108
CH1
CH6
CH11
CH7
CH12
CH8
CH13
CH9
CH14
CH10
CH15
CH16
CH2CH3CH4CH515/12/2016 13:45:N37
KEIN fIDEO
kúinú Kamúrkúinú Kamúrkúinú Kamúrkúinú Kamúrkúinú Kamúr kúinú Kamúrkúinú Kamúrkúinú Kamúrkúinú Kamúr KEIN fIDEOKEIN fIDEOKEIN fIDEOKEIN fIDEO
KEIN fIDEOKEIN fIDEOKEIN fIDEOKEIN fIDEO
Abb. 7-5 Live-Überwachung mit dem AXR-116
Jedes Kamerabild ist ab Werk mit dem Namen „CH-“ und der Nummer des Kanals gekennzeichnet. Die Namen können bei Bedarf geändert werden, z. B. „Lager“, „Eingang“, „Kasse“ usw. (siehe Kapitel 6.8). Zusätzlich wird der Kameratyp vorangestellt angezeigt:
21
Deutsch VoranstellungKameratyp keineanaloge Kamera mit FBAS-Signal AAHD-Kamera (Analog High Definition) C-CVI-Kamera (Composite Video Interface) T-TVI-Kamera (Transport Video Interface) Die Live-Überwachung beeinflusst nicht eine laufende Aufnahme (signalisiert durch das Symbol R im Kamerabild). Einzelne Kamerabilder oder eine Auswahl von Bildern können auch größer dargestellt werden: DarstellungAktion Einzelbild als VollbildMit der linken Maustaste: Auf das gewünschte Bild doppelklicken.
Am Gerät oder mit der Fernbedienung: Die zugehörige Zifferntaste 1 … 9 drücken oder die Taste CH – / CH + (AXR-104, AXR-108); Kanäle 10 … 16: Taste 1 und Taste 0 …6
zurück auf alle KamerabilderMit der linken Maustaste: Auf das Vollbild doppelklicken.
Am Gerät oder mit der Fernbedienung: Die Taste ALL (mehrfach) drücken oder die Taste (AXR-116).
verschiedene Anzahl von Kamerabildern Mit der Maus: Durch Drücken der rechten Maustaste die Funktionsleiste einblenden. Dort die Ansicht wählen: SymbolBilderAXR-104AXR-108AXR-116
4 9— 12— 16—— 25—— weitere Unter-teilungen Durch mehrfaches Klicken auf das Darstellungssymbol auf weitere Kamerakanäle umschalten.
Am Gerät oder mit der Fernbedienung: Die Taste ALL (mehrfach) drücken oder die Taste (AXR-116).
Durchlauf aller Vollbilder (Sequenz)Mit der Maus in der Funktionsleiste auf das Symbol „Start SEQ“ klicken. Zur Einstellung der Verweildauer der Bilder siehe nächstes Kapitel.
Zum Beenden des Durchlaufs das Symbol erneut anklicken.
7.3.1 Verweildauer und Darstellung beim Bilddurchlauf einstellen Ab Werk ist eine Verweildauer von 5 Sekunden eingestellt.
Um die Dauer zu ändern: 1) Das Hauptmenü einblenden. Entweder die Taste MENU am Rekorder / auf der Fernbedienung drücken oder mit der Maus: Die Funktionsleiste einblenden: Die rechte Maustaste drücken oder mit dem Mauszeiger in die Mitte der unteren Bildschirmkante fahren Abb. 7-6 Funktionsleiste und auf das Symbol HAUPTMENÜ klicken.
i Analog Channels Anzeige AusgabeAusgabe NetzwerkPassageCH1
CH2
CH3
CH4Gerft CH1
CH2
CH3
CH4State EúN
EúN
EúN
EúN
IP Cafera Privat Zone úicherung ABBRUCH
Parafeter Aufnahfe úuche Gerät úystef Erweitert úchließung Analog Channels Live Ifage Control Capture Alarf CH1 CH2 CH3 CH4
Abb. 7-7 Hauptmenü 2) Das Untermenü „Anzeige“ im Menü „Parameter“ ist angewählt. Ganz links im Untermenü auf „Ausgabe“ (ohne Symbol) klicken.
0
i Anzeige AusgabeAusgabe Netzwerk IP Cafera Privat ZoneVideoausgabeLIVE-OUTSefuence úodeLayout1Ereignis Zeit5VGA/HDúI-Auösung Transparenz Support Overscan1280x1024
úicherung DefaultABBRUCH
Parafeter Aufnahfe úuche Gerät úystef Erweitert úchließung Analog Channels Live Ifage Control Capture Alarf Abb. 7-8 Menü „Parameter“, Untermenü „Anzeige“, Bereich „Ausgabe“ 3) In der Zeile „Sequence Mode“ lässt sich von Einzelbild (Layout1) auf eine Mehrfachbilddarstellung umschalten.
Dazu auf das Symbol ganz rechts in der Zeile klicken.
4) Zum Ändern der Verweildauer in der Zeile „Ereignis Zeit“ in das Feld mit der 5 klicken und die Dauer in Sekunden eingeben.
5) Zum Speichern der Einstellung auf „Sicherung“ klicken und nach der Meldung „Sicherung erfolgreich“ auf „OK“ klicken.
6) Das Menüfenster durch Klicken auf „ABBRUCH“ schließen.
7.3.2 Bildausschnitt vergrößern 1) Mit der linken Maustaste auf das Live-Bild klicken, bei dem ein Ausschnitt vergrößert dargestellt werden soll. (Bei einer Einzelbild-Darstellung einfach die linke Maustaste drücken.) Die Schnell-Auswahlleiste erscheint: Abb. 7-9 Schnell-Auswahlleiste für jedes Kamerabild 2) Auf das Lupensymbol klicken. Bei einer Mehrfachbild-Darstellung wird auf Vollbild-Darstellung umgeschaltet. Es erscheint ein Lupensymbol; mit diesem ein Fenster aufziehen, das den zu vergrößernden Ausschnitt bestimmt.
3) Zum Zurückschalten auf normales Vollbild die linke Maustaste drücken. Die Zoomfunktion ist weiter aktiv: Es kann ein anderer Ausschnitt vergrößert werden.
4) Zum Ausschalten der Zoomfunktion die rechte Maustaste drücken. Danach kann durch Doppelklicken mit der linken Maustaste auf die vorherige Mehrfachbild-Darstellung zurückgeschaltet werden.
22
Deutsch 7.3.3 Tonwiedergabe Es wird immer der Kamerakanal abgehört, der als Vollbild gezeigt wird oder bei einer Mehrfachbild-Darstellung das blau umrandete Bild (mit der linken Maustaste auswählen).
1) Zum Einstellen der Lautstärke mit der rechten Maustaste die Funktionsleiste (Abb. 7-10) einblenden.
2) Auf das Lautsprechersymbol klicken. Ein Lautstärkeregler wird eingeblendet.
3) Bei gedrückter linker Maustaste mit dem Schieberegler die Lautstärke verändern.
4) Zum Tonausschalten auf das Lautsprechersymbol direkt unter dem Regler klicken. Auf gleiche Weise kann der Ton auch wieder eingeschaltet werden.
Zum Tonein- und -ausschalten kann auch die Taste MUTE auf der Fernbedienung oder am Gerät verwendet werden. Jedoch darf dazu nicht der Lautstärkeregler eingeblendet sein.
7.4 Bedienleisten – schneller Zugriff auf Einstellungen und Funktionen Für einen schnellen Zugriff auf die Einstellmenüs und die wichtigsten Funktionen gibt es die Funktionsleiste (zum Einblenden mit der rechten Maustaste klicken) und für jedes Kamerabild die Schnell-Auswahlleiste (mit der linken Maustaste in das gewünschte Kamerabild klicken).
Abb. 7-10 Funktionsleiste SymbolFunktion Hauptmenü aufrufen; beim Aufrufen ist angewählt: Menü „Parameter“ Untermenü „Anzeige“ Bereich „Analog Channels“ Das Schloss-Symbol ist nur vorhanden, wenn ein Passwort aktiviert wurde (Kap. 6.5).
Ist das Schloss geöffnet, wird durch Anklicken des Symbols die Bediensperre aktiviert (Kap. 7.1).
Ist das Schloss geschlossen, ist die Bediensperre aktiv; durch Anklicken des Symbols wird das Fenster für einen Benutzerwechsel geöffnet (Kap. 7.2).
Ansicht mit vier Kamerabildern Bei den Rekordern AXR-108 und AXR-116 sind weitere Symbole für die Ansicht von 9, 12, (16), (25) Bildern vorhanden.
Ansicht mit unterschiedlich großen Kamerabildern Stream Switch für das blau umrandete Kamerabild: „Main Stream“ = hohe Auflösung, jedoch große Datenmengen „Sub-stream“ = geringere Auflösung, aber auch geringere Datenmengen Preview Policy regelt die Prioritäten bei voller System-auslastung Realtime = möglichst hohe Bildrate, dafür geringere Bildqualität Balanced = mittlere Bildrate und mittlere Bildqualität Smooth = möglichst hohe Bildqualität, dafür weniger Bilder pro Sekunde Bilddurchlauf (Sequenz) starten/beenden (Kap. 7.3) Lautstärke einstellen, Ton aus- und einschalten (Kap. 7.3.3) Menü für die Suche von Aufnahmen öffnen (Kap. 7.7.2) Abb. 7-11 Schnell-Auswahlleiste mit den Funktionen separat für jedes Kamerabild SymbolFunktion Schnappschuss-Aufnahme speichern (Kap. 7.6.2) Aufnahme manuell starten oder beenden (Kap. 7.6) Die letzten 5 Aufnahme-Minuten abspielen (Kap. 7.7.1) Bildausschnitt vergrößern (Kap. 7.3.2) Farbe, Helligkeit und Kontrast einstellen (Kap. 7.5) Steuermenü für eine PTZ-Kamera einblenden (Kap. 7.8
7.5 Farbe, Helligkeit, Kontrast der Live-Bilder einstellen 1) Mit der linken Maustaste auf das Live-Bild klicken, das eingestellt werden soll. (Bei einer Einzelbild-Darstellung einfach die linke Maustaste drücken.) Die Schnell-Auswahlleiste erscheint (Abb. 7-11).
2) Auf das Farbpalettensymbol klicken. Das Live-Bild wird als Einzelbild dargestellt und das Menü für die Bildeinstellung blendet sich ein: 125130132100
Farbe Passage FARBTIEFEfH1
HELLIGúEIT
úONTRAST
SÄTTIGUNG
DefaultSicherungABBRUfH
Abb. 7-12 Menü für die Bildeinstellung MenüpunktFunktion PassageUmschalten auf einen anderen Kamerakanal FARBTIEFEFarbton einstellen HELLIGKEITHelligkeit einstellen KONTRASTKontrast einstellen SÄTTIGUNGFarbsättigung einstellen DefaultZurücksetzen auf die Werkseinstellung SicherungEinstellung sichern ABBRUCHMenü ausblenden 3) Um nach dem Ausblenden des Menüs zurück auf die vorherige Ansicht zu schalten, mit der linken Maustaste doppelklicken.
7.6 Aufnahmen Ab Werk ist der Rekorder so eingestellt, dass nach dem Einschalten alle Kanäle aufgenommen werden, an denen eine Kamera angeschlossen ist. Wurde die Einstellung geändert (Menü „Parameter“, Untermenü „Ausgabe“, Bereich „Record schedule“), kann für einen Kanal, der nicht automatisch aufgenommen wird, manuell eine Aufnahme gestartet werden: 1) Mit der linken Maustaste auf das Live-Bild klicken, welches aufgenommen werden soll. (Bei einer Einzelbilddarstellung einfach die linke Maustaste drücken). Die Schnell-Auswahlleiste erscheint (Abb. 7-11).
2) Auf das Kamerasymbol klicken. Kurz darauf startet die Aufnahme und das Symbol R (Record) wird eingeblendet.
3) Zum Stoppen der Aufnahme erneut auf das Symbol klicken.
23
Deutsch Alternativ lässt sich eine Aufnahme mit der Taste am Rekorder oder auf der Fernbedienung starten und mit der Taste ■ wieder stoppen. Bei einer Mehrfachbild-Darstellung wird immer die Aufnahme der Kamera gestartet, deren Bild blau umrandet ist. Bei Bedarf vor dem Aufnahmestart mit den Zifferntasten oder den Tasten CH − / CH + auf die VollbildDarstellung des aufzunehmenden Kanals schalten.
7.6.1 Aufnahmezeiten ändern 1) Das Hauptmenü aufrufen und im Menü „Parameter“ das Unter menü „Ausgabe“ wählen. Dort den Bereich „Record schedule“ anklicken.
i 020181614121022
2468Anzeige Ausgabe Record schedule Main ftream fub stream MobilstreamAusgabe Netzúerk ficherung ABBRUCH
Parameter Aufnahme fuche Gerätfystem Erúeitert fchließung Default KopiereBis CH1ALLEKopiere fassageNúNormal Beweg.AúAlarm CH1
Sonntag Montag Dienstag Mittwoch Donnerstag Freitag Sonnabend Capture Alarm M S
W T
T
F
S
Abb. 7-13 Aufnahme-Wochenkalender In der Werkseinstellung werden alle Kamerakanäle, an denen eine Kamera angeschlossen ist, von 0 Uhr bis 24 Uhr aufgezeichnet. Zum Ändern: 2) Hinter „Passage“ ist ein Kamerakanal angewählt (hier Kanal 1). Soll die Aufnahmezeit für einen anderen Kanal geändert werden, auf das Symbol klicken.
3) Zu Löschen von Aufnahmezeiten bei gedrückter linker Maustaste über den gewünschten Zeitbereich fahren.
Einzelne Halb-Stunden-Blöcke lassen sich auch durch Anklicken löschen.
4) Gelöschte Zeiten können genauso wieder hinzugefügt werden.
5) Um Aufnahmen bei einer Bewegungserkennung und / oder Alarmierung automatisch starten zu lassen, zuerst in das gelbe Oval „Beweg.“ klicken bzw. in das rote Oval „A-Alarm“. Dann bei gedrückter linker Maustaste über den gewünschten Zeitbereich fahren.
6) Soll die Einstellung auch für andere Kamerakanäle übernommen werden, in der unteren Zeile „Kopiere CH… Bis ALLE“ die Auswahl vornehmen und auf die Schaltfläche „Kopiere“ klicken.
7) Zum Speichern der Zeiten auf „Sicherung“ klicken. Die Meldung „Speicherung erfolgreich“ mit „OK“ bestätigen und ausblenden.
8) Zum Ausblenden des Kalenders auf „ABBRUCH“ klicken.
7.6.2 Schnappschuss-Bilder Jederzeit lässt sich mit der Schnappschuss-Funktion eine Moment aufnahme eines Kamerabilds speichern, z. B. wenn während der Live-Überwachung ein wichtiges Ereignis festgehalten werden soll. Ab Werk ist die Schnappschuss-Funktion nicht eingeschaltet. Zum Einschalten siehe Kapitel 6.12. Zum Speichern einer Schnappschuss- Aufnahme: 1) Mit der linken Maustaste auf das Live-Bild klicken, welches aufgenommen werden soll. (Bei einer Einzelbilddarstellung einfach die linke Maustaste drücken). Die Schnell-Auswahlleiste erscheint (Abb. 7-11).
2) Auf das Schnappschuss-Symbol klicken. Die Momentaufnahme ist damit gespeichert.
3) Zum Anzeigen und Exportieren von Schnappschuss-Bildern siehe Kapitel 7.7.3.
7.7 Abspielen von Aufnahmen Das Abspielen einer Aufnahme unterbricht nicht eine laufende Aufnahme.
7.7.1 Die letzten 5 Aufnahme-Minuten einer Kamera abspielen 1) Mit der linken Maustaste in das Live-Kamerabild klicken, dessen Aufnahme abgespielt werden soll. Die Schnell-Auswahlleiste erscheint (Abb. 7-11).
2) Auf das Symbol klicken. Das Abspielen der letzten aufgenommenen 5 Minuten startet und es wird eine Steuerleiste eingeblendet: Abb. 7-14 Abspielsteuerleiste 3) Mit den Schaltflächen und II kann das Abspielen angehalten und fortgesetzt werden.
4) Durch mehrfaches Klicken auf das Pausensymbol II lassen sich Einzelbilder nacheinander betrachten.
5) Durch Vor- und Zurückschieben des Abspielknopfes bei gedrückter linker Maustaste kann in der Aufnahme schnell vor- und zurückgesprungen werden.
6) Zum vorzeitigen Beenden des Abspielens auf das rote × klicken.
7.7.2 Aufnahme eines bestimmten Zeitraums abspielen und ggf. extern speichern Zum Einblenden des Aufnahmesuche-Kalenders entweder die Taste am Gerät / auf der Fernbedienung drücken oder mit der rechten Maustaste die Funktionsleiste (Abb. 7-10) einblenden und dort ganz rechts auf das Wiedergabesymbol klicken.
1234123456
i Wiedergabe Passagen Anafog Channefs úP Camera Allgemein SPúEL
S
25 26 27 28 29 30 3112 3 4 5 67
14
21
284
8
9
16 17 18 19 20232425 26 27
30 311 2 3
10 11 12 13
15
22
29M T W T F S
Suche Passage ALLE
Jan.2017
Startzeit: 00:00:00Endzeit: 23:59:59NR. ALLE
Picture Ereignisse ABBRUCH
Pfrfmeter Aufnfhme úuche Gerät úystem Erweitert úchließung Abb. 7-15 Kalender für die Aufnahmesuche Nach dem Einblenden des Kalenders ist immer der heutige Tag angewählt (gelb markiert).
Die Tage mit Aufnahmen sind durch ein oranges Dreieck gekennzeichnet.
1) Auf den Tag klicken, dessen Aufnahmen abgespielt werden sollen. Um auf einen anderen Monat zu springen, auf den weißen Pfeil < oder > vor/ hinter der Monatsangabe klicken.
Zur Auswahl eines anderen Jahres auf den blauen Pfeil oder hinter der Jahreszahl klicken.
24
Deutsch 2) Im Feld „Wiedergabe Passage“ können Kanäle ab- oder angewählt werden. Die blau markierten Kanäle werden abgespielt.
3) Um den Abspielzeitraum einzugrenzen, unten im Fenster eine Start- und Endzeit eingeben.
4) Zum Abspielen auf „SPIEL“ klicken.
24h 2h 1h 30m CH2
CH1
00:00:0023:59:59
1702:00
0:0004:0006:0008:0010:0012:0014:0016:0018:0020:0022:0000
SPIEL10/01/2017 07:16:4810/01/2017 07:16:48S
12 3 4 5 67
91011 12 1314
16 17 18 19 2021
23 24 25 26 2728
30 311 2 3 4
25 26 27 28 29 30 31
8
15
22
29M f W f F SJún.
Plúybúck fype AllgemeinSEL.2017
Bewegung Smúrt Normúl IO Alúrm CH1
CH2
CH3
CH4
IP CH1
IP CH2
IP CH3
IP CH4
IP CH5
IP CH6
07:16:48
Abb. 7-16 Ansicht Aufnahme abspielen 5) Die Ansicht beim Abspielen ist sehr übersichtlich und selbsterklärend. In der folgenden Tabelle sind die am häufigsten benötigten Funktionen aufgeführt: SymbolFunktionAnzeige (grünes Feld oben rechts) ✓ CH..Kanal aus- und einblenden— Menüs ausblenden; zum Wiedereinblenden mit dem Mauszeiger an die untere Bildkante fahren und erneut auf das Symbol klicken— * schneller Rücklauf> X 2 … 16
Ausschnitt vergrößern; vorherige Ansicht: rechte Maustaste— Abschnitt einer Aufzeichnung extern speichern: 1. Eine exter ne Festplatte oder einen USB-Speicherstick mit einem der beiden USB-Anschlüsse verbinden.
2. Die Aufzeichnung abspielen und am Anfang des gewünschten Abschnitts sowie am Ende des Abschnitts auf das Symbol klicken.
3. Beim 2. Klick am Endes des Abschnitts öffnet sich ein Fenster zum Speichern der Videodatei. Das Video-format auswählen und auf „Sicherung“ klicken.
4. In einem weiteren Fenster den Speicher und ggf. einen Ordner auswählen und auf OK klicken. Zum Schließen des Fensters auf ABBRUCH klicken.
Zum Abspielen von Videodateien das Programm „VideoPlayer…exe“ (auf der mitgelieferten CD) auf einem Computer installieren.
Ton aus- und einschalten; mit dem Regler rechts neben dem Symbol die Lautstärke einstellen angewählten Kanal (blau umrandet) auf Vollbildansicht schalten 24h 2h 1h 30mBereich für die Zeitskala wählen: 24 Stunden, 2 Stunden, 1 Stunde, 30 Minuten *Symbol ggf. mehrfach anklicken 6) Zum Beenden des Abspielens und zum Zurückspringen auf den Aufnahmesuche-Kalender mit der rechten Maustaste doppelklicken oder rechts oben mit der linken Maustaste auf das rote × klicken.
7) Um im Kalender nach einer Aufnahme zu suchen, die z. B.
durch eine erkannte Bewegung oder über einen Alarmeingang ausgelöst wurde, auf das Symbol oben im Feld NR.
klicken (Voreinstellung ALLE). Aus dem Pop-Up-Menü eine Möglichkeit auswählen und rechts daneben auf „Suche“ klicken. Die weitere Auswahl und das Abspielen erfolgt, wie bereits in den Schritten 1 bis 4 beschrieben.
7.7.3 Schnappschuss-Bilder aufrufen 1) Das Menü „Aufnahme Suche“ aufrufen: Entweder die Taste am Gerät / auf der Fernbedienung drücken oder mit der rechten Maustaste die Funktionsleiste einblenden Abb. 7-17 Funktionsleiste und dort auf das Wiedergabesymbol klicken. Der Aufnahmekalender wird eingeblendet (Abb. 7-15).
2) Im Kalender auf „Picture“ klicken.
> 30
i ParameterGerätSystem Erweitert Schließufg Allgemeif Sicherung SucheDATUM
fassage15/ú2/2ú17
ALLEúú:úú:úú 23:59:59
Zeit–ALLE
Nr.
Nr.1
3NR.
NIDATUM
12/ú2/2ú17
12/ú2/2ú17Zeit 23:38:ú2
23:51:47GRÖS.
378KB
382KB
WiedergabfassageCH3
CH1
AuffahmeúSuche Picture Ereigfisse ABBRUCH
Sicherufg Abb. 7-18 Fenster zum Suchen von Schnappschuss-Bildern MenüpunktFunktion DATUMDatum der Suchanfrage ZeitZeitraum der Suchanfrage PassageAuswahl der Kamerakanäle NR.Auslösegrund der Bilder ALLE, Normal (zeitgesteuert), Alarm, Bewegung, I O, Manual (manuell) Suche Im gewählten Zeitraum nach Bildern suchen: Die Bilder werden chronologisch aufgelistet.
Zum Betrachten eines Bildes auf dessen Datum /Zeit klicken und danach auf das Symbol .
Zum Zurückspringen vom Bild auf die Liste mit der rechten Maustaste klicken.
SicherungAngewählte Bilder (vor deren Nr. einen ✓ setzen) auf einer externen Festplatte oder einem USB-Stick speichern ABBRUCHMenü ausblenden
25
Deutsch 7.8 PTZ-Kamera steuern Ist eine oder sind mehrere Kameras angeschlossen, die ferngesteuert werden können (Schwenken, Neigen, Zoom, Fokus etc.), lassen sich diese komfortabel über den Rekorder steuern.
1) Mit der linken Maustaste auf das Live-Bild der Kamera klicken, die gesteuert werden soll. (Bei einer EinzelbildDarstellung einfach die linke Maustaste drücken.) Die Schnell- Auswahlleiste erscheint: Abb. 7-19 Schnell-Auswahlleiste 2) Auf das Symbol klicken. Das Steuerfenster wird geöffnet: Speed: ZOOM
20CH1
+– FOKUS+– IfIS+– Abb. 7-20 Fenster für die PTZ-Steuerung Menüpunkt SymbolFunktion CH…Auswahl des Kamerakanals PfeileSchwenken, Neigen, Schwenken und Neigen gleichzeitig automatische Panorama-Schwenkfunktion Ein /Aus SpeedSchwenk- / Neigegeschwindigkeit Kamerafahrt starten / stoppen Fenster zum Speichern von Kamerapositionen für die Kamerafahrt öffnen ZOOMZoom-Funktion FOKUSSchärfeeinstellung IRISBlendeneinstellung 3) Zum Ausblenden des Steuerfensters mit der rechten Maustaste in das Bild klicken.
7.9 Daten löschen Wollen Sie den Rekorder an Dritte weitergeben (z. B. verkaufen, verleihen) oder ihn entsorgen, löschen Sie unbedingt alle Aufzeichnungen und Passwörter, indem Sie die Festplatte formatieren und den Rekorder zurück auf die Werkseinstellung stellen. Anderenfalls reichen Sie mit dem Gerät auch alle Aufzeichnungen, persönliche Daten und Passwörter weiter.
1) Das Hauptmenü einblenden. Entweder am Rekorder / auf der Fernbedienung die Taste MENU drücken oder mit der Maus: Zum Einblenden der Funktionsleiste die rechte Maustaste drücken oder mit dem Mauszeiger in die Mitte der unteren Bildschirmkante fahren.
Abb. 7-21 Funktionsleiste In der Funktionsleiste ganz links auf das Symbol HAUPTMENÜ klicken.
i Analog Channels Anzeige AusgabeAusgabe NetzwerkPassageCH1
CH2
CH3
CH4Gerft CH1
CH2
CH3
CH4State EúN
EúN
EúN
EúN
IP Cafera Privat Zone úicherung ABBRUCH
Parafeter Aufnahfe úuche Gerät úystef Erweitert úchließung Analog Channels Live Ifage Control Capture Alarf CH1 CH2 CH3 CH4
Abb. 7-22 Hauptmenü 2) In der Leiste oben auf „Gerät“ klicken.
i HDD
Sicherung DefaultABBRUfH
Parameter Aufnahme SucheúerätSystem Erweitert Schließung floud verfüg.ze.202STD
Verfü./Ges.
89fG/93fG
Statús OK
Nr.
f*SEL.
Überschreib. AUTOFormat HDD
PTZ
Abb. 7-23 Menü „Gerät“, Untermenü HDD
3) Die Festplatte selektieren: In der Spalte SEL die Zeile der Platte anklicken (siehe Mauszeiger in der Abbildung).
4) Auf die Schaltfläche „Format HDD“ klicken. Es wird das Fenster „Anmelden“ geöffnet.
i PTZHDD
Sicherung DefaultAffRUCH
Paraúeter Aufnahúe SucheGerätSysteú Erweitert Schließung Cloud verfüg.ze.202STD
Verfü./Ges.
89fG/93fG
Statús OK
Nr.
f*SEL.
Überschreib. AUTOFormat HDD
Anmelden Nútzername IadminPasswortAnmeldenABBRUCH
Abb. 7-24 Fenster „Anmelden“ 5) Falls ein Passwort vergeben wurde, dieses eingeben. Auf „Anmelden“ klicken. Es erscheint folgendes Fenster zur Bestätigung: OK
ABBRUCH
Nach der Formafierunmú der Fesfplaffe sindm alle Dafen verloren!
Nofice Abb. 7-25 Fenster zum Bestätigen der Formatierung 6) Die Schaltfläche „OK“ anklicken. Der Formatierungsvorgang wird im Fortschrittsbalken angezeigt. Am Ende der Formatierung erscheint die Meldung: 100%OK
Notice Formatierung erfolg reich Abb. 7-26 Festplatte formatiert 7) Auf „OK“ klicken: Die verfügbare Kapazität und die verfügbare Aufnahmezeit werden angezeigt.
8) Um alle Passwörter und andere Daten zu löschen, ein Reset durchführen (siehe folgendes Kapitel).
26
Deutsch 7.10 Werkseinstellung (Reset) Um den Rekorder zurück auf die Werkseinstellung zu stellen: 1) Das Hauptmenü einblenden: Entweder die Taste MENU am Rekorder / auf der Fernbedienung drücken oder die rechte Maustaste drücken, um die Funktionsleiste einzublenden und dann auf das Symbol HAUPTMENÜ klicken.
2) In der Leiste oben auf „Erweitert“ klicken.
i Wartung Sicherung DefaultABBRUfH
Parameter AufnahmeúSuche GerätSystemErweitertSchließung User Einst.adminAuto NeutstartEINWieder ftartenWöchentúich fon.00:00aktuaúisieren Einst. úaden IPC Load DefauútWerkseinsteúúungEinst. sichernReboot IPCIPC Upgrade Ereignisse Abb. 7-27 Menü „Erweitert“ 3) Auf das Feld „Werkseinstellung“ klicken.Werkseinstellung Anzeige Ausgabe Netzwerk AlarmGerft System Erweitert AúúE úöschen Sicherung ABBRUCH
Abb. 7-28 Fenster Werkseinstellung 4) Das Zurückstellen auf die Werkseinstellung kann für alle Bereiche erfolgen oder nur für bestimmte Bereiche. Die aufgeführten Bereiche entsprechen den gleichnamigen Menüs oder Untermenüs. Zum Auswählen der Bereiche mit der Maus auf die entsprechenden Felder klicken.
Menüpunkt Funktion (Anzeige etc.)bestimmten Bereich anwählen ALLEalle Bereiche anwählen Löschenalle angewählten Bereiche wieder abwählen Sicherungdie angewählten Bereiche auf die Werkeinstellung zurückstellen ABBRUCHFenster schließen 7.11 Ereignisliste aufrufen Der Rekorder speichert alle Ereignisse, wie z. B. fehlendes Kamerasignal, Ein- und Ausschalten des Rekorders, manuelle Aufnahme, Wiedergabe einer Aufnahme, Änderungen in den Menüeinstellungen und vieles mehr.
Das Menü „System“ aufrufen und dort das Untermenü „Log“ anklicken.
3030
> i Allgemein Info Log Nutzer Sicherung AffRUCú Parameter Aufnahme Suche Gerät System Erweitert Schließung Suche Start Date Melden fyp15/ú2/2ú17
úú:úú:úú Startzeit: End Date 15/ú2/2ú17ALLE23:59:59
Endzeit: NR.
SystemAlarm Alarm Alarm Alarm LagerungAlarm EinrichtenZeit 15/ú2/2ú17 11:17:54
15/ú2/2ú17 11:17:54
15/ú2/2ú17 11:17:54
15/ú2/2ú17 11:17:54
15/ú2/2ú17 11:17:54
15/ú2/2ú17 11:23:ú7
15/ú2/2ú17 11:3ú:41
15/ú2/2ú17 12:ú2:36KON.
Starten KEIN VIDEO
KEIN VIDEO
KEIN VIDEO
KEIN VIDEO
No. 1 Format HDDHandy Ende Record schedule senttingAusgabe NEIN
NEIN
NEIN
NEINJA
iedergaPassageCH1
CH2
CH3
CH4
CH4
Abb. 7-29 Ereignisliste nach einer Suchanfrage MenüpunktFunktion Start Dateerster Tag der Suchanfrage End Date letzter Tag StartzeitZeitanfang EndzeitZeitende Melden TypAuswahl einer Ereignisgruppe: Alle, System, Einrichten, Alarm, Nutzer, Ausgabe, Lagerung Die Gruppe wird in der Listenspalte NR. angezeigt.
SucheSuchanfrage starten Sicherung Fenster zum Speichern der Liste z. B. auf einem USB-Stick ABBRUCHFenster schließen Damit jede Manipulation am Rekorder in der Ereignisliste erkennbar ist, lässt sich die Liste weder durch Formatieren der Festplatte noch durch ein Zurücksetzen auf die Werkseinstellung löschen.
7.12 Systeminformationen anzeigen Geräte-ID und Gerätenamen ändern Das Menü „System“ aufrufen und Untermenü „Info“ anklicken. Der Bereich „Info“ ist angewählt: i Allgemein Info Info Channel Info Record Info Log futzerGeräte ID000000Device Name1080P-fY04NGerätetyúfY-DVRfardware VersionDM-284Software VersionV7.1.0-20160719IE Client VersionV2.0.0.867IP Adresse192.168.1.159MAC Adresse00-23-63-63-FR-A7Lautstärke931GVideo FormatPAL
P2P IDRSV160700970782
QR-CodeP2P ID
úicherung ABBRUCH
Parameter Aufnahme úuche Gerät úystem Erweitert úchließung Abb. 7-30 Systeminformationen In der Zeile „Geräte ID“ kann eine eigene Identifikations-Nr.
eingegeben werden, wenn z. B. über ein Netzwerk auf mehrere Rekorder zugegriffen werden soll. Nur mit unterschiedlichen ID-Nummern lassen sich die Rekorder separat ansprechen.
In der Zeile „Device Name“ lässt sich ein anderer Gerätename eintragen, um mehrere Rekorder anhand des Names leichter unterscheiden zu können.
In zwei weiteren Bereichen werden zusätzliche Informationen angezeigt: „Channel Info“: Informationen zu den Kamerakanälen „Record Info“: Informationen zu den Aufnahme-Einstellungen Siehe ggf. Menüübersicht im Kapitel 6.4.
27
Deutsch 7.13 Ausschalten Vor dem Betätigen des Ein- /Ausschalters den Rekorder ordnungsgemäß herunterfahren. Nur dann ist ein Verlust von Einstellungen und laufenden Aufnahmen ausgeschlossen.
1) Die Funktionsleiste einblenden: Die rechte Maustaste drücken oder mit dem Mauszeiger in die Mitte der unteren Bildschirmkante fahren.
Abb. 7-31 Funktionsleiste 2) Auf das Symbol HAUPTMENÜ klicken.
3) Oben rechts im Menü auf das Symbol „Schließung“ klicken. Es erscheint folgende Information: Warnung Recording was stoplped successfullf, folu can turnoff the power safelf nlow !
Abb. 7-32 Meldung, dass der Rekorder jetzt ordnungsgemäß ausgeschaltet werden kann 4) Den Rekorder mit dem Wippschalter auf der Rückseite ausschalten.
Hinweis: Das angeschlossene Netzgerät verbraucht auch bei ausgeschaltetem Rekorder einen geringen Strom. Schalten Sie es ggf. über eine schaltbare Steckdosenleiste aus.
8 Einblendungen und Störungsmeldungen EinblendungStörung H*Die Festplatte ist nicht formatiert, wenn zusätzlich „Warnung Unformat.“ eingeblendet wird.
Die Festplatte ist vollgeschrieben, wenn zusätzlich „Warnung Full“ eingeblendet wird.
Die Festplatte formatieren und damit alle Aufnahmen löschen: Das Menü „Gerät“ aufrufen, in der Spalte „SEL.“ die Festplatte anwählen und auf „Format HDD“ klicken.
Den Überschreibmodus ändern, damit die ältesten Aufnahmen überschrieben werden können: Das Menü „Gerät“ aufrufen, in der Spalte „SEL.“ die Festplatte anwählen und im Feld „Überschreib.“ die Einstellung ändern (z. B. von AUS auf AUTO oder weniger Tage einstellen).
I *Es wurde ein Alarm über einen der Alarmeingänge SENSOR (27) ausgelöst.
Keine HDD*Es ist keine Festplatte eingebaut.
KEIN VIDEO *Das Videosignal ist nicht vorhanden.
M *Es wurde eine Bewegung im Kamerabild erkannt.
RDas Kamerabild wird aufgezeichnet.
* Gleichzeitig ertönt der inter ne Signalgeber für die im Menü „Para-meter“ bzw. „Erweitert“ eingestellte Dauer (siehe Kapitel 6.7) 9 Fernüberwachung und Fernzugriff auf den Rekorder 9.1 Fernüberwachung über Mobiltelefon und Tablet-Computer Über Mobiltelefone und Tablet-Computer mit dem Betriebssystem „Android“ oder ist „IOS“ ganz leicht eine Fernüberwachung möglich.
1) Die App „RXCamView“ aus dem „App Store“ von Apple oder „Play Store“ von Google installieren.
HD
Abb. 9-1 App „RXCamView“ 2) Die App starten.
3) Links in der Symbolleiste „Config“ (a) anwählen (Abb. 9-2).
4) Oben rechts in der Zeile „Device“ auf das Pluszeichen (b) tippen.
RXCamView Playback Create QR Code Record Image Config HelpLive Config Device Device Alarm Favorites Manual Adding Scan QR Code Online Device (a)(b) (c) Abb. 9-2 Fenster „Config“ / „Device“ 5) In dem sich öffnenden Pop-up-Menü auf „Manual Adding“ (c) tippen.
RXCamView Playback RecordImage Config HelpLive ConfigNew Devices Device Name DVR1
Login TypeDevice ID
9000
admin Please enter password Disconnected Please enter the DDNS IDDevice ID
Media Port User Name Password Channels8
Device Alarm Favorites Abb. 9-3 Fenster „New Devices“ 6) In der Zeile „Login Type“ sollte „Device ID“ angewählt sein. Gegebenenfalls von „IP/ DOMAIN“ auf „Device ID“ umstellen.
7) Auf das QR-Code-Symbol in der Zeile „Device ID“ tippen und den QR-Code auf der Gehäuseoberseite des Rekorders einscannen oder in der Zeile die auf der Gehäuseoberseite angegebene ID-Nr. eintippen.
8) In der Zeile „Password“ das Passwort eintippen (ab Werk ist in der Zeile kein Passwort eingetragen).
9) Abschließend zum Speichern oben in der Zeile „New Devices“ auf das Diskettensymbol oder auf „Save“ tippen.
10) Zur Fernüberwachung links in der Symbolleiste auf „Live“ tippen.
28
DeutschChannel 02
1/1RXCamView PlaybackRecordImage Confg HelpLive Live DVR1
Channel 01
Channel 02
Channel 03
Channel 04
IP Channel 01
IP Channel 02
IP Channel 03
IP Channel 04
×× Abb. 9-4 Live-Überwachung von einem Smartphone aus 11) Links oben neben dem Rekordernamen auf das Dreieck „>“ tippen, damit die Rekorderkanäle angezeigt werden.
12) Unten in der Funktionsleiste auf das Symbol tippen, um die Anzahl der Fenster für die Rekorderkanäle auszuwählen.
13) Die gewünschten Kanäle in je ein Fenster ziehen. Das jeweilige Kamerabild erscheint dann dort. Sind mehrere Rekorder zur Überwachung vorhanden, lassen sich auch Kamerabilder von verschiedenen Rekordern in einer Ansicht betrachten.
14) Weitere Funktionen können über die anderen Symbole aufgerufen werden.
15) Eine Hilfe in Englisch ist unter „Help“ verfügbar.
9.2 Fernzugriff über einen Computer Mit der Programmerweiterung „ActiveX“ ist von einem Computer aus der Fernzugriff auf den Rekorder möglich. Die Erweiterung ist im Rekorder gespeichert und lässt sich über das Netzwerk (lokales Netzwerk / Internet) auf dem Computer installieren.
1) Der Rekorder muss eingeschaltet und mit dem Netzwerk verbunden sein.
2) Auf dem Computer den Web-Browser öffnen und die IPAdresse sowie den Web-Port des Rekorders eingeben (siehe Rekorder-Menü: Parameter Netzwerk Netzwerk), z. B.: http: // 192.186.001.178:00080
Wenn der Computer mit dem Netzwerk verbunden ist, erfolgen nun der Download und die Installation von „ActiveX“ automatisch.
Hinweis: Wenn der Download von „ActiveX“ nicht erfolgreich war, überprüfen, ob die Sicherheitseinstellungen des Browsers oder der Firewall zu hoch sind.
3) Nach der Installation von „ActiveX“ kann durch Eingabe der IP-Adresse des Rekorders im Web-Browser auf den Rekorder zugegriffen werden. Zuerst erscheint ein Fenster zum Anmelden: Username admin Password Client Port 9000Bitrate Sub stream Language LoginReset Remember Pwd Open All Channels PreviewEnglish User login Abb. 9-5 Login für den Fernzugriff MenüpunktFunktion UsernameBenutzername (ab Werk: admin) PasswordPasswort (ab Werk: kein Passwort) Client Port Port-Nr. des Rekorder, siehe ggf. Menü Para-meter Netzwerk Netzwerk BitrateDatenübertragung (ab Werk „Main stream“ für ein Intranet, „Sub stream“ für das Internet) Menüpunkt Funktion LanguageDie Menüsprache ist Englisch.
Remember PwdPasswort speichern Open All Chan-nels PreviewAlle Rekorderkanäle öffnen LoginVerbindung zum Rekorder herstellen ResetAlle Eingaben löschen 4) Nach dem Login erscheint auf dem Monitor die Ansicht zur Live-Überwachung: 0 1 2 3 4 5 6 7 8 9 10
11
CH01CH01
CH02
CH03
CH04
IP CH01
IP CH02
IP CH03
IP CH04
IP CH05
IP CH06
125 130 132 100
No Video No VideoNo Video No VideoNo Video No Video CH02
CH03CH04
LivePlaybackRemote SettingLocal SettingsLogout ZOOM
DefaultFOCUS
IRIS
Preset Cruise Abb. 9-6 Live-Überwachung von einem Computer aus Menüpunkt SymbolFunktion oben, Funktionsbereich LiveLive-Überwachung PlaybackAufnahmen wiedergeben Remote SettingEinstellungen für den Rekorder Local SettingPfade für Aufnahmen auf dem Computer festlegen LogoutAbmelden links, Kanalübersicht Live-Bild ein- oder ausschalten Videoaufnahme auf dem Computer starten oder stoppen Schnappschuss-Aufnahme auf dem Computer speichernunten, Funktionssymbole alle Live-Bilder einschalten / ausschalten vorherige / nächste Kanalgruppe wählen Full Screen: Alle Steuerelemente ausblenden; mit der Taste „Esc“ alle wieder einblenden Live-Bilder: Original-Proportionen / format- füllend dehnen Symbole zur Auswahl der Live-Ansicht ein- /ausblenden rechts, PTZ-Steuerung und Bildeinstellungen PfeileSchwenken, Neigen, Schwenken und Neigen gleichzeitig automatische Panorama-Schwenkfunktion Ein /Aus Schwenk- / Neigegeschwindigkeit ZOOM
Zoom-Funktion FOCUSSchärfeeinstellung IRISBlendeneinstellung PresetKamera-Blickrichtung speichern Cruise Kamerafahrt starten / stoppen Farbton einstellen Helligkeit einstellen Kontrast einstellen Farbsättigung einstellen DefaultBild auf die Werkseinstellung zurücksetzen Durch Klicken mit der rechten Maustaste in ein Live-Bild erscheint ein Pop-up-Menü zur Main / SubStream-Auswahl.
29
Deutsch 10 Wo finde ich welche Einstellungen und Funktionen?
Einstellung / FunktionMenüUntermenüBereich / FensterMenüpunkt Alarmeingänge SENSOR konfigurierenParameterAlarmAlarmdiverse Alarmsummer Ein /Aus ErweitertEreignisse— Alarmton ParameterAlarmBewegung Alarm Aufnahmen abspielenAufnahme SucheAllgemein—SPIEL
Aufnahmen extern speichernAufnahme SucheAllgemein— SPIEL Aufnahmen löschenGerätHDD—Format HDD
Aufnahmezeiten ändernParameterAusgabeRecord schedulediverse Ausschalten / HerunterfahrenSchließung—SchließungSchließung Bediensperre siehe Passwörter aktivieren Benutzerrechte festlegenSystemNutzer—Permission Bewegungserkennung einstellenParameterAlarmBewegungdiverse Bildbereiche abdeckenParameterAnzeige Privat Zonediverse C
loud zum Speichern von Schnappschuss-BildernGerätCloud—diverse Dateien löschen siehe Aufnahmen löschen Datum und Uhrzeit ausblendenParameterAnzeigeLiveZeige Zeit Datum / Datumsformat einstellenSystemAllgemeinAllgemeinDATUM / Datumsformat Einrichtungsassistenten beim Einschalten starten: Ja / NeinSystemAllgemeinAllgemeinShow wizard E-Mail bei Alarm automatisch versendenParameterNetzwerkEmail Email Schedulediverse Ereignisliste aufrufenSystemLog—über Suche im gewählten Zeitraum Ereignisse auflisten Festplatte formatierenGerätHDD—Format HDD
ID-Nummer des Rekorders bestimmen SystemInfoInfoGeräte ID
Kamera-Namen ändernParameterAnzeigeLiveName Kanäle, an denen keine Kameras angeschlossen sind, abschaltenParameter AnzeigeAnalog Channels CH … MenüeinblendzeitSystemAllgemeinAllgemeinAnzeigezeit des Menüs MenüspracheSystemAllgemeinAllgemeinSprache Menü-TransparenzParameterAnzeigeAusgabeTransparenz Momentaufnahmen ermöglichenParameterCaptureCapture + Schedulediverse Namen des Rekorders ändernSystemInfoInfoDevice Name Neustart, automatisch (täglich, wöchentlich, monatlich)Erweitert Wartung—Wieder Starten Neustart, manuellSchließung—SchließungWieder Starten Netzwerk-Kamera hinzufügen / abmeldenParameterAnzeigeIP CameraIP CH..
Auto Assign IP to Camera(s) Add All User-defined Add Netzwerk-Menüs ausschaltenSystemAllgemeinAllgemeinModus: DVR
Passwörter aktivierenSystemNutzerBearbeitenPasswort ändern: EIN
Point to Point ID-Nr. anzeigen (auch als QR-Code)SystemInfoInfoP2P ID (ganz unten) PTZ-Kamerasteuerung einstellenGerätPTZ—diverse R
ekorder-Konfiguration speichern / abrufenErweitertWartung—Einst. sichern / Einst. laden ResetErweitertWartung—Werkseinstellung Schnappschuss-Aufnahmen ermöglichenParameterCaptureCapture Schedulediverse Sommer- / Winterzeit-UmstellungSystem AllgemeinDSTdiverse Tastensperre siehe Passwörter aktivieren Ton für Netzwerkübertragung Ein /AusParameterAusgabeMain Stream Sub-stream MobilestreamAudio Uhrzeit einstellenSystemAllgemeinAllgemeinZeit Uhrzeit und Datum ausblendenParameterAnzeigeLiveZeige Zeit Verweildauer beim Bilddurchlauf (Sequenz-Funktion)ParameterAnzeigeAusgabeEreignis Zeit Video von der Installation ansehen https://youtu.be/13P1Y4PiBmk Vollbild bei erkannter Bewegung / bei Alarmauslösung von Eingang SENSORParameter AlarmBewegung AlarmVollbild Werkseinstellung wiederherstellenErweitertWartung—Werkseinstellung = unbedingt einstellen = sehr hilfreich
30
Deutsch 11 Häufig gestellte Fragen nach Suchbegriffen alphabetisch sortiert Aufnahmedauer Welche Aufnahmedauer ist möglich?
Als Faustregel gilt hierbei: 1 GB/Std. je angeschlossener Kamera mit FBAS-Signal 4 GB/Std. je angeschlossener Kamera mit Full-HD-Auflösung (1920 × 1080 p) kein Bild Warum habe ich kein Bild auf dem angeschlossenen Monitor?
Bitte prüfen, welche Auflösungen der verwendete Monitor unterstützt. In der Werkseinstellung beträgt die Auflösung am HDMI-Monitorausgang des Rekorders 1280 × 1024 Bildpunkte. Der AXR-… unterstützt folgende Auflösungen: 1024 × 768
1080 × 1024
1280 × 720
1440 × 900
1920 × 1080
Cloud Kann ich Bilder in einer Cloud speichern?
Die AXR-Rekorder unterstützen Alarm-Uploads in die Cloud des Anbieters DROPBOX. Bei Alarmaufnahmen durch Bewegungserkennung oder I / O-Alarm können JPEG-Bilder in die Cloud geladen werden.
Datenrate Welche Datenrate steht für Aufnahmen insgesamt zur Verfügung?
ModellAXR-104AXR-108AXR-116
Anzahl der Kanäle für analoge Kameras4816
Datenrate für analoge Kameras 16 Mbps*32 Mbps*64 Mbps* zusätzliche Kanäle für IPKameras248
Datenrate für IPKameras8 Mbps16 Mbps32 Mbps Datenrate insgesamt24 Mbps48 Mbps96 Mbps * 4 Mbps je Kamera Wird ein Kanal für eine analoge Kamera abgeschaltet, kann dafür eine zusätzliche IP-Kamera verwendet werden.
Ersatz für ältere Kameras Welche Kameras kann ich als Ersatz für ältere Kameras einsetzen?
Die Kameras der AXC-Serie (ausgenommen AXC- 137NLC und AXC-137PHC) sind mit den zwei vorhandenen Signalausgängen TVI und AHD / CVBS nicht nur als Ersatz für ältere Kamerasysteme interessant. Auch komplexe Installationen lassen sich hiermit elegant lösen. Als praktisches Beispiel dient die Überwachung einer Eingangstür. Hier kann das TVI-Signal auf einen Rekorder gegeben werden und gleich zeitig das CVBS-Signal auf einen kleinen Kontrollmonitor (z. B. TFT-800LED).
Handy Wie bekomme ich Kamerabilder auf mein Handy?
In einem kurzen Video wird gezeigt, wie der Fernzugriff per Smartphone auf einen AXR-Rekorder eingerichtet wird: https://youtu.be/13P1Y4PiBmk IP-Kameras Welche IP-Kameras können mit den AXR- Rekordern verwendet werden?
IOC-2812BV
IOC-2812DV
Unterstützt werden auch folgende IP-Kameras mit Einschränkungen (z. B. Keine Alarm-Aufnahmen / kein Audio): Alle Modelle aus der INC-Serie sowie die Modelle F-4215 und B-6220
Kamerabilder-Fernzugriff Wie kann ich Kamerabilder zur Einbindung in eine Homepage oder in eine Türsprechstelle mit Monitor abrufen?
Der Zugriff auf angeschlossene Kameras ist über den vom AXR-Rekorder bereitgestellten RTSP-Stream möglich. Die genauen Adress informationen dazu sind im Netzwerk-Menü des Rekorders unter RTSP angegeben.
OSD-Menü einer AXC-Kamera Wie kann ich das OSD-Menü einer AXC- Kamera über den AXR-Rekorder aufrufen?
Das Kamera-OSD-Menü lässt sich über die PTZ- Konsole des AXR aufrufen: 1) Im Hauptmenü unter „Gerät“ / „PTZ“ das PTZ-Protokoll von „Pelco-D“ auf „COAX1“ (Baudrate 9600) umstellen.
2) Über die Funktion „IRIS +“ der PTZ-Konsole kann jetzt das OSD-Menü der AXC-Kamera aufgerufen werden.
3) Die Navigation innerhalb des Menüs erfolgt mit den Richtungstasten der PTZ-Konsole, die „ENTER“ Funktion ebenfalls mit „IRIS +“.
Tonaufnahme Wie kann ich Ton aufnehmen?
Die AXR-Rekorder verfügen über Audioeingänge mit LinePegel. Für eine Aufzeichnung mit Ton wird daher neben einem Mikrofon ein kleiner Mikrofon-Vorverstärker oder ein kleines Mischpult benötigt.
Beispiel-Konfiguration: MPA-102 (Mikrofon-Vorverstärker) und ECM-302B (Grenzflächenmikrofon)
31
Deutsch 12 Technische Daten ModellAXR-104 / AXZ-2..AXR-108 / AXZ-408..AXR-116
Video Signaleingänge für analoge Kameras4 × BNC
8 × BNC16 × BNC
Kanäle für Netzwerkkameras2
48
Wird ein Kanal einer analogen Kamera abgeschaltet, kann dafür eine zusätzliche Netzwerkkamera verwendet werden.
GesamtDatenrate24 Mb /s48 Mb /s96 Mb /s Videoausgänge für Monitore1 × HDMI® 1 × VGA1 × HDMI
® 1 × VGA1 × HDMI
® 1 × VGA
Auflösung1850 × 1080 Pixel (25 fps)1850 × 1080 Pixel (25 fps)1850 × 1080 Pixel (25 fps) VideokomprimierungH.264H.264H.264
Aufzeichnungmax. 100 Bilder/s (25 je Kamera)max. 200 Bilder/s (25 je Kamera)max. 400 Bilder/s (25 je Kamera) Aufnahmemodimanuell, Timer, Bewegungserkennung, Alarmmanuell, Timer, Bewegungserkennung, Alarmmanuell, Timer, Bewegungserkennung, Alarm KameraNamefrei bestimmbar, in der LiveAnsicht eingeblendet frei bestimmbar, in der LiveAnsicht eingeblendet frei bestimmbar, in der LiveAnsicht eingeblendet Anzeige einer VideosignalUnterbrechungjajaja Audio Audioeingänge4 × Cinch8 × Cinch8 × Cinch 8 × DSub auf 8 × Cinch Audioausgang1 × Cinch1 × Cinch1 × Cinch Alarm Alarmeingänge4816
Alarmausgang1 Relaiskontakt Belastbarkeit 30 V (⎓ ), 1 A
1 Relaiskontakt Belastbarkeit 30 V (⎓ ), 1 A
1 Relaiskontakt Belastbarkeit 30 V (⎓ ), 1 A
Akustischer Signalgeber integriertintegriertintegriert Allgemein SicherheitPasswortschutz aktivierbar Schnittstellen1 × RS485 für PTZ
Steuerung 2 × USB 2.0 für Maussteuerung und externe Sicherung von Aufzeichnungen 1 × LAN (RJ 45) für Netzwerkanschluss 1 × HDMI® für Monitoranschluss Festplatten AXR104: optional, max. 1 × 6 TB (SATA)AXR108: optional, max. 1 × 6 TB (SATA)optional, max. 2 × 6 TB (SATA) AXZ2..: 1 TB eingesetzt AXZ408..: 1 TB eingesetzt— RAIDLevel ( Redundant Array of Independent Disks)Single SingleSingle Lüfter——ja Stromversorgung12 V (⎓ ) / 5 A über beiliegendes Netzgerät an 230 V/50 Hz Zulässige Einsatztemperatur0 – 40 °C
Abmessungen (B × H × T)300 × 48 × 225 mm300 × 48 × 225 mm380 × 48 × 330 mm Gewicht (ohne Festplatte)1,3 kg1,4 kg3 kg Änderungen vorbehalten.
Diese Bedienungsanleitung ist urheberrechtlich für MONACOR ® INTERNATIONAL GmbH & Co. KG geschützt. Eine Reproduktion für eigene kommerzielle Zwecke – auch auszugsweise – ist untersagt.
32
English 1 Safety Notes . . . . . . . . . . . . . . . . . . . . . . 33
2 Important Data Security Notes . . . . . . . . . . . 33
3 Applications and Major Features. . . . . . . . . . 33
4 Overview . . . . . . . . . . . . . . . . . . . . . . . . 34
4.1 Front panel. . . . . . . . . . . . . . . . . . . . . . 34
4.2 Rear panel . . . . . . . . . . . . . . . . . . . . . . 36
4.3 Remote control . . . . . . . . . . . . . . . . . . . 37
4.3.1 Inserting / Replacing batteries . . . . . . . . . . . 37
5 Connecting the Recorder. . . . . . . . . . . . . . . 37
5.1 Installing the hard disk. . . . . . . . . . . . . . . 37
5.2 Cameras, monitor, USB mouse . . . . . . . . . . 37
5.3 Audio signals. . . . . . . . . . . . . . . . . . . . . 37
5.4 Alarm inputs and alarm outputs, PTZ connection . . . . . . . . . . . . . . . . . . . 37
5.5 Network . . . . . . . . . . . . . . . . . . . . . . . 38
5.6 Power supply. . . . . . . . . . . . . . . . . . . . . 38
6 Setting the Recorder into Operation . . . . . . . 38
6.1 Setting the menu language. . . . . . . . . . . . 38
6.2 Possible error messages after switch-on. . . . . 39
6.2.1 No hard disk installed. . . . . . . . . . . . . . . . 39
6.2.2 Hard disk not formatted . . . . . . . . . . . . . . 39
6.3 Status at first switch-on . . . . . . . . . . . . . . 40
6.4 Startup Wizard . . . . . . . . . . . . . . . . . . . 40
6.5 All menus at a glance . . . . . . . . . . . . . . . 42
6.6 Enabling password protection, changing passwords and defining user rights . . . . . . . 44
6.7 Configuring alarm inputs . . . . . . . . . . . . . 44
6.8 Activating / Deactivating signal sounds Forwarding events to the alarm output. . . . . 45
6.9 Settings for live surveillance: Camera name, image, time display . . . . . . . 45
6.10 Masking image areas. . . . . . . . . . . . . . . . 45
6.11 Setting the motion detection feature. . . . . . 45
6.12 Remote control of cameras (PTZ). . . . . . . . . 46
6.13 Enabling the snapshot feature . . . . . . . . . . 46
6.13.1 Cloud storage for snapshots. . . . . . . . . . . . 47
6.14 Saving and loading different configurations. . 47
6.15 Tips . . . . . . . . . . . . . . . . . . . . . . . . . . 47
7 Operation. . . . . . . . . . . . . . . . . . . . . . . . 48
7.1 User lock . . . . . . . . . . . . . . . . . . . . . . . 48
7.2 User change . . . . . . . . . . . . . . . . . . . . . 48
7.3 Live surveillance. . . . . . . . . . . . . . . . . . . 48
7.3.1 Setting dwell time and display for image sequence . . . . . . . . . . . . 49
7.3.2 Magnifying an image section . . . . . . . . . . . 49
7.3.3 Sound reproduction . . . . . . . . . . . . . . . . 50
7.4 Operating bars – fast access to settings and functions . . . . . . . . . . . . . . . . . . . . . . . 50
7.5 Adjusting colour, brightness, contrast of the live images. . . . . . . . . . . . . . . . . . 50
7.6 Recordings . . . . . . . . . . . . . . . . . . . . . . 50
7.6.1 Changing recording times . . . . . . . . . . . . . 51
7.6.2 Snapshots . . . . . . . . . . . . . . . . . . . . . . 51
7.7 Replaying recordings. . . . . . . . . . . . . . . . 51
7.7.1 Replaying the most recent 5 minutes recorded by a camera. . . . . . . . . . . . . . . . . . . . . 51
7.7.2 Recording a specific time range and, if required, saving it to an external device . . . . . . . . . . . 51
7.7.3 Calling up snapshots . . . . . . . . . . . . . . . . 52
7.8 Controlling a PTZ camera . . . . . . . . . . . . . 53
7.9 Deleting data . . . . . . . . . . . . . . . . . . . . 53
7.10 Factory setting (reset) . . . . . . . . . . . . . . . 54
7.11 Calling up the event list . . . . . . . . . . . . . . 54
7.12 Showing system information Changing device IDs and device names . . . . . 54
7.13 Switching off the recorder . . . . . . . . . . . . 54
8 Insertions and Error Messages . . . . . . . . . . . 55
9 Remote Surveillance and Remote Access to the Recorder . . . . . . . . . . . . . . . . . . . . 55
9.1 Remote surveillance via mobile phone and tablet computer . . . . . . . . . . . . . . . . 55
9.2 Remote access via a computer . . . . . . . . . . 56
10 Where to Find Settings and Functions. . . . . . . 57
11 Frequently Asked Questions . . . . . . . . . . . . 58
12 Specifications . . . . . . . . . . . . . . . . . . . . . 59
EnglishEnglish PageContents Contents DeutschDeutsch SeiteInhalt Français Français PageTable des matières Italiano Italiano PaginaIndice Espa?ol Espa?ol P?ginaContenidos Nederlands Nederlands PaginaInhoud Polski Polski StronaSpis tre ci
33
English 1 Safety Notes The units (recorder, power supply unit, remote control and USB
mouse) correspond to all relevant directives of the EU and are therefore marked with .
WARNINGThe power supply unit uses dangerous mains voltage. Leave servicing to skilled personnel; inexpert handling may result in electric shock.
Do not insert anything into the air vents of the recorder; it may be damaged.
– The units are suitable for indoor use only. Protect them against dripping water, splash water and high air humidity.
The admissible ambient temperature range is 0 – 40 °C.
– Always place the recorder at a location where sufficient air circulation is ensured during operation. Never cover the air vents of the housing.
– Do not place any vessels filled with liquid, e. g. drinking glasses, on the units.
– Immediately disconnect the plug of the power supply unit from the mains socket 1. if the recorder, the power supply unit or the mains cable is visibly damaged 2. if a defect might have occurred after a unit was dropped or suffered a similar accident 3. if malfunctions occur.
In any case the units must be repaired by skilled personnel.
– Never pull the mains cable to disconnect the mains plug from the mains socket, always seize the plug.
– No guarantee claims for the units and no liability for any resulting personal damage or material damage will be accepted if the units are used for other purposes than originally intended, if they are not correctly connected or operated, or if they are not repaired in an expert way.
– Likewise, no liability will be accepted for data loss caused by a defect or operating errors and for any consequential damage of this data loss.
If the units are to be put out of operation definitively, take them to a local recycling plant for a disposal which is not harmful to the environment.
2 Important Data Security Notes The recorder is set to automatically log in to the Internet as soon as the connection to the Internet has been established.
Consequently, anybody who knows your device ID number and the preset password will be able to access, modify and misuse the recorder (for criminal offences) without you taking note of it.
IMPORTANTAlways change the password (chapter 6.6).
Make sure to remember your password and disclose your password only to authorized persons.
When you want to dispose of the recorder or plan to give (e. g. sell or lend) it to a third party, make sure to delete all recordings and passwords: Format the hard disk and reset the recorder to its factory settings (chapter 7.10, page 54).
Otherwise, you will pass on your recordings, personal data and passwords with the recorder.
3 Applications and Major Features In combination with a minimum of one surveillance camera and a monitor, the recorder can be used to monitor objects such as private residential buildings, salesrooms, outdoor areas and so forth. The recording of camera images facilitates evaluations at any time and thus can substantially contribute to crime deterrence and solution.
Benefits of the hybrid recorder from MONACOR: -Analog Full HD images (resolution of 1080p) can be routed to the recorder via coaxial cables (max. 300 m) -Downwards compatible (AHD, CVBS) – the camera type will be automatically recognized -Easy installation even without a network -Remote access to the recorder as well as remote surveillance via a local network or the Internet (e. g. by means of a computer, mobile phone) supported -Monitoring by means of IP cameras (network cameras) also supported The HYBRID product line includes individual recorders (AXR-…) as well as entire surveillance sets (AXZ-…) with colour cameras, power supply unit for the cameras and connection cables: ModelCamera channels*Hard disks Cameras providedPSU for the cameras AXR1044 / 2None, 1 × 6 TB (SAGA) can be usedNone, all camera models AXC… can be used (as well as all AHCAM… and TVCCD…; the resolution, however, is lower) — AXR1088 / 4
AXR11616 / 8
None, 2 × 6 TB (SAGA) can be used AXZ204BV
4 / 2
1 × 1 TB (SATA)2 × AXC2812BVPSS1230DC
(12 V, 3 A)AXZ204DV2 × AXC2812DV
AXZ224BD2 × AXC2812BV
2 × AXC2812DV
PSS1250DC
(12 V, 5 A) AXZ408BV8 / 44 × AXC2812BVPSS1230DC
(12 V, 3 A)AXZ408DV4 × AXC2812DV
*x / y = for analog cameras / IP cameras
34
English 4 Overview 4.1 Front panel AXR-… …-CH HYBRID DIGITAL RECORDER
MENU
ESCPWR HDDSEARCHMUTE CH– CH+ ALL
PTZ
5
1112 13 14 15 166 78
12 3 49 10
Fig. 4-1 AXR-104 (also included in the sets AXZ-2…) AXR-108 (also included in the sets AXZ-4…) ItemLetteringFunction 1SEARCH
MUTE
CH– /CH+ ALLTo search for a recording To unmute / mute Previous / next camera channel Splitscreen mode, all channels displayed 2 / To go to the left / fast reverse 3Upwards 4 / To go to the right / fast forward 5Downwards 6To activate the selected menu item for setting / to confirm entry 7MENU/ESCTo call up / exit the main menu 8–IR sensor for the control commands of the remote control 9PWRPower indicator 10HDDWill flash when the hard disk is being read or written; in the standby mode, the LED will light continuously.
11
USB port for data backup on a USB flash drive / hard disk; can also be used to connect a mouse 12To start the replay 13
IIPause / framebyframe replay 14To stop the replay or manual recording 15
-To start manual recording 16PTZPTZ control (pan, tilt, zoom) Fig. 4-2 Button functions of the 4-channel recorder and 8-channel recorder
35
English AXR-116 16-CH HYBRID DIGITAL RECORDER
MENU
ESCPWR HDD
PTZ2345678
90
1
12 3 49 10
5
1112 13 14 15 16 176 78
Fig. 4-3 AXR-116
ItemLetteringFunction 1
1– 9, 0
Buttons 1– 9 for digits 1– 9 and channels 1– 9
To select channels CH 11– CH 16: First press digit button 1, then press the next digit button (e. g. for channel 16, first press 1 and then press 6).
2 / To go to the left / fast reverse 3Upwards 4 / To go to the right / fast forward 5Downwards 6 / PTZTo activate the selected menu item for setting / to confirm entry / to call up PTZ control (pan, tilt, zoom) 7MENU/ESCTo call up / exit the main menu 8–IR sensor for the control commands of the remote control 9PWRPower indicator 10HDDWill flash when the hard disk is being read or written; in the standby mode, the LED will light continuously.
11
USB port for data backup on a USB flash drive / hard disk; can also be used to connect a mouse 12
In the live view, to go to the splitscreen mode (4, 9 or 16 cameras) 13To unmute / mute 14To start the replay 15
IPause / framebyframe replay 16To stop the replay or manual recording 17
-To start manual recording Fig. 4-4 Button functions of the AXR-116
36
English 4.2 Rear panel VIDEOINPUT1
3
42
AUDIO
OUTPUTAUDIO
INPUTHDMI
VGA
LAN
RS485
12 V
4 3
SENSOR2 1 G
ALARM
1
3
42
23 20 22 25 24 26 28 27 29 30
Fig. 4-5 AXR-104
VIDEO
INPUT1
2
3
4
8642
AUDIO
OUTPUT
AUDIO
INPUTHDMI
VGA
LAN
RS485
12 V
8 7 6 5 4 3
SENSOR2 1 G
ALARM
2025 24 26 28 27 29 30
22 23
Fig. 4-6 AXR-108
202122 23 24 25 26 27 28 29 30
Fig. 4-7 AXR-116
ItemLetteringFunction 20VIDEO INPUTVideo inputs (BNC jacks) for the surveillance cameras 21
AUDIO INPUT (916) (AXR116 only) Audio inputs for channels 9 – 16 (Dsub jack), connection via adapter cable supplied and equipped with RCA jacks 22AUDIO INPUTAudio inputs (RCA jacks) AXR104: for channels 1 – 4
AXR108 and AXR116: for channels 1 – 8
23AUDIO OUTPUTAudio output (RCA jack) 24VGAVGA connection for a VGA monitor (for a display with 1080p, use the HDMI
® output) 25HDMIHDMI
® output for a highresolution monitor 26LANConnection for LAN, Ethernet (RJ45 jack) for remote surveillance 27
RS485 / SENSOR / ALARM
RS485 + − = RS485 interface for PTZ camera control Sensor = alarm inputs, e. g. for motion detectors Alarm = alarm output, e. g. for an alarm signal device (see chapter 5.4) 28
Connection for the USB mouse 2912V⎓Connection for the power supply unit provided 30I Power switch
37
English 4.3 Remote control SEL
0ALLMENU
9
7
56
4
23
1
MUTE SUBMENU
8
Fig. 4-8 Remote control ButtonFunction 1 … 9, 0Channel selection; digit input ALL
Splitscreen mode, all channels displayed MENUTo call up / exit the main menu to hide the toolbar or quickselection bar MUTETo unmute / mute SUBMENUTo call up the toolbar second press of the button: call up the quickselection bar for the camera image selected (chapter 7.4) Upwards Downwards / To go to the left / right; to decrease / increase parameter value SELTo activate the selected menu item for setting / to confirm entry (≙ Enter button) Fast reverse To call up the record search function, to replay recording Fast forward -To start manual recording II
Pause / framebyframe replay ■To stop the replay or manual recording 4.3.1 Inserting / Replacing batteries To insert the batteries (2 x 1.5 V, AAA size), remove the battery compartment cover on the rear of the remote control. Insert the batteries as indicated in the battery compartment and then close the compartment again.
If the remote control is not used for a longer time, remove the batteries as a precaution so that the remote control will not be damaged in case the batteries should leak.
Never put batteries in the household waste. To protect the environment, always take them to a special waste disposal, e. g. collection container at your retailer.
5 Connecting the Recorder 5.1 Installing the hard disk The recorders of the surveillance sets (AXZ-…) are equipped with a hard disk. The individual recorders (AXR-…), however, do not include a hard disk, i. e. it must be installed first. The MONACOR product line offers suitable hard disks (SATA-…) with different storage capacities. When using hard disks of other vendors, make sure that they are specially suited for security and surveillance technology.
Caution: Never insert or remove the hard disk when the recorder is switched on!
1) Disconnect the recorder from the power supply.
2) Screw off the housing cover.
3) Insert the hard disk and fasten it with screws.
4) Connect the power supply cable for the hard disk as well as the data cable to the corresponding connections of the hard disk.
5) Screw on the housing cover.
6) Connect the recorder and switch it on; then format the hard disk (chapter 6.2.2) and finally make all settings, using the “Startup Wizard” (chapter 6.4).
5.2 Cameras, monitor, USB mouse Cameras BNC jacks VIDEO INPUT (20) For the camera models AXC-…, connect the TVI output to be able to use the maximum resolution.
When PTZ cameras are used, pan, tilt and zoom can be controlled via the connection RS485 (27) (for the connection, refer to chapter 5.4).
Monitor jack HDMI (25) for the maximum resolution of 1080p; when the monitor only provides a VGA connection, the jack VGA (24) can be used (lower resolution) Mouse provided USB port (28) on the rear; the USB
jack (11) on the front should be used for data backup.
5.3 Audio signals Audio signals (from the cameras) RCA jacks AUDIO
INPUT (22) for the recorder AXR-116, additionally the D-sub jack AUDIO
INPUT (21) for the channels 9 – 16; an adapter cable with RCA
jacks is provided Audio signals for monitoring When the monitor is connected via the jack HDMI (25), this jack will be used to route the audio signal to the monitor. For other connection options, the audio signal is available at the red RCA jack AUDIO OUTPUT (23).
It is always possible to monitor the camera channel that is shown in the full-screen mode or, in the multi-image mode, to monitor the image highlighted by a blue border (select with the left mouse button).
5.4 Alarm inputs and alarm outputs, PTZ connection These connections are made by means of the green terminal strip (27).
Alarm inputs SENSOR
Alarm sensors (motion detectors, photoelectric sensors etc.) can be connected to the alarm inputs SENSOR in order to, for example, automatically save a snapshot and to display the
38
English respective camera image in full-screen mode or to automatically send an e-mail with the snapshot.
Connect the connection [–] of a sensor to the pin G
(ground) and connect the connection [+] of the sensor to the respective channel input (1 – 16) of the recorder. Proceed in the same way to connect the other sensors. The menu “Parameter”, submenu “Alarm”, section “Alarm” can be used to define the alarm display duration, alarm sound duration, recording duration and alarm contact (NC or NO) and to make other settings (chapter 6.7).
Output ALARM
A relay with a normally open contact (maximum power rating of 30 V/1 A) is available as a potential-free alarm output. An acoustic or optical alarm signal device, for example, can be connected to the output ALARM.
PTZ connection RS485
The RS-485 interface can be used for remote control of suitable cameras: e. g. pan, tilt, zoom, iris and motion speed.
Connect the contacts – (= RS-485-A) and + (= RS-485-B) to the respective contacts of the camera. An additional camera can be connected in parallel to the connections of the first camera etc. until all cameras are connected in a chain. To reduce interference, twisted cables should be used. At the final camera of the chain, terminate the two cables with a 120 Ω resistor (this is often possible by means of a switch at the camera).
To be able to address the cameras independently from the recorder, assign an individual address to the cameras (via a menu or DIP switch at the camera). At the recorder, set the address to be used to control the respective camera as well as the transmission parameters and protocol the camera requires (chapter 6.12).
5.5 Network For remote control, connect the jack LAN (26) of the recorder to a local network or to a router. Always observe the data security notes in chapter 2!
5.6 Power supply Connect the power supply unit to the jack 12 V⎓ (29) and to a mains socket (230 V/ 50 Hz).
6 Setting the Recorder into Operation A YouTube video clip (only available in German) from MONACOR INTERNATIONAL explains the most important steps of how to set the recorder into operation. The video clip also shows how easy it is to connect the recorder to a network.
https://youtu.be/13P1Y4PiBmk When the cameras monitor mouse power supply unit of the recorder power supply unit for the cameras have been connected, switch on the recorder with the rocker switch (30) on the rear. After a few seconds, the MONACOR
logo will appear on the monitor connected: After approx. 15 seconds, the start page with the “Startup Wizard” will appear: MR
MR
T-CH1
CH4
T-CH2
CH3
KEIN VIDEO
Sfarfuú Wizard Don‘f show fhis windoSw nexf fime.
Welcome to use the wizard of setup KEIN VIDEOkeine Kamerkeine Kamer 15/12/2016 09:53:S46
× ABBRUCH Weifer Fig. 6-1 Start page: The “Startup Wizard” is displayed; depending on the recorder model, additional fields for the camera images are available 6.1 Setting the menu language The menu language is factory-set to German. To change the menu language: 1) When a warning appears after switch-on, click × to close it.
2) In the window “Startup Wizard”, click the button “ABBRUCH”. The confirmation box “Are you sure you want to cancel Startup Wizard?” will appear. Click “OK”.
3) To show the toolbar, press the right mouse button or move the mouse pointer to the centre of the lower edge of the screen: Fig. 6-2 Toolbar 4) Click the symbol HAUPTMENÜ (MAIN MENU).
i Analog Channels Anzeige AusgabeAusgabe NetzwerkPassageCH1
CH2
CH3
CH4Gerft CH1
CH2
CH3
CH4State EúN
EúN
EúN
EúN
IP Cafera Privat Zone úicherung ABBRUCH
Parafeter Aufnahfe úuche Gerät úystef Erweitert úchließung Analog Channels Live Ifage Control Capture Alarf CH1 CH2 CH3 CH4
Fig. 6-3 Hauptmenü (main menu) 5) Click “System” at the top of the menu.
39
English 30
i Allgemein Info Allgemein DST
NTP
Log Nutzef Sicherung ABBRUCH
Parameter Aufnahme Suche Gerät Sústem Erweitert Schließung Default DATUM0ú/15/ú017
MM/TT/JJ11:04:56
Zeit Datumsfofmatú4STD.
Zeitfofmat DEUTSCH
Spfache PAL
Video Fofmat 1MIN.
Anzeigezeit des MenüzsXVR
Modus Show wizafd Fig. 6-4 Menu “System” 6) In the line “Sprache”, select ENGLISCH.
7) Click the button “Sicherung” at the bottom of the menu.
8) The message “Speicherung erfolgreich” will appear. Click “OK” to confirm the message.
9) Restart the recorder to display the menus in the language selected and to start the “Startup Wizard”: a) Click “Schließung“ at the top of the menu.
b) The window “Schließung” will appear. Click “Wieder Starten”: The recorder will be restarted and the menu language will be English.
In the following text, all menus are shown in English.
6.2 Possible error messages after switch-on According to the factory settings of the recorder, an alarm signal will sound for 10 seconds when an error occurs.
6.2.1 No hard disk installed ×Warning 1
No disk Fig. 6-5 No hard disk installed Additionally, the message NO HDD will appear at the bottom of the screen. Please refer to page 37 (chapter 5.1) for information on how to install a hard disk. First, shut down the recorder properly: 1) Click × to close the “Warning” window.
2) In the window “Startup Wizard”, click “Cancel.” The confirmation box “Are you sure you want to cancel Startup Wizard?” will appear. Click “OK”.
3) To show the toolbar (Fig. 6-2), press the right mouse button or move the mouse pointer to the centre of the lower edge of the screen.
4) Click the symbol “Main Menu”.
5) In the main menu, click the symbol “Shutdown”. The following information will appear: Warning Recording was stoplped successfullf, folu can turn off the power safelf nlow !
Fig. 6-6 The recorder can now be safely switched off 6) Switch off the recorder with the rocker switch.
6.2.2 Hard disk not formatted ×Warning 1
Unformat.
Fig. 6-7 Hard disk unformatted Additionally, H will appear at the bottom of the screen. To format the hard disk: 1) Click × to close the window “Warning”.
2) In the window “Startup Wizard”, click “ Next”. The following window will appear: HDD Management Free Time 0s Free/Total 0M/f863ú State Unformat.
No.
fSelect Don‘t show this windlow next time.× Cancel Next Previous Overwrite AutloFormat HDD
Fig. 6-8 Window for the hard disk settings The hard disk installed will be shown; the column “Free / Total” will show the capacity available (here “0” because the disk has not been formatted yet) and the total capacity.
3) Select the hard disk: In the column “Select”, click the line of the disk (see mouse pointer in Fig. 6-8).
4) Click the button “Format HDD”. The window “Login” will appear.
HDD Management Free Time 0s Free/Total 0M/f863ú State Unformat.
No.
fSelect Don‘t show this windlow next time.× Cancel Next Previous Overwrite AutloFormat HDD
User l Iadmin Password LoginCancel Login Fig. 6-9 Window “Login” 5) Click “Login”. The following confirmation window will appear: HDD Management Don‘t show this wi.ndow next time.f Cancel úext Previous Free Time 0s Free/Total 0M/931G
State Unformat.
úo.
1Select Overwrite Aut.oFormat HDD
OKCancel Entire Data Will Be. Erased. Do You Want To Continue?
úotice Fig. 6-10 Window to confirm formatting 6) Click the button “OK”. The status bar will indicate the progress of the formatting process. When formatting has been finished, the following message will appear: HDD Management Don‘t show this wi.ndow next time.f Cancel úext Previous Free Time 920Hour Free/Total 922G/931G
State OK
úo.
1Select Overwrite Aut.oFormat HDD
100%OK
Format Completed úotice Fig. 6-11 Hard disk formatted
40
English 7) Click the button “OK”. The available capacity and the available recording time will be shown. To make further settings, proceed with step 2) in chapter 6.4, or, to terminate the setup, click “Cancel” and then click “OK” when the message “Are you sure you want to cancel Startup Wizard?” appears.
6.3 Status at first switch-on 1. Continuous recording of all channels to which a camera is connected will start immediately, indicated by the symbol R (Record) in the camera image.
2. If there are channels to which no camera is connected, an alarm signal will sound for 10 seconds (automatic recognition of missing video signal).
3. When the hard disk is full, the oldest recordings will be automatically overwritten (continuous recording).
4. The motion detection feature is switched on: When a change of the image contents is recognized, the symbol M (Motion) will appear and an entry in the event list will be made (date, time, camera channel).
5. The date and the time are not correct.
IMPORTANT: Make sure to update the date and the time (chapter 6.4 or chapter 6.5). Otherwise, it will not be possible to find recordings made at a specific point in time.
6.4 Startup Wizard When the recorder is equipped with a formatted hard disk, the “Startup Wizard” will be called up after switch-on (☞ Fig. 6-1). The wizard will guide you through the required settings to be made.
Note: If the wizard fails to appear: 1) Press the right mouse button to show the toolbar: Fig. 6-12
2) Click the symbol “Main Menu”.
3) In the main menu, click “System” in the upper bar.
4) In the last line “Show wizard”, tick-select the corresponding field.
5) Click “Save” in the lower right of the menu. The message “Save Parameters Successful” will appear. Click “OK” to close it.
6) In the main menu, click “Shutdown” in the upper bar. A new window will appear; click “Reboot”. After the restart, the “Startup Wizard” will appear.
If you do not want to use the wizard, click “Cancel”. You will be asked if you want to terminate the wizard. Click “OK” to confirm. For configuration of the recorder, please refer to chapter 6.5 (next double page) which provides an overview of all menus.
1) To configure the recorder with the wizard, click “Next”.
The menu for setting the hard disk will appear: HDD Management Don‘t show this wi.ndow next time.f Cancel úext Previous Free Time 210Hour Free/Total 923G/931G
State OK
úo.
1Select Overwrite Aut.oFormat HDD
Fig. 6-13 Settings for the hard disk 2) The line at the top of the menu provides information with regard to the hard disk. To set the overwrite mode, open the pop-up menu: Click the symbol .
Heading No.Number of the hard disk StateHard disk okay or unformatted Free / TotalAvailable / total hard disk capacity Free TimeRecording time still available (in hours) SelectColumn to select the hard disk to be formatted Settings and functions Overwrite Auto (factory setting)When the hard disk is full, the oldest recordings will be overwritten and deleted.
OFFNo recordings will be overwritten and deleted.
When the hard disk is full, the message “Warning Full” will appear and it will not be possible to make any further recordings.
1 Day 3 Days ⋮ 90 DaysRecordings can be overwritten after the storage time selected. When the hard disk is full earlier, it will not be possible to make any further recordings.
Format HDDButton to format the hard disk selected in the column “Select” 3) When the hard disk settings have been made, click “Next”.
The menu for the network settings will appear.
Network Congurati0on PPPoE
Client Port 0f000
IP Addreúú1f2.168.001.100
Subnet Maúke255.255.255.000
Gateway1f2.168.001.100
DNS11f2.168.001.100
DNS2 008.008.008.008HTTP Port 00080
3G
Static DHCP
Don‘t úhow thiú win0dow next time.× Cancel Next Previouú UPNP Diúable Fig. 6-14 Network settings 4) If the recorder is not connected to a network, click “Next” to go to the next menu and then continue with step 5.
For the network connection, the static setting is recommended. The following setting options are available: Settings PPPoE
Point-to-Point Protocol over Ethernet (for DSL modems, hardly used anymore)With the option PPPoE, enter the user name and the password supplied by the Internet service provider and set the client port as well as the HTTP port. It will then be possible to remotely access the recorder via the IP address captured after a domain name and the HTTP
port have been registered.
DHCP
Dynamic Host Configuration Protocol (factory setting)With the option DHCP, the router will automatically assign an IP address to the recorder.
However, the IP address assigned can be different with each restart. Consequently, port forwarding is required for remote access to the recorder (set UPNP to “Enable”).
Static (recommended setting)With the option “Static”, enter the correct IP
address, subnet mask, gateway and DNS.
3G
mobile phone systemThis option is available for older mobile phones and is hardly used anymore.
UPNP
Universal Plug and PlayWhen the router supports the UPnP function and when UPNP has been set to “Enable”, the recorder will automatically send the port numbers to the router. For the recommended setting “Static”, the factory setting “Disable” should be used.
41
English When the network has been configured, click “Next”.
5) The menu for adding IP cameras will appear: IPC Setup Don‘t show this wixndow next tife.× Canúel Next Previous Channel IP CH1
IP CH2
IP CH3
IP CH4
IP CH5
IP CH6Edit State Port M
IP Adress/Dofain Subnet Maske Auto Assign IP to xCafera(s)Channel DeleteAdd All User-dened Add Total band width:8Mbxps, used band widthx:0bps Fig. 6-15 Adding IP cameras When no IP camera is available, click “Next” to go to the next menu and continue with step 7.
IP cameras can only be added when they have been connected to the network (see instruction manual of the camera). For adding IP cameras, the following options are available: ButtonFunction IP CH… Click the plus symbol to assign a specific IP camera to a camera channel. The window “Quick Add” will appear. Click “Search” to show all cameras available in the network. Click the camera desired to select it and then click “Add”.
Auto Assign IP
to Camera(s)Automatic assignment Channel DeleteTo remove a camera (click to select the entire line of the camera) Add AllTo add cameras to all IP camera channels available User-defined AddUser-defined adding of cameras In addition to analog cameras, 2 IP cameras (with recorder AXR-104) 4 IP cameras (with recorder AXR-108) 8 IP cameras (with recorder AXR-116) can be used. When a channel for an analog camera is switched off, an additional IP camera can be used instead.
When the IP cameras have been added, click “Next”.
6) The menu for automatic recording will appear. According to the factory settings, all camera channels to which a camera is connected, will record from 00:00 – 24:00.
020181614121022
2468
Record Schedule Donft show thús wúndow nnext túme.× Cancel Next Prevúous CopyTo CH1
Channel NormalMotúonAlarm CH1
AllCopy Sunday Monday Tuesday Wednesday Thursday Friday SaturdayS
M
T
W
T
F
S
Fig. 6-16 Weekly schedule for recordings To change the settings: a) After “Channel”, a camera channel is selected (here: channel 1). To change the recording time for a different channel, click the symbol .
b) To delete recording times, keep the left mouse button pressed and move the mouse pointer over the time range desired. Individual half-hour blocks can be deleted by a simple click.
c) Proceed in the same way to add times that have been deleted.
d) To automatically start recording when a motion is detected and/or an alarm is triggered, first click the yellow ellipse “Motion” or the red ellipse “Alarm”. Then keep the left mouse button pressed and move the mouse pointer over the time range desired.
e) To use the setting for other camera channels as well, make the appropriate selection in the line “Copy CH … To All” at the bottom of the menu and then click “Copy”.
f) If required, the recorder can be easily reset to its factory settings (chapter 7.10).
When the settings have been made, click “Next”.
7) A menu for date, time, menu language and other basic settings will appear: 30
System General ConDguration Donft show this windoDw neút time.× Cancel Save Previous Date02/18/2017Time16:37:47Date FormatMM/DD/YYTime Format24HourLanguageENGLISHVideo FormatPALMenu Timeouts1MinModeXVR
Fig. 6-17 Basic system settings Menu itemNote DateAlways make sure to update the date and the time so that it will be possible to search recordings in specific time ranges.
Time Date Format — Time Format24-hour format or 12-hour format LanguageTo select one of the 17 menu languages available Video FormatColour format of the analog cameras connected: PAL (Europe) or NTSC (USA, Asia) Menu TimeoutsWhen there is no user input or user action, the menu will automatically disappear after 30 seconds, 1, 2, 5 or 10 minutes OFF = The menu will be shown until it is saved or cancelled.
Mode DVR = Basic mode when the recorder is not to be connected to a network: The network menus will not be displayed.
XVR = Advanced mode with all network menus.
8) When the settings have been made, click the field “Don’t show this window next time” at the bottom of the menu to make sure that the wizard will not be called up with the next switch-on. Then click “Save” to save the settings.
9) The message “Wizard Complete !” will appear. Click “OK” to confirm.
OKWizard Complete !
Fig. 6-18 Message “Wizard Complete !“ 10) The most important settings for operating the recorder have now been made. However, if it is possible to access the recorder via the Internet, make sure to enable the password protection feature and to change the password (see chapter 6.6).
11) Finally, reboot the recorder so that all changes will take effect (Menu Shutdown Reboot).
42
English 6.5 All menus at a glance
43
English
44
English 6.6 Enabling password protection, changing passwords and defining user rights According to the factory settings, access to the recorder is not protected. The predefined password “admin” is not enabled, i.e. it must not be entered to make any changes to the settings.
When the recorder is connected to a network, always make sure to enable the password protection feature and to change the password (also see chapter 2 “Important Data Security Notes”) 1) Call up the main menu, select the menu “System” and there, on the left side, click the submenu “Users”.
i General Edit Cancel ParameterRecord Searchfevice System údvanced Shutdown Info Log Users No.
1
2
3
4
5
6
7User Name admifuser1
user2
user3
user4
user5
user6Leveú ADMINUSER1
USER2
USER3
USER4
USER5
USER6Efabúe Efabúe Disabúe Disabúe Disabúe Disabúe Disabúe Disabúe Fig. 6-19 Menu for passwords and user groups 2) Line number 1 for the administrator password is selected.
To change the password and to enable the password protection feature, click the button “Edit”.
User Edit User Name User Name adminadmin Disable Password Enable Password fonrm Defaultúavefancel Fig. 6-20 Window to change passwords 3) Change the user name “admin”, if desired.
4) Set the line “Password Enable” to “Enable”: The user lock will be activated after 2 minutes when no menu is displayed and the recorder is not operated.
5) In the line “Password”, enter a new password with a length of at least 8 characters. Re-enter the password in the line “Confirm”.
Important: For remote recorder control and access via the network, the password must consist of exactly 8 characters. It is possible to enter more characters; this password, however, will be regarded as invalid by the software for remote access.
6) To save the new password, click “Save”. When the password has been successfully saved, a corresponding message will appear; click “OK” to confirm.
7) To define user rights, first assign a user name and a password to each user as described above.
8) When a line for a user has been selected, the button “Permission” will additionally appear at the bottom of the menu. Click the button to define the user rights.
User Permission Backup Analog fhannels IP fhannels Parameter úog SearchMaintainManuel Record Disk Manage Remote úogin SEQ fontrol Manual fapture User Name user1
All flear Save fancel 1234123456
úiveAnalog fhannels IP fhannels 1234123456
PlaybackAnalog fhannels IP fhannels 1234123456
PTZAnalog fhannels IP fhannels 1234123456
Fig. 6-21 Menu for the user rights Define the rights of the user selected and save them. If applicable, repeat this procedure for any additional users.
9) To exit the menu, click “Cancel” or wait for the menu to disappear after the time defined.
6.7 Configuring alarm inputs When alarm sensors such as motion detectors or photoelectric sensors are connected to the contacts SENSOR (27), configure the alarm inputs by means of the menu “Parameter”, submenu “Alarm”, section “Alarm”.
i 11234
23456
Display AlarmRecord Network fave Cancel úarameter Record fearch Device fystem Advancefhutdown Default Alarm InIO-1Alarm TypfNormally-OpfnLaúch Timfr10 sBuzzfrPosú RfcordingAlarm OuúShow MfssagfFull Scrffn Sfnd Email OFF
30 s CopyTo IO-1All Copy Rfcord Channfl Analog Channfls IP ChannflsMotionCapture Alarm Fig. 6-22 Menu for the alarm inputs Menu item Function Alarm InTo select the alarm input Alarm TypeTo select the contact type Normally-Open Normally-Close OFF = input signal will not be evaluated Latch TimeTime the symbol I will appear in the live image and time the camera image will be displayed in full-screen mode BuzzerDuration of the alarm sound Post RecordingDuration of an alarm-triggered recording Alarm OutThe alarm will be routed to the output ALARM (27) Show MessageIn the live image, an alarm will be indicated by the symbol I
Send EmailIn case of an alarm, an e-mail will be sent; for the e-mail settings, refer to menu “Parameter”, submenu “Network”, section “Email” Full ScreenThe corresponding channel will be displayed in the full-screen mode CopyTo use the settings of an alarm input for additional inputs DefaultReset to factory settings SaveTo save the setting CancelTo exit the menu
45
English 6.8 Activating / Deactivating signal sounds Forwarding events to the alarm output When the following events occur, the internal alarm buzzer may sound and the alarm relay may respond [output ALARM
(27), can be loaded with 30 V (⎓), 1 A]. The duration of the alarm sound and the response of the relay can be set via the corresponding menus and the menu items “Buzzer” and “Alarm Out”.
EventMenu path Alarm triggered via the inputs SENSOR (27)Parameter Alarm Alarm Motion in the imageParameter Alarm Motion Disk fullAdvance Events Event Type: No Space on Disk Write error on diskAdvance Events Event Type: Disk Error Video signal interruptedAdvance Events Event Type: Video Loss 6.9 Settings for live surveillance: Camera name, image, time display Call up the menu “Parameter”, click the submenu “Display” and then click the section “Live”.
i Display OutputRecord Network fP Cúannels Privacy Zone DefaultChannelCH1Channel NameCH1Show NameEnableRecorf Time OSú Position ColorEnable CovertúisableShow TimeEnable CopyTo CH1All Copy Setup Setup Save Cancel Parameter Record Searcú Device System Advance Súutdown fmage Control Live Capture Alarm Analog Cúannels Fig. 6-23 Menu for live surveillance Menu item Function ChannelTo select the camera channel Channel NameTo enter the channel name Show NameTo show the camera name Record TimeTo show the date and the time of the recording during replay OSD PositionTo move the position of the camera name and the time display (with left mouse button pressed; to terminate the setting: press right mouse button) ColorTo call up a window for making image settings (colour, brightness, etc.) CovertThe camera image will not be shown during live surveillance Show TimeTo show the time CopyTo use the settings of a camera channel for additional channels DefaultReset to factory settings SaveTo save the setting CancelTo exit the menu 6.10 Masking image areas It is possible to mask specific areas of the image that shall not be visible (e. g. public ways or places): In each camera image, four different black squares can be placed. Call up the menu “Parameter”, click the submenu “Display” and then click the section “Privacy Zone”.
i Display OutputRecord Network fave Cancel úarameter Record fearch Device fystem Advanced fhutdown Iú Channels úrivacy Zone Default ChannelCH1Mask AreaDisableArea Setfp1 2 3 ú Mask Area CopyTo CH1AllCopy Setfp Analog Channels Live Image Control Alarm Fig. 6-24 Menu to mask image areas Menu itemFunction ChannelTo select the camera channel Mask AreaSet to “Enable” to define the areas to be masked Area SetupTo define a mask, click the appropriate number Mask Area 1. Click Setup to switch to the camera image selected.
2. To move a mask: with the mouse pointer in the centre of the mask, keep the left mouse button pressed.
3. To change the size: with the mouse pointer at the lower right mask corner, keep the left mouse button pressed.
4. To go back to the menu: click the camera image with the right mouse button.
CopyTo use the settings of a camera channel for additional channels DefaultReset to factory settings SaveTo save the setting CancelTo exit the menu 6.11 Setting the motion detection feature According to the factory settings, the motion detection feature is enabled for each camera channel and set in such a way that it is sensitive to motions in the entire image area. When there is a motion in the image, the symbol M (Motion) will be inserted. The symbol will disappear after 10 seconds when there is no further motion.
Call up the menu “Parameter”, click the submenu “Alarm” and then click the section “Motion”.
i 11234
23456
Display AlarmRecord Network Default ChannelCH1Enable Buzzer fatch úimeEnableDisable 10 sSensitivity4Area Post Recording Alarm Out Show MessageFull Screen Send Email30 s Copyúo CH-1All Copy Setup Record Channel Analog Channels IP Channels Save úancel Parameter Record Search Device System Advance Shutdown Motion úapture Alarm Lorem ipsum Fig. 6-25 Menu for the motion detection feature Menu item Function ChannelTo select the camera channel EnableTo enable/disable the motion detection feature BuzzerThe alarm buzzer will sound when a motion is detected SensitivitySensitivity of the motion detection feature
46
English Menu itemFunction Area 1. Click Setup to exclude specific detection fields for the motion detection feature.
2. The motion-sensitive fields are marked in red. To deactivate multiple fields, keep the left mouse button pressed and move the mouse pointer over the respective fields.
3. It is possible to directly click individual fields.
4. The same procedure can be used to reactivate fields.
5. To go back to the menu, click the right mouse button in the camera image.
Post RecordingDuration of a recording that has been started via the motion detection feature Latch TimeDuration of the alarm ( M inserted, alarm sound, alarm relay will respond) Alarm OutWhen an alarm is detected, the alarm relay will respond (output ALARM, chapter 5.4) Show MessageA detected motion will be indicated by the symbol M (Motion) Send EmailWhen a motion is detected, an e-mail will be automatically sent provided that the required specifications have been made in the menu “Parameter”, submenu “Network”, section “Email”.
Full ScreenWhen a motion is detected, the corresponding camera image will be displayed in the full-screen mode.
Record ChannelSpecification of the channels that are to be recorded when a motion is detected (it is possible to record multiple channels even when the motion has been detected in one channel only).
The times of a motion-triggered recording must be entered in the record schedule (menu “Parameter”, submenu “Record”, section “Record schedule”; click the yellow, round-shaped selection field “Motion” and, with the left mouse button pressed, move the mouse pointer over the days/hours).
CopyTo use the settings of a camera channel for additional channels DefaultReset to factory settings SaveTo save the setting CancelTo exit the menu 6.12 Remote control of cameras (PTZ) For remote control of the cameras connected to the RS-485
interface (27), make the required settings at the recorder. Call up the menu “Device” and click the submenu “PTZ”.
i HDD
Save DefaultCancel Parameter RecordfSearchDeviceSyútem AdvanceShutdown Cloud ChannelCH1ProtocolPelco-DBaudrate9f00DateBit8útopBit1ParityNoneCruiseEnableAddress001
Copy To CH1AllCopy PTZ
Fig. 6-26 Menu to set the remote control of cameras Menu itemFunction ChannelTo select the camera channel ProtocolTo select the control protocol of the camera BaudrateTo select the data transmission rate DataBitNumber of data bits StopBitNumber of stop bits ParityType of parity bit: None, Odd, Even, Mark (always 1), Space (always 0) Menu item Function CruiseTo enable or disable the camera cruise feature AddressAddress of the camera for independent control of all cameras connected CopyTo use the settings of a camera channel for additional channels DefaultReset to factory settings SaveTo save the setting CancelTo exit the menu Please refer to the specifications of the camera for the settings concerning protocol, baud rate, data bit, stop bit and address.
6.13 Enabling the snapshot feature The snapshot feature allows you to save camera snapshots manually and in a time-controlled manner. Call up the menu “Parameter” and then click the submenu “Capture”.
i Bewegung Display Capture Capture ScheduleRecord fetwork Save Caúcel Parameter Record Search Device System Advaúce Shutdowú Default ChannelCH1Auto CaptureAUfftream ModeMaúnstreamNormal IntervalAlarm Interval Manual Capture5 s5 s Dúsable CopyTo CH1All Copy Alarm Capture Fig. 6-27 Menu to enable the snapshot feature Menu itemFunction ChannelTo select the camera channel Auto CaptureTo enable time-controlled snapshots (set the recording times in the section “Capture Schedule”) Stream Mode“Mainstream” = high resolution, high data volume “Substream”= lower resolution, lower data volume Normal IntervalIntervals between recordings in normal mode Alarm IntervalIntervals between recordings in case of an alarm Manual CaptureTo enable manual snapshots (see chapter 7.6.2 on how to take snapshots) CopyTo use the settings of a camera channel for additional channels DefaultReset to factory settings SaveTo save the setting CancelTo exit the menu To define the times at which snapshots are to be taken automatically, click the section “Capture Schedule”: i Bewegung 020181614121022
2468Display Capture Capture ScheduleRecord fetwork Save Caúcel Parameter Record Search Device System Advaúce Shutdowú Default CopyTo CH1AffCopy ChannefNoúmafMotionAfaúm CH1
Sunday Monday Tuesday Wednesday Thursday Friday SaturdayCapture AlarmM S
W T
T
F
S
Fig. 6-28 Schedule for time-controlled snapshots 1) After “Channel”, a camera channel is selected (here: channel 1). To change the recording time of a different channel, click the symbol .
47
English 2) To set the recording times, keep the left mouse button pressed and move the mouse pointer over the time range desired. Individual half-hour blocks can be selected by a simple click.
3) Proceed in the same way to delete recording times.
4) To automatically save recordings when a motion is detected and/or an alarm is triggered, first click the yellow ellipse “Motion” or the red ellipse “Alarm”. Then keep the left mouse button pressed and move the mouse pointer over the time range desired.
5) To use the setting for other camera channels as well, make the appropriate selection in the line “Copy CH … To All” at the bottom of the menu and then click “Copy”.
6) To save the setting, click “Save”; to delete all times, click “Default”; to exit the menu, click “Cancel”.
6.13.1 Cloud storage for snapshots When a recorder is stolen or damaged, all recordings will be lost. However, it is possible to automatically save snapshots to a cloud (storage space on an external server) provided that the recorder is connected to the Internet. The images can then be called up via a protected access to the cloud: 1) Sign up to the “Dropbox” website: https://www.dropbox.com 2) Call up the menu “Device” and then click the submenu “Cloud”.
1234123456
i HDD
Save DefaultCancel Parameter RecordfSearchDeviceSyútem Advanced Shutdown Cloud Cloud Storage Dfsable Cloud TúpeDROPBOX
Tfme trfgger1 Mfn Motfon DetectfonDfsable Drfver NameDevfce Actfvate CloudUpgrade Cloud StorDageAdvanced E-mafl SetDup PTZ
Channel Analog Channels IP Channels Fig. 6-29 Menu to save images to a cloud 3) In the submenu “Cloud”, make the settings required.
Menu itemFunction Cloud Storage To enable /disable the cloud function Cloud TypeCurrently, it is only possible to save to “Dropbox” ChannelTo select the channels whose images are to be saved to the cloud Time TriggerTime intervals between recordings in normal mode Motion DetectionTo save (additional) recordings when a motion is detected Driver NameTo define the name under which the images are to be saved to the cloud Activate CloudTo activate the cloud function, click here Advanced E-mail SetupIf you want to receive an e-mail when images are saved to the cloud, click this button and then, in the window that will appear, enter the required information.
DefaultReset to factory settings SaveTo save the setting CancelTo exit the menu 6.14 Saving and loading different configurations It is possible to save different recorder configurations for different users or fields of applications (e. g. to a USB flash drive) and to retrieve them when required.
1) Connect an external storage device (flash drive/hard disk) to one of the two USB ports of the recorder.
2) Configure the recorder as desired.
3) Call up the menu “Advanced”; the submenu “Maintain” will appear: i Maintain Save DefaultCancel Parameter Recorf Search Device SyútemAfvancefShutfown Default UseradminAuto RebootfnableRebootfvery Weeú Sun.00:00Update Load Settings IPC Load DefaultLoad DefaultSave SettingsReboot IPCIPC Upgrade Eventú Fig. 6-30 Menu “Advanced”, submenu “Maintain” 4) Click “Save Settings”. The window “Save Settings” will appear. Make the settings for saving and click “OK”. The name “DEVICE_Settings” will be assigned to the configuration file.
5) If you have more than one configuration, save the configurations to different folders to make sure that a recorder configuration already saved will not be overwritten.
6) To load a configuration, click “Load Settings”.
6.15 Tips TipMenu path To automatically set the recorder for daylight saving timeSystem General DST
To automatically set the time via the networkSystem General NTP
To restrict motion detectionParameter Alarm Motion To automatically send an e-mail in case of an alarmParameter Network Email To switch off channels where no camera is connected For each switched-off channel of an analog camera, an additional IP camera can be usedParameter Display Analog Channels When no recorder is connected to a network, to disable the network menus in order to obtain a simpler user interfaceSystem General General: Mode = DVR
48
English 7 Operation The most comfortable way to operate the recorder is using the mouse. Therefore, these instructions do not focus on operation by means of a remote control or directly at the recorder.
Switch on the recorder with the rocker switch (30) located on the rear of the unit. After a few seconds, the MONACOR logo will appear on the monitor connected: Then the camera images for live surveillance (chapter 7.3) will appear. The internal alarm signal device will sound five times to indicate correct operation. In case of a failure or alarm, refer to chapter 8.
7.1 User lock With the password protection feature enabled for the recorder (chapter 6.6), the recorder will be automatically locked after approx. 2 minutes when the recorder is not operated. This will protect the recorder against unauthorized access and will be indicated by the lock symbol in the toolbar.
1) Show the toolbar: Press the right mouse button or move the mouse pointer to the centre of the lower edge of the screen.
Fig. 7-1 Toolbar 2) To activate the lock earlier (before the 2 minutes have elapsed), click the lock symbol.
3) When a function (e. g. the main menu) is called up while the lock is activated, the window “Login” will appear: LoginCancel Login User I adminDevice ID ffffff I ( ffffff ) Passúord Fig. 7-2 Window to disable the lock 4) Click the field “Password” highlighted by a blue border.
A window with a keyboard will appear. Use the keyboard to enter the password and then click “Login”.
7.2 User change When multiple user accounts have been created for the recorder, each new user must log in with their password to be able to operate the recorder with the user rights they have been assigned: 1) Show the toolbar (Fig. 7-1): Press the right mouse button or move the mouse pointer to the centre of the lower edge of the screen.
2) The lock symbol should be closed. If the lock is open, click the lock with the left mouse button to close it.
3) Click the closed lock symbol: The window “Login” will appear (Fig. 7-2).
4) Click the field “User” highlighted by a blue border. A window with a keyboard will appear.
5) First use the button “Backspace” to delete the previous user name in the keyboard window. Then enter the new name via the keyboard window.
6) Proceed in the same way to enter the password, and then click “enter”.
7) Finally, click “Login”.
When the password protection feature is not enabled, it will suffice to click “Login”.
7.3 Live surveillance When the recorder is switched on, the camera images will be shown in the live view: MR
MR
T-CH1
CH4
T-CH2
CH3
VIDEO LOSS
VIDEO LOSSNf CameúaNf Cameúa 12/15/2016 09:53:N46
Fig. 7-3 Live surveillance with AXR-104
CH1CH2
CH5CH6
CH3
CH8CH7
CH412/15/2016 13:45:O37
VIDEO fOSSVIDEO fOSSVIDEO fOSSVIDEO fOSS
No CúmerúNo CúmerúNo CúmerúNo Cúmerú Fig. 7-4 Live surveillance with AXR-108
CH1
CH6
CH11
CH7
CH12
CH8
CH13
CH9
CH14
CH10
CH15
CH16
CH2CH3CH4CH512/15/2016 13:45:E37
VIDEf LfSSVIDEf LfSSVIDEf LfSSVIDEf LfSS
Nú CameraVIDEf LfSS
Nú CameraNú CameraNú CameraNú Camera Nú CameraNú CameraNú CameraNú Camera VIDEf LfSS
VIDEf LfSSVIDEf LfSSVIDEf LfSS
Fig. 7-5 Live surveillance with AXR-116
49
English According to the factory settings, each camera image is designated by the name “CH-“ and the number of the channel. If required, the names can be changed, e. g. to “Stockroom”, “Entrance”, “Checkout area” etc. (see chapter 6.9).
A prefix, indicating the camera type, is added to the name: PrefixCamera type NoneAnalog camera with CVBS signal AAHD camera (Analog High Definition) C-CVI camera (Composite Video Interface) T-TVI camera (Transport Video Interface) The live surveillance will not have any influence on the current recording (indicated by the symbol R in the camera image). It is possible to enlarge individual camera images or a selection of images.
DisplayAction Individual image in full-screen modeWith the left mouse button: Double-click the image desired.
At the recorder or with the remote control: Press the corresponding numeric key 1 … 9 or the button CH– / CH+ (AXR-104, AXR-108); channels 10 … 16: Button 1 and button 0 … 6
Return to the display of all camera imagesWith the left mouse button: Double-click the full-screen display.
At the recorder or with the remote control: Press the button ALL (repeatedly) or the button (AXR-116).
Different numbers of camera imagesWith the mouse: Press the right mouse button to show the toolbar. Then select the view: Symbol ImagesAXR-104AXR-108AXR-116
4 9— 12— 16—— 25—— Additional layouts Click the layout symbol repeatedly to switch to additional camera channels.
At the recorder or on the remote control: Press the button ALL (repeatedly) or the button (AXR-116).
Sequence of all full-screen imagesUse the mouse to click the symbol “Start SEQ” in the toolbar. For setting the dwell time, refer to the figures in the following chapter. To terminate the sequence, click the symbol again.
7.3.1 Setting dwell time and display for image sequence The dwell time is factory-set to 5 seconds. To change the dwell time: 1) Call up the main menu. Either press the button MENU at the recorder/on the remote control or with the mouse: Show the toolbar: Press the right mouse button or move the mouse pointer to the centre of the lower edge of the screen.
Fig. 7-6 Toolbar and click the symbol “Main Menu”.
i Analog Channels Display OutputRecord Network fave Cancel úarameterRecord fearch Device fystem Advanced fhutdown Channel CH1
CH2
CH3
CH4Channel Name CH1
CH2
CH3
CH4Sfafe Enable Enable Enable Enable Iú Channels úrivacy ZoneAnalog Channels Live Image Control Capture Alarm CH1 CH2 CH3 CH4
Fig. 7-7 Main menu 2) The submenu “Display” in the menu “Parameter” will be selected. In the submenu, click “Output” (without any symbol) to the left.
0
i Display OutputRecord Network fP Cúannels Privacy ZoneVideo OutputLIVE-OUTSeq fodeLayout1SEú Dwell Time5VGA/HDfI Resolution Transparency Support Overscan1280x1024
Save DefaultCancel Parameter Record Searcú Device System Advance Súutdown Analog Cúannels Live fmage Control Capture Alarm Fig. 7-8 Menu “Parameter”, submenu “Display”, section “Output” 3) In the line “Seq Mode”, it is possible to switch from single-image mode (Layout1) to multi-image mode: Click the symbol to the right of the line.
4) To change the dwell time, click the field with the number “5” in the line “SEQ Dwell Time” and then enter the time in seconds.
5) To save the setting, click “Save”. The message “Save Parameters Successful !” will appear. Click “OK”.
6) Click “Cancel” to exit the menu window.
7.3.2 Magnifying an image section 1) Using the left mouse button, click the live image in which you want to magnify an image section. (In the single- image mode, simply press the left mouse button.) The quick-selection bar will appear: Fig. 7-9 Quick-selection bar for each camera image 2) Click the magnifier symbol . When in the multi-image mode, the display will change to the full-screen mode.
A magnifier symbol will appear; use this symbol to draw a rectangle that will define the section to be magnified.
3) To go back to the normal full-screen mode, press the left mouse button. The zoom function will remain active: It is possible to magnify another image section.
4) To disable the zoom function, press the right mouse button.
Then, with a double click of the left mouse button, it will be possible to return to the multi-image mode.
50
English 7.3.3 Sound reproduction Only the sound of the camera channel displayed in full-screen mode, or, in the multi-image mode, only the sound of the image highlighted by a blue border (to be selected with the left mouse button) will be reproduced.
1) To adjust the volume, show the toolbar (Fig. 7-10) with the right mouse button.
2) Click the speaker symbol . A volume control (slider) will appear.
3) Keep the left mouse button pressed and adjust the volume with the slider.
4) To mute the sound, click the speaker symbol located directly beneath the slider. Proceed in the same way to unmute the sound.
To mute and unmute the sound, the button MUTE at the recorder or on the remote control may be used as well. Please note that the volume control (slider) must not be shown.
7.4 Operating bars – fast access to settings and functions For fast access to the setting menus and the most important functions, the toolbar (click the right mouse button to show it) is available; for each camera, the quick-access bar (click the desired camera image with the left mouse button) is provided.
Fig. 7-10 Toolbar SymbolFunction To call up the main menu; the following will be selected: menu “Parameter” submenu “Display” section “Analog Channels” The lock symbol will only be available when the password feature has been enabled (chapter 6.6).
When the lock is opened, click the lock symbol to enable the password protection feature (chapter 7.1) When the lock is closed, the password protection feature is enabled, click the lock symbol to open the window for changing the user (chapter 7.2).
View with four camera images The recorders AXR-108 and AXR-116 provide additional symbols for a view with 9, 12, (16), (25) images.
View with camera images of different sizes Stream switch for the camera image highlighted by a blue border: “Mainstream” = high resolution, high data volumes “Substream” = low resolution, low data volumes The “Preview Policy” defines the priorities to be applied when system utilization has reached 100% Realtime = highest frame rate possible, lower image quality Balanced = medium frame rate, medium image quality Smooth = highest image quality possible, fewer frames per second To start / stop the image sequence (chapter 7.3) To adjust the volume; to mute and unmute the sound (chapter 7.3.3) To open the menu for record search (chapter 7.7.2) Fig. 7-11 Quick-selection bar with separate functions for each camera image SymbolFunction To save a snapshot (chapter 7.6.2) To start or stop recording manually (chapter 7.6) To replay the most recent 5 minutes recorded (chapter 7.7.1) To magnify an image section (chapter 7.3.2) To adjust colour, brightness and contrast (chapter 7.5) To call up the control menu for a PTZ camera (chapter 7.8) 7.5 Adjusting colour, brightness, contrast of the live images 1) Use the left mouse button to click the live image to be adjusted. (In the single-image mode, simply press the left mouse button.) The quick-selection bar will appear (Fig. 7-11).
2) Click the colour palette symbol . The live image will be displayed in the single-image mode and the menu for the image settings will appear: 125130132100
Color Channel HUECH1
BRIfHT
CONTRúST
SúTURúTION
DefaultSaveCancel Fig. 7-12 Menu for the image settings Menu itemFunction ChannelTo switch to a different camera channel HUETo adjust the hue BRIGHTTo adjust the brightness CONTRASTTo adjust the contrast SATURATIONTo adjust the saturation DefaultReset to factory settings SaveTo save the settings CancelTo exit the menu 3) To go back to the previous view after the menu was exited, double-click with the left mouse button.
7.6 Recordings According to the factory settings, the recorder will, after it is switched on, record all channels to which a camera is connected. When this setting has been changed (menu “Parameter”, submenu “Record”, section “Record Schedule”), recording can be manually started for a channel that is not automatically recorded.
1) Use the left mouse button to click the live image to be recorded. (In the single-image mode, simply press the left mouse button.) The quick-selection bar will appear (Fig. 7-11).
2) Click the camera symbol . Recording will start shortly afterwards and the symbol R (Record) will be shown.
3) To stop recording, click the symbol again.
As an alternative, use the button at the recorder or on the remote control to start recording, and the button ■ to stop recording. In the multi-image mode, the camera whose image is highlighted by a blue border will be recorded. If required, before recording is started, use the numeric keys or the buttons CH– / CH+ to switch to the full-screen mode.
51
English 7.6.1 Changing recording times 1) Call up the main menu; in the menu “Parameter”, select the submenu “Record” and then click the section “Record Schedule”.
i 020181614121022
2468Display Record Record Schedule Mainsfream Subsfream MobilsfreamRecord Nefúork Save Cancel Paramefer Record Search Device SysfemAdvance Shufdoún Defaulf CopyTo CH1AllCopy ChannelNofmalMotúonAlafm CH1
Sunday Monday Tuesday Wednesday Thursday Friday Saturday Capfure Alarm M S
W T
T
F
S
Fig. 7-13 Weekly schedule for recordings According to the factory settings, all camera channels to which a camera is connected will be recorded from 00:00 – 24:00. To change this setting: 2) After “Channel”, a camera channel is selected (here: channel 1). To change the recording time of a different channel, click the symbol .
3) To delete recording times, keep the left mouse button pressed and move the mouse pointer over the time range desired. Individual half-hour blocks can be deleted by a simple click.
4) Proceed in the same way to add recording times you may have deleted.
5) To automatically start recording when a motion is detected and/or an alarm is triggered, first click the yellow ellipse “Motion” or the red ellipse “Alarm”. Then keep the left mouse button pressed and move the mouse pointer over the time range desired.
6) To use the setting for other camera channels as well, make the appropriate selection in the line “Copy CH … To All” at the bottom of the menu and then click “Copy”.
7) To save the times, click “Save”. The message “Save Parameters Successful!” will appear; click “OK”.
8) To exit the recording schedule, click “Cancel”.
7.6.2 Snapshots With the snapshot feature, a snapshot of a camera image can be saved any time, e. g. to capture an important event during live surveillance. The snapshot feature is disabled in the factory settings. Refer to chapter 6.13 on how to enable the snapshot feature. To save a snapshot: 1) Use the left mouse button to click the live image to be recorded. (In the single-image mode, simply press the left mouse button.) The quick-selection bar will appear (Fig. 7-11).
2) Click the snapshot symbol . The snapshot will be saved.
3) To show and export snapshots, see chapter 7.7.3.
7.7 Replaying recordings A current recording will not be interrupted when a recording is being replayed.
7.7.1 Replaying the most recent 5 minutes recorded by a camera 1) Use the left mouse button to click the live camera image whose recording is to be replayed. The quick-selection bar will appear (Fig. 7-11).
2) Click the symbol . The replay of the 5 minutes most recently recorded will start and a control bar will be shown: Fig. 7-14 Replay control bar 3) To stop and continue the replay, use the buttons and II.
4) To view single images one after the other, click the pause symbol II repeatedly.
5) For fast forward or fast reverse, keep the left mouse button pressed and move the replay button forwards or backwards.
6) To stop the replay at any time, click the red ×.
7.7.2 Recording a specific time range and, if required, saving it to an external device To call up the record search calendar, either press the button at the unit / on the remote control or call up the toolbar with the right mouse button (Fig. 7-10) and click the replay symbol on the right of the toolbar.
1234123456
i Playback Channel Analfg Channels IP Channels General Play ú 25 26 27 28 29 30 3112 3 4 5 67
14
21
284
8
9
16 17 18 19 20232425 26 27
30 311 2 3
10 11 12 13
15
22
29M T W T F ú úearch Channel All Jan.2017
útart Time 00:00:00 End Time 23:59:59Type All Picture Events Cancel Parameter RecordfSearch Device Sústem Advance Shutdown Fig. 7-15 Record search calendar When the calendar is called up, the current day will be selected (highlighted in yellow).
The days with recordings will be indicated by an orange triangle.
1) Click the day whose recordings are to be replayed. To go to a different month, click the white arrow < or > before / after the month. To select a different year, click the blue arrow or after the year.
2) The field “Playback Channel” can be used to select and deselect channels. The channels highlighted in blue will be replayed.
3) To define a specific period to be replayed, enter a start time and end time in the fields at the bottom of the menu.
52
English 4) To start the replay, click “Play”.
24h 2h 1h 30m CH2
CH1
00:00:0023:59:59
1702:00
0:0004:0006:0008:0010:0012:0014:0016:0018:0020:0022:0000
Play01/10/2017 07:16:4801/10/2017 07:16:48S
12 3 4 5 67
91011 12 1314
16 17 18 19 2021
23 24 25 26 2728
30 311 2 3 4
25 26 27 28 29 30 31
8
15
22
29M f W f F SJaú.
Playback fype GeúeralSelect2017
Motioú Smart Normal IO Alarm CH1
CH2
CH3
CH4
IP CH1
IP CH2
IP CH3
IP CH4
IP CH5
IP CH6
07:16:48
Fig. 7-16 View for recording replay 5) The recording replay view is clearly arranged and self explanatory. The following table lists the functions most frequently required: SymbolFunctionDisplay (green field in the upper right) ✓ CH..
To show / hide a channel— To hide menus; to show the menus again, move the mouse pointer to the lower edge of the screen and click the symbol again.— * Fast reverse> X 2 … 16
To magnify the image section; previous view: right mouse button— To save a section of a recording externally: 1. Connect an exter nal disk or a USB flash drive to one of the two USB ports.
2. Replay the recording and click the symbol at the beginning and at the end of the desired section.
3. With the second click, a window for saving the video file will appear. Select the video format and click “Save”.
4. Another window will appear; select the storage medium and, if required, a folder and then click “OK”. To close the window, click “Cancel”.
To replay video files, install the program “VideoPlayer… exe” (available on the CD supplied) on a computer.
To mute and unmute the sound; adjust the volume with the control located to the right of the symbol To switch the selected channel (highlighted by a blue border) to the full-screen mode 24h 2h 1h 30mTo select the range for the time scale: 24 hours, 2 hours, 1 hour, 30 minutes *click symbol repeatedly, if required 6) To terminate the replay and to go back to the record search calendar, double-click with the right mouse button or, using the left mouse button, click the red × in the upper right.
7) To search the calendar for a recording that, for example, was triggered by motion detection or via an alarm input, click the symbol in the field “Type” at the top of the menu (default: “All”). A pop-up menu will appear: Select the option desired and click “Search” to the right. The further procedure for selection and replay is identical to steps 1 to 4 described above.
7.7.3 Calling up snapshots 1) Call up the menu “Record Search”: Either press the button at the unit /on the remote control or use the right mouse button to show the toolbar Fig. 7-17 Toolbar and click the replay symbol . The record search calendar will be called up (Fig. 7-15).
2) In the calendar, click “Picture”.
> 30
i ParameterDevice System Advance Shutdofn General Quick BackupSearchDate fhannel0ú/15/ú017
All00:00:00
ú3:59:59
Time–AllType No.1
3Type NIDate 0ú/1ú/ú017
0ú/1ú/ú017Time ú3:38:0ú ú3:51:47Size 378KB
38úKB
PlaybackfhannelfH3
fH1
RecordúSearch Picture Events Cancel Save Fig. 7-18 Window to search snapshots Menu itemFunction DateDate of the search request TimeTime range of the search request ChannelTo select the camera channels TypeReason that triggered the snapshot All, Normal (time-controlled), Alarm, Motion, I O, Manual Search To search for images in the time range selected: The images will be listed in chronological order.
To view an image, click the corresponding date/ time and then click the symbol .
To return from the image to the list, click with the right mouse button.
SaveTo save the selected images (tick-select ✓ the field in front of the corresponding number) to an external hard disk or USB flash drive CancelTo exit the menu
53
English 7.8 Controlling a PTZ camera When one or more cameras are connected that can be remote-controlled (pan, tilt, zoom, focus etc.), they may be conveniently controlled by means of the recorder.
1) Use the left mouse button to click the live image of the camera to be controlled. (In the single-image mode, simply press the left mouse button.) The quick-selection bar will appear: Fig. 7-19 Quick-selection bar 2) Click the symbol . The control window will appear: SPEED
ZOOM
20CH1
+– FOCUS+– IRIS+– Fig. 7-20 Window for PTZ control Menu item SymbolFunction CH…To select the camera channel arrowsTo pan, tilt, to pan and tilt at the same time To enable / disable the automatic panorama pan function SPEED
Pan / Tilt speed To start / stop the camera cruise To call up the window for saving camera positions for the camera cruise feature ZOOMZoom function FOCUSTo adjust the focus IRISTo adjust the iris 3) To exit the control window, click the image with the right mouse button.
7.9 Deleting data When you want to dispose of the recorder or plan to give (e. g. sell or lend) it to a third party, make sure to delete all recordings and passwords: Format the hard disk and reset the recorder to its factory settings. Otherwise, you will pass on your recordings, personal data and passwords with the recorder.
1) Call up the main menu. Either press the button MENU at the recorder/on the remote control or use the mouse: To call up the toolbar, press the right mouse button or move the mouse pointer to the centre of the lower edge of the screen.
Fig. 7-21 Toolbar In the toolbar, click the symbol “Main Menu” to the left.
i Analog Channels Display OutputRecord Network fave Cancel úarameterRecord fearch Device fystem Advanced fhutdown Channel CH1
CH2
CH3
CH4Channel Name CH1
CH2
CH3
CH4Sfafe Enable Enable Enable Enable Iú Channels úrivacy ZoneAnalog Channels Live Image Control Capture Alarm CH1 CH2 CH3 CH4
Fig. 7-22 Main menu 2) In the bar located at the top of the menu, click “Device”.
i HDD
Save DefaultCancel Parameter RecordfSearchDeviceSyútem Advance Shutdown Cloud Free Time202STD
Free/Total 891f/931f State OK
úo.
1*Select Overwrite AutoFormat HDD
PTZ
Fig. 7-23 Menu “Device”, submenu “HDD” 3) Select the hard disk: In the column “Select”, click the row with the hard disk (see mouse pointer in the figure above).
4) Click the button “Format HDD”. The window “Login” will appear: i PTZHDD
Save DefaultCancel Parameter Recfrd SearchDevúceSystem Advanced Shutdfwn Clfud Free Time202Hour Free/Total 891f/931f State Oú No.
1*Select Overwrite AutoFormat HDD
Login User 1 IadminPasswordLoginCancel Fig. 7-24 Window “Login” 5) When a password has been defined, enter the password.
Click “Login”. The following confirmation window will appear: OKCancel Entire Data Will B.e Erased. Df Yfu Want Tf Cfntinueú Nftice Fig. 7-25 Window for confirming formatting 6) Click the button “OK”. A status bar will appear, indicating the formatting progress. When formatting has been completed, the following message will appear: 100%OK
Format Completed Notife Fig. 7-26 Hard disk formatted 7) Click “OK”: The available capacity and the available recording time will be shown.
8) To delete all passwords and other data, reset the recorder (see next chapter).
54
English 7.10 Factory setting (reset) To reset the recorder to its factory settings: 1) Call up the main menu: Either press the button MENU at the recorder/on the remote control or press the right mouse button to call up the toolbar and then click the symbol “Main Menu”.
2) In the bar located at the top of the menu, click “Advanced”.
i Maintain Save DefaultCancel Parameter Recorf Search Device SyútemAfvancefShutfown Default UseradminAuto RebootfnableRebootfvery Weeú Sun.00:00Update Load Settings IPC Load DefaultLoad DefaultSave SettingsReboot IPCIPC Upgrade Eventú Fig. 7-27 Menu “Advanced” 3) Click the field “Load Default”.Load Default Display Record Netfork AlarmDeúice System Adúanced All Clear Saúe Cancel Fig. 7-28 Window “Load Default” 4) A reset to the factory settings can be performed for all or specific setting types. The setting types listed correspond to the menus or submenus with the same name. To select setting types, click the respective fields with the mouse.
Menu item Function (Display etc.)To select a specific setting type AllTo select all setting types ClearTo deselect the setting types selected SaveTo reset the selected setting types to their factory settings CancelTo close the window 7.11 Calling up the event list The recorder saves all events such as loss of camera signal, switch-on and switch-off of the recorder, manual recording, replay of a recording, changes to the menu settings etc.
Call up the menu “System” and then click the submenu “Log”.
3030
> i General Info Log Users Backup Cancel farameter Recorú Search Device System Aúvanceú Shutúown Search Start Date Log Tyfe 02/15/201ú 00:00:00
Start Time End Date 02/16/201úAll23:59:59
End Time Tyfe SystemAlarm Alarm Alarm Alarm StorageAlarm CongTIME
02/15/201ú 11:1ú:54
02/15/201ú 11:1ú:54
02/15/201ú 11:1ú:54
02/15/201ú 11:1ú:54
02/15/201ú 11:1ú:54
02/15/201ú 11:23:0ú 02/15/201ú 11:30:41
02/15/201ú 12:02:36CON.
System StartufVIDEO LOSS
VIDEO LOSS
VIDEO LOSS
VIDEO LOSS
No. 1 Format HDDHandy End ecording Schedule ySettinRECORD
No No No No Yes PlaybackChannelCH1
CH2
CH3
CH4
CH4
Fig. 7-29 Event list after a search request Menu itemFunction Start DateFirst day of the search request End Date End day Start TimeBeginning End TimeEnd Log TypeSelection of an event group: All, System, Config, Alarm, Users, Record, Storage The group is shown in the column “Type”.
Menu item Function SearchTo start a search request BackupTo save the list to a USB flash drive, for example CancelTo close the window To make sure that any tampering with the recorder is shown in the event list, the list will not be deleted when the hard disk is formatted or when the recorder is reset to its factory settings.
7.12 Showing system information Changing device IDs and device names Call up the menu “Device” and click the submenu “Info”. The section “Info” will be selected: i General Info Info Channel Info Record Info Log UsersDevice ID000000Device Name1080P-HY04NDevice TfpeHY-DVRHaúdwaúe VeúsionDM-284Softwaúe VeúsionV7.1.0-20160719IE Client VeúsionV2.0.0.867IP Addúess192.168.1.159MAC Addúess00-23-63-63-FR-A7HDD Volume931GVideo FoúmatPAL
P2P IDRSV160700970782
QR codeP2P ID
fave Cancel Parameúer Record fearch Device fysúem Advanced fhuúdown Fig. 7-30 System information In the line “Device ID”, you can enter a specific identification number, e. g. when multiple r ecorders are to be accessed via a network. The recorders can only be addressed separately when they have different ID numbers.
In the line “Device Name”, a different name can be entered so that it will be easier to distinguish multiple recorders from each other by their name.
Two additional sections provide further information: “Channel Info”: Information with regard to the camera channels “Record Info”: Information with regard to the recording settings If required, refer to the menu overview in chapter 6.5.
7.13 Switching off the recorder Prior to using the POWER switch, shut down the recorder properly. Otherwise, settings or current recordings may be lost.
1) Call up the toolbar: Either press the right mouse button or move the mouse pointer to the centre of the lower edge of the screen.
Fig. 7-31 Toolbar 2) Click the symbol “Main Menu”.
3) Click the symbol “Shutdown” in the upper right of the menu. The following message will appear: Warning Recording was stoplped successfullf, folu can turnoff the power safelf nlow !
Abb. 7-32 Message to inform the user that the recorder can be switched off 4) Switch off the recorder with the rocker switch at the rear.
Note: The power supply unit connected has a low power consumption even when the recorder is switched off. If applicable, switch the power supply unit off by means of a power strip with on/off switch.
55
English 8 Insertions and Error Messages InsertionError H*When “Warning Unformat.” is shown as well: The hard disk is not formatted.
When “Warning Full” is shown as well: The hard disk is full.
To format the hard disk and thus to delete all recordings: Call up the menu “Device”, select the hard disk in the column “Select” and then click “Format HDD”.
To change the overwrite mode so that the oldest recordings can be overwritten: Call up the menu “Device”, select the hard disk in the column “Select” and then change the setting in the field “Overwrite” (e. g. change from OFF to “Auto” or reduce the number of days).
I *An alarm has been triggered via one of the alarm inputs SENSOR (27).
NO HDD*No hard disk installed.
VIDEO LOSS *No video signal available.
M *Motion detected in the camera image.
RThe camera image is being recorded.
* At the same time, the inter nal signal device will sound for the time range defined in the menu “Parameter” or “Advanced” (see chapter 6.8) 9 Remote Surveillance and Remote Access to the Recorder 9.1 Remote surveillance via mobile phone and tablet computer Mobile phones and tablet computers with the operating system “Android” or “IOS” can be used for convenient remote surveillance.
1) Install the app “RXCamView” from the Apple “App Store” or the Google “Play Store”.
HD
Fig. 9-1 App “RXCamView” 2) Start the app.
3) In the toolbar to the left, select “Config” (a) (Fig. 9-2).
4) In the line “Device” located in the upper right of the menu, tap the plus sign (b).
RXCamView Playback Create QR Code Record Image Config HelpLive Config Device Device Alarm Favorites Manual Adding Scan QR Code Online Device (a)(b) (c) Fig. 9-2 Window “Config” / “Device” 5) A pop-up menu will appear. Tap “Manual Adding” (c).
RXCamView Playback RecordImage Config HelpLive ConfigNew Devices Device Name DVR1
Login TypeDevice ID
9000
admin Please enter password Disconnected Please enter the DDNS IDDevice ID
Media Port User Name Password Channels8
Device Alarm Favorites Fig. 9-3 Window “New Devices” 6) “Device ID” should be selected in the line “Login Type”. If required, change the entry from “IP/ DOMAIN” to “Device ID”.
7) Tap the QR code symbol in the line “Device ID”, and then scan the QR code which can be found on the upper side of the recorder or enter the ID number provided on the upper side of the recorder into the line.
8) In the line “Password”, enter the password (no password is factory-set in this line).
9) Finally click the diskette symbol in the line “New Devices” (located at the top of the window) or tap “Save”.
10) For remote surveillance, tap “Live” in the toolbar to the left.
Channel 02
1/1RXCamView Playback RecordImage Confg HelpLive Live DVR1
Channel 01
Channel 02
Channel 03
Channel 04
IP Channel 01
IP Channel 02
IP Channel 03
IP Channel 04
×× Fig. 9-4 Remote surveillance from a smartphone 11) To show the recorder channels, tap the triangle ”>” in the upper left next to the recorder name.
12) To select the number of windows for the recorder channels, tap the symbol in the toolbar at the bottom of the menu.
13) Drag each of the desired channels into a separate window.
The respective camera image will then appear. When multiple recorders are available for surveillance, camera images of different recorders can be viewed in a single view.
14) Further functions can be called up via the other symbols.
15) To call up online help (English), tap “Help”.
56
English 9.2 Remote access via a computer With the program extension “ActiveX”, the computer can be used for remote access to the recorder. The extension is stored on the recorder; it can be installed on the computer via the network (local network / Internet).
1) Make sure that the recorder is switched on and connected to the network.
2) On the computer, open the web browser and enter both the IP address and the web port of the recorder (see recorder menu: Parameter Network Network), e. g.: http://192.186.001.178:00080
When the computer is connected to the network, “ActiveX” will be automatically downloaded and installed.
Note: If the download of “ActiveX” fails, check whether the security settings of your browser or firewall are too high.
3) Once “ActiveX” has been installed, it is possible to enter the IP address of the recorder in the web browser and to access the recorder. First, a login window will appear: Username admin Password Client Port 9000Bitrate Sub stream Language LoginReset Remember Pwd Open All Channels PreviewEnglish User login Fig. 9-5 Login for remote access Menu itemFunction UsernameUser name (factory setting: admin) PasswordPassword (factory setting: no password) Client PortPort number of the recorder; if required, see menu Parameter Network Network BitrateData transmission (factory setting: “Main stream” for Intranet, “Substream” for Internet) LanguageThe menu language is English.
Remember PwdTo save the password Open All Chan-nels PreviewTo open all recorder channels LoginTo establish a connection to the recorder ResetTo delete all settings 4) After login, the view for live surveillance will appear on the monitor: 0 1 2 3 4 5 6 7 8 9 10
11
CH01CH01
CH02
CH03
CH04
IP CH01
IP CH02
IP CH03
IP CH04
IP CH05
IP CH06
125 130 132 100
No Video No VideoNo Video No VideoNo Video No Video CH02
CH03CH04
LivePlaybackRemote SettingLocal SettingsLogout ZOOM
DefaultFOCUS
IRIS
Preset Cruise Fig. 9-6 Live surveillance from a computer Menu item SymbolFunction top of the menu, function area LiveLive surveillance PlaybackTo replay recordings Remote SettingSettings for the recorder Local SettingTo define paths for recordings on the computer LogoutLogout left side of the menu, channel overview To enable or disable the live image To start or stop video recordings on the computer To save a snapshot on the computer bottom of the menu, function symbols To enable / disable all live images To select the previous / next channel group Full screen: To hide all control elements; use the button ESC to show all control elements Live images: original proportions / stretch to fill the frame To show / hide the live-view selection symbols right side of the menu, PTZ control and image settings arrowsTo pan, tilt, to pan and tilt at the same time To enable / disable the automatic panorama pan function Pan / Tilt speed ZOOMZoom function FOCUSTo adjust the focus IRISTo adjust the iris PresetTo save the viewing direction of the camera Cruise To start / stop the camera cruise To adjust the hue To adjust the brightness To adjust the contrast To adjust the colour saturation DefaultTo reset the image to its factory settings To call up a pop-up menu for mainstream / substream selection, click a live image with the right mouse button.
57
English 10 Where to Find Settings and Functions Setting / FunctionMenuSubmenuSection / WindowMenu item A
larm buzzer on / off AdvancedEvents— Buzzer ParameterAlarmMotion Alarm Alarm inputs SENSOR, configureParameterAlarmAlarmvarious menu items Camera name, changeParameterDisplayLiveChannel Name Channels to which no cameras are connected, switch offParameter DisplayAnalog Channels CH … Cloud to save snapshotsDeviceCloud—various menu items Date and time, hideParameterDisplayLiveShow Time Date, setSystemGeneralGeneralDate Daylight saving timeSystemGeneralDSTvarious menu items Dwell time for image sequenceParameterDisplayOutputSEQ Dwell Time E-mail, send automatically in case of an alarmParameterNetworkEmail Email Schedulevarious menu items Event list, call upSystemLog—use “Search” to list events of the time range selected Factory settings, resetAdvancedMaintain—Load Default Files, delete Recordings, delete Full-screen display when motion detected / alarm triggered by input SENSORParameter AlarmMotion AlarmFull Screen Hard disk, formatDeviceHDD—Format HDD
ID number of the recorder, defineSystemInfoInfoDevice ID
Image areas, maskParameterDisplay Private Zonevarious menu items Installation video, view (German only) https ://youtu.be/13P1Y4PiBmk IP camera, add / removeParameterDisplayIP ChannelsIP CH..
Auto Assign IP to Camera(s) Add All User-defined Add Keylock Passwords, enable Menu display timeSystemGeneralGeneralMenu Timeouts Menu languageSystemGeneralGeneralLanguage Menu transparencyParameterDisplayOutputTransparency Motion detection, setParameterAlarmMotionvarious menu items Name of the recorder, changeSystemInfoInfoDevice Name Network menus, disableSystemGeneralGeneralMode: DVR
Passwords, enableSystemUsersEditPassword Enable: Enable Point-to-point ID number, show (also as QR code)SystemInfoInfoP2P ID (at the bottom) PTZ camera control, setDevicePTZ—various menu items Reboot, automatic (daily, weekly, monthly)AdvancedMaintain—Reboot Reboot, manualShutdown—ShutdownReboot Recorder configuration, save / loadAdvancedMaintain—Save Settings / Load Setting Recordings, deleteDeviceHDD—Format HDD
Recordings, replayRecord SearchGeneral—Play Recordings, save externallyRecord SearchGeneral— Play Recording times, changeParameterRecordRecord Schedulevarious menu items ResetAdvancedMaintain—Load Default S
etup wizard, start at switch-on: yes / noSystemGeneralGeneralShow wizard Snapshots, enableParameterCaptureCapture + Schedulevarious menu items Sound for network transmission on / offParameterRecordMainstream Substream MobilestreamAudio Switch-off / ShutdownShutdown —ShutdownShutdown User lock Password, enable User rights, defineSystemUsers—Permission Time and date, hideParameterDisplayLiveShow Time Time, setSystemGeneralGeneralTime = always to be set = very useful
58
English 11 Frequently Asked Questions sorted alphabetically by search terms Audio recording How can I record sound?
The AXR recorders provide audio inputs with line level. For audio recordings, a microphone and a small microphone preamplifier or a small mixer are required.
Configuration example: MPA-102 (microphone preamplifier) and ECM-302B (boundary microphone) Cloud Can I save images to a cloud?
The AXR recorders support alarm uploads to the cloud of the provider DROPBOX. For alarm recordings due to motion detection or I / O alarm, JPEG images can be loaded to the cloud.
Data rate What is the total data rate available for recordings?
ModelAXR-104AXR-108AXR-116
Number of channels for analog cameras4816
Data rate for analog cameras 16 Mbps*32 Mbps*64 Mbps* Additional channels for IP cameras248
Data rate for IP cameras 8 Mbps16 Mbps32 Mbps Total data rate24 Mbps48 Mbps96 Mbps * 4 Mbps per camera When a channel for an analog camera is switched off, an additional IP camera can be used instead.
No image Why is there no image on the monitor connected?
Please check the resolutions supported by your monitor. The resolution at the HDMI monitor output of the recorder is factory-set to 1280 × 1024 pixels. The AXR-… supports the following resolutions: 1024 × 768
1080 × 1024
1280 × 720
1440 × 900
1920 × 1080
IP cameras Which IP cameras can be used with the AXR recorders?
IOC-2812BV
IOC-2812DV
The following IP cameras are supported as well; however, please note that some restrictions apply (e. g. no alarm recordings, no audio): All models of the INC series and the models F-4215 and B-6220
Mobile phone How can I get camera images onto my mobile phone?
A short video clip (only available in German) explains how to set up remote access to an AXR recorder via a smartphone: https://youtu.be/13P1Y4PiBmk OSD menu of an AXC camera How can I call up the OSD menu of an AXC camera via the AXR recorder?
The OSD menu of the camera can be called up via the PTZ
console of the AXR: 1) In the main menu, select “Device”/”PTZ” and then change the PTZ protocol from “Pelco-D” to “COAX1” (baud rate 9600).
2) The function “IRIS+” of the PTZ console can now be used to call up the OSD menu of the AXC camera.
3) To navigate within the menus, use the arrow buttons of the PTZ console; for the “ENTER” function, use “IRIS+”.
Recording time What is the recording time possible?
The rule of thumb is: 1 GB/hour for each connected camera with CVBS signal 4 GB/hour for each connected camera with Full HD resolution (1920 × 1080 p) Remote access to camera images How can I retrieve camera images to include them into my homepage or a video door phone system?
It is possible to access connected cameras via the RTSP stream which is provided by the AXR recorder. For detailed address information, please refer to “RTSP” in the network menu of the recorder.
Replacement for older cameras Which cameras can be used as a replacement for older cameras?
The cameras of the AXC series (with the exception of AXC137NLC and AXC-137PHC), offering the two signal outputs TVI and AHD / CVBS are not only interesting as a replacement for older cameras, but can also be part of sophisticated and complex installations such as the surveillance system of an entrance door: While the TVI signal is sent to a recorder, the CVBS signal can be sent to a small monitor (e. g. TFT-800LED) at the same time.
59
English 12 Specifications ModelAXR-104 / AXZ-2. .AXR-108 / AXZ-408..AXR-116
Video Signal inputs for analog cameras4 × BNC
8 × BNC16 × BNC
Channels for IP cameras2
48
When a channel of an analog camera is switched off, an additional IP camera can be used instead.
Total data rate 24 Mb /s48 Mb /s96 Mb /s Video outputs for monitors1 × HDMI® 1 × VGA1 × HDMI
® 1 × VGA1 × HDMI
® 1 × VGA
Resolution1850 × 1080 pixels (25 fps)1850 × 1080 pixels (25 fps)1850 × 1080 pixels (25 fps) Video compressionH.264H.264H.264
Recording max. 100 images /sec. (25 per camera)max. 200 images /sec. (25 per camera)max. 400 images /sec. (25 per camera) Recording modesmanual, timer, motion detection, alarmmanual, timer, motion detection, alarmmanual, timer, motion detection, alarm Camera name userdefinable, shown in the live viewuserdefinable, shown in the live viewuserdefinable, shown in the live view Indication of video signal lossyesyesyes Audio Audio inputs4 × RCA8 × RCA8 × RCA
8 × Dsub to 8 × RCA
Audio output1 × RCA1 × RCA1 × RCA
Alarm Alarm inputs4816
Alarm output1 relay contact load of 30 V (⎓ ), 1 A
1 relay contact load of 30 V (⎓ ), 1 A
1 relay contact load of 30 V (⎓ ), 1 A
Acoustic signal device integratedintegratedintegrated General information SecurityPassword protection can be enabled Interfaces1 × RS485 for PTZ control 2 × USB 2.0 for mouse control and external storage of recordings 1 × LAN (RJ 45) for network connection 1 × HDMI® for monitor connection Hard disks AXR104: optional, max. 1 × 6 TB (SATA)AXR108: optional, max. 1 × 6 TB (SATA)optional, max. 2 × 6 TB (SATA) AXZ-2..: 1 TB installedAXZ408..: 1 TB installed — RAID level ( Redundant Array of Independent Disks)single singlesingle Fan——yes Power supply12 V (⎓ ) / 5 A via PSU supplied and connected to 230 V/50 Hz Admissible ambient temperature0 – 40 °C
Dimensions (W × H × D)300 × 48 × 225 mm300 × 48 × 225 mm380 × 48 × 330 mm Weight (w/o hard disk)1.3 kg1.4 kg3 kg Subject to technical modification.
All rights reserved by MONACOR ® INTERNATIONAL GmbH & Co. KG.
No part of this instruction manual may be reproduced in any form or by any means for any commercial use.
60
Table des matières Français FrançaisFrançais PageTable des matières 1 Conseils d’utilisation et de sécurité . . . . . . . . 61
2 Conseils importants pour la sécurité des données . . . . . . . . . . . . . . . 61
3 Possibilités d’utilisation et caractéristiques principales . . . . . . . . . . . . . 61
4 Présentation . . . . . . . . . . . . . . . . . . . . . . 62
4.1 Face avant . . . . . . . . . . . . . . . . . . . . . . 62
4.2 Face arrière. . . . . . . . . . . . . . . . . . . . . . 64
4.3 Télécommande . . . . . . . . . . . . . . . . . . . 65
4.3.1 Insérer / remplacer les batteries. . . . . . . . . . . 65
5 Branchement de l’enregistreur . . . . . . . . . . . 65
5.1 Installer le disque dur . . . . . . . . . . . . . . . 65
5.2 Caméras, moniteur, souris USB . . . . . . . . . . 65
5.3 Signaux audio . . . . . . . . . . . . . . . . . . . . 65
5.4 Entrées et sorties alarme, connexion PTZ. . . . 65
5.5 Réseau . . . . . . . . . . . . . . . . . . . . . . . . 66
5.6 Alimentation. . . . . . . . . . . . . . . . . . . . . 66
6 Utilisation. . . . . . . . . . . . . . . . . . . . . . . . 66
6.1 Réglage de la langue du menu. . . . . . . . . . 66
6.2 Messages d’erreur possibles après l’allumage . 67
6.2.1 Aucun disque dur intégré . . . . . . . . . . . . . 67
6.2.2 Disque dur non formaté . . . . . . . . . . . . . . 67
6.3 Etat au premier allumage . . . . . . . . . . . . . 68
6.4 Assistant d’installation. . . . . . . . . . . . . . . 68
6.5 Présentation de tous les menus . . . . . . . . . 70
6.6 Activation du verrouillage, modifications des mots de passe, détermination des droits utilisateur. . . . . . . . . . . . . . . . . . . . . . . 72
6.7 Configurer les entrées alarme . . . . . . . . . . 72
6.8 Activation / désactivation des sons. . . . . . . . .
Diriger les événements vers la sortie alarme . . 73
6.9 Réglages pour la surveillance Live : nom de la caméra, image et affichage temps. . . . . . . . 73
6.10 Cacher des zones d’images . . . . . . . . . . . . 73
6.11 Réglage de la détection de mouvements. . . . 73
6.12 Gestion à distance de caméra (PTZ) . . . . . . . 74
6.13 Autoriser des enregistrements Capture (photographies instantanées). . . . . . . . . . . 74
6.13.1 Sauvegarde Cloud pour des enregistrements Capture . . . . . . . . 75
6.14 Mémoriser et appeler différentes configurations. . . . . . . . . . . . . 75
6.15 Astuces . . . . . . . . . . . . . . . . . . . . . . . . 75
7 Utilisation. . . . . . . . . . . . . . . . . . . . . . . . 76
7.1 Verrouillage . . . . . . . . . . . . . . . . . . . . . 76
7.2 Changement utilisateur . . . . . . . . . . . . . . 76
7.3 Surveillance Live. . . . . . . . . . . . . . . . . . . 76
7.3.1 Durée d’affichage et réglage de l’affichage en défilement d’image. . . . . . . . . . . . . . . . . 77
7.3.2 Augmenter la taille d’un segment d’image. . . . 77
7.3.3 Restitution audio . . . . . . . . . . . . . . . . . . 78
7.4 Barres de commande – accès rapide aux réglages et fonctions. . . . . . . . . . . . . . . . 78
7.5 Réglage de couleur, luminosité, contraste des images Live. . . . . . . . . . . . . . . . . . . . . . 78
7.6 Enregistrements. . . . . . . . . . . . . . . . . . . 78
7.6.1 Modification des horaires d’enregistrement . . . 79
7.6.2 Images Capture écran (photographie instantanée) 79
7.7 Lecture des enregistrements . . . . . . . . . . . 79
7.7.1 Lectures des 5 dernières minutes d’enregistrement d’une caméra . . . . . . . . . . 79
7.7.2 Lecture d’un enregistrement d’une période donnée et si besoin, la sauvegarder sur un support externe . . . . . . 79
7.7.3 Appeler des images Captures d’écran (photographie instantanée) . . . . . . . . . . . . 80
7.8 Gestion de caméras PTZ . . . . . . . . . . . . . . 81
7.9 Effacer des données . . . . . . . . . . . . . . . . 81
7.10 Réglage usine (Reset) . . . . . . . . . . . . . . . 82
7.11 Appeler une liste d’événements . . . . . . . . . 82
7.12 Afficher les informations système Modifier les ID des appareils et les noms des appareils . . . . . . . . . . . . . . . 82
7.13 Arrêt. . . . . . . . . . . . . . . . . . . . . . . . . . 83
8 Messages et messages d’erreurs . . . . . . . . . . 83
9 Surveillance à distance et accès à distance à l’enregistreur. . . . . . . . . . . . . . . . . . . . . . 83
9.1 Surveillance à distance via un téléphone mobile et une tablette . . . . . . . . . . . . . . . . . . . 83
9.2 Accès à distance via un ordinateur. . . . . . . . 84
10 Où trouver les réglages et les fonctions ? . . . . 85
11 Questions les plus fréquentes . . . . . . . . . . . 86
12 Caractéristiques techniques. . . . . . . . . . . . . 87
DeutschDeutsch SeiteInhalt English English PageContents Italiano Italiano PaginaIndice Espa?ol Espa?ol P?ginaContenidos Nederlands Nederlands PaginaInhoud Polski Polski StronaSpis tre ci
61
Français 1 Conseils d’utilisation et de sécurité Les appareils (enregistreur, bloc secte«ur, télécommande et souris USB) répondent à toutes les directives nécessaires de l’Union Européenne et portent donc le symbole .
AVERTISSEMENTLe bloc secteur est alimenté par une tension dangereuse. Ne touchez jamais l’intérieur de l’appareil car, en cas de mauvaise manipulation, vous pouvez subir une décharge électrique. Ne faites rien tomber dans les ouïes de ventilation, il y a risque de décharge électrique.
– Les appareils ne sont conçus que pour une utilisation en intérieur. Protégez-les des éclaboussures, de tout type de projections d’eau et d’une humidité d’air élevée. La tem pérature ambiante admissible est de 0 – 40 °C.
– Positionnez l’enregistreur de telle sorte qu’une circulation suffisante de l’air soit assurée pendant le fonctionnement.
Les ouïes de ventilation du boîtier ne doivent en aucun cas être obturées.
– En aucun cas, vous ne devez pas poser d’objet contenant du liquide ou un verre sur l’appareil.
– Débranchez le bloc secteur immédiatement dans les cas suivants : 1. l’enregistreur, le bloc secteur ou le cordon secteur présentent des dommages visibles.
2. après une chute ou accident similaire, vous avez un doute sur l’état de l’appareil.
3. des dysfonctionnements apparaissent.
Dans tous les cas, les dommages doivent être réparés par un technicien spécialisé.
– Ne débranchez jamais l’appareil en tirant sur le cordon secteur ; retirez toujours le cordon secteur en tirant la fiche.
– Nous déclinons toute responsabilité en cas de dommages corporels ou matériels résultants si les appareils sont utilisés dans un but autre que celui pour lequel ils ont été conçus, s’ils ne sont pas correctement branchés ou utilisés ou s’ils ne sont pas réparés par une personne habilitée ; en outre, la garantie deviendrait caduque.
– De même, notre responsabilité ne saurait être engagée en cas de pertes de données résultant d’une mauvaise utilisation ou d’un défaut, ni pour les conséquences.
Lorsque les appareils sont définitivement retirés du service, vous devez les déposer dans une usine de recyclage de proximité pour contribuer à leur élimination non polluante.
CARTONS ET EMBALLAGE PAPIER ň TRIER
2 Conseils importants pour la sécurité des données L’enregistreur est réglé de telle sorte qu’il s’enregistre automatiquement sur internet une fois la connexion internet établie. Ainsi, toute personne possédant le numéro de l’appareil et le mot de passe préréglé peut accéder à l’enregistreur, le manipuler et l’utiliser à des fins frauduleuses (criminelles) sans que vous ne le remarquiez.
IMPORTANTModifiez impérativement le mot de passe (chapitre 6.6). Notez bien votre mot de passe et ne le communiquez qu’à des personnes de confiance.
Si vous voulez donner l’enregistreur à une tierce personne (par exemple le vendre, le prêter) ou le mettre au rebut, effacez impérativement tous les enregistreurs et mots de passe en formatant le disque dur et en réinitialisant l’appareil sur les réglages usine (chapitre 7.10, page 82). Sinon, vous communiquez tous les enregistrements, données personnelles et mots de passe avec l’appareil.
3 Possibilités d’utilisation et caractéristiques principales L’enregistreur, combiné avec une caméra de surveillance au moins et un moniteur, est prévu pour la surveillance d’objets tels que domiciles, commerces, installations en extérieur… L’enregistrement des images de la caméra permet à tout moment une évaluation et peut ainsi contribuer grandement à la dissuasion et résolution de crimes.
Avantages des enregistreurs hybrides de MONACOR : -Images analogiques Full-HD (résolution 1080p) peuvent être dirigées vers l’enregistreur via un cČble coaxial (300 m max.) -Compatible en amont (AHD, CVBS) – le type de caméra est automatiquement reconnu -Installation simple également sans réseau -Accès à distance à l’enregistreur et surveillance à distance via un réseau local ou internet possibles, par exemple via un ordinateur, téléphone mobile -Surveillance possible également avec des caméras réseau La gamme HYBRID propose des enregistreurs seuls (AXR-…), des sets complets de surveillance (AXZ-…) avec caméras couleurs, bloc secteur pour les caméras et cordons de branchement : ModèleCanaux caméras*Disques durs Caméras livréesBloc secteur pour caméra AXR1044 / 2aucun, 1 × 6 TO
(SAGA) peut être utiliséaucune, tous les modèles de caméras AXC… peuvent être utilisés (y compris toutes les AHCAM… et TVCCD… mais résolution plus faible)— AXR1088 / 4
AXR11616 / 8
aucun 2 × 6 TO
(SAGA) peut être utilisé AXZ204BV
4 / 2
1 × 1 TO (SATA)2 × AXC2812BVPSS1230DC
(12 V, 3 A)AXZ204DV2 × AXC2812DV
AXZ224BD2 × AXC2812BV
2 × AXC2812DV
PSS1250DC
(12 V, 5 A) AXZ408BV8 / 44 × AXC2812BVPSS1230DC
(12 V, 3 A)AXZ408DV4 × AXC2812DV
*x / y : pour caméras analogique / caméras réseau
62
Français 4 Présentation 4.1 Face avant AXR-… …-CH HYBRID DIGITAL RECORDER
MENU
ESCPWR HDDSEARCHMUTE CH– CH+ ALL
PTZ
5
1112 13 14 15 166 78
12 3 49 10
Schéma 4-1 AXR-104 (compris également dans les sets AXZ-204..) AXR-108 (compris également dans les sets AXZ-408..) Pos.DescriptionFonction 1SEARCH
MUTE
CH– /CH+ ALLRecherche d’un enregistrement Son coupé /activé Canal de caméra précédent /suiv ant Image divisée avec visualisation de tous les canaux 2
/ Vers la gauche / retour 3Vers le haut 4 / Vers la droite / avance 5Vers le bas 6Activer le point de menu sélectionné pour réglage / confirmer la saisie 7MENU/ESCAppeler / quitter le menu principal 8–Capteur IR pour les ordres de commande de la télécommande 9PWRTémoin de fonctionnement 10HDDClignote lors de la lecture du disque dur ou de l’écriture sur le disque dur ; en mode veille, la LED brille en continu.
11
Port USB pour sauvegarder les données sur une clé USB / disque dur ; peut également être utilisé pour brancher la souris 12Démarrer la lecture 13
IIPause / Lecture image par image 14
Arrêter la lecture ou l’enregistrement manuel 15
-Démarrer l’enregistrement manuel 16PTZAppeler la gestion PTZ (Pan, Tilt, Zoom) Schéma 4-2 Fonctions des touches de l’enregistreur 4 canaux et de l’enregistreur 8 canaux
63
Français AXR-116 16-CH HYBRID DIGITAL RECORDER
MENU
ESCPWR HDD
PTZ2345678
90
1
12 3 49 10
5
1112 13 14 15 16 176 78
Schéma 4-3 AXR-116
Pos.DescriptionFonction 1
1– 9, 0
Touches 1 – 9 pour les chiffres 1 – 9 et les canaux 1 – 9
Sélection de canal CH 11– CH 16 : appuyez tout d’abord sur la touche numérique 1, puis sur la touche suivante (par exemple pour canal 16, appuyez sur 1 puis sur 6).
2
/ Vers la gauche / retour 3Vers le haut 4 / Vers la droite / avance 5Vers le bas 6 / PTZActiver le point de menu sélectionné pour réglage / confirmer la saisie / appeler la gestion PTZ (Pan, Tilt, Zoom) 7MENU/ESCAppeler / quitter le menu principal 8–Capteur IR pour les ordres de commande de la télécommande 9PWRTémoin de fonctionnement 10HDDClignote lors de la lecture du disque dur ou de l’écriture sur le disque dur ; en mode veille, la LED brille en continu.
11
Port USB pour sauvegarder les données sur une clé USB / disque dur ; peut également être utilisé pour brancher la souris 12
En visualisation Live, commuter sur écran divisé (4, 9 ou 16 caméras) 13Son activé /désactivé 14Démarrer la lecture 15
IPause / Lecture image par image 16
Arrêter la lecture ou l’enregistrement manuel 17
-Démarrer l’enregistrement manuel Schéma 4-4 Fonctions des touches du AXR-116
64
Français 4.2 Face arrière VIDEOINPUT1
3
42
AUDIO
OUTPUTAUDIO
INPUTHDMI
VGA
LAN
RS485
12 V
4 3
SENSOR2 1 G
ALARM
1
3
42
23 20 22 25 24 26 28 27 29 30
Schéma 4-5 AXR-104
VIDEO
INPUT1
2
3
4
8642
AUDIO
OUTPUT
AUDIO
INPUTHDMI
VGA
LAN
RS485
12 V
8 7 6 5 4 3
SENSOR2 1 G
ALARM
2025 24 26 28 27 29 30
22 23
Schéma 4-6 AXR-108
202122 23 24 25 26 27 28 29 30
Schéma 4-7 AXR-116
Pos.DescriptionFonction 20VIDEO INPUTEntrées vidéo (prises BNC) pour les caméras de surveillance 21
AUDIO INPUT (916) (nur AXR116) Entrées audio pour les canaux 9 – 16 (prise Dsub), Branchement via le cordon adaptateur livré avec prises RCA
22AUDIO INPUTEntrées audio (prises RCA) AXR104 : pour les canaux 1– 4
AXR108 et AXR116 : pour les canaux 1– 8
23
AUDIO OUTPUTSortie audio (prise RCA) 24VGA
Connexion VGA pour un moniteur VGA (pour une visualisation avec 1080 p, utilisez la sortie HDMI®) 25HDMISortie HDMI
® pour un moniteur haute résolution 26LANConnexion pour LAN, Ethernet (prise RJ45) pour une surveillance à distance 27
RS485 / SENSOR / ALARM
RS485 + − = interface RS485 pour la gestion PTZ des caméras Sensor = entrées alarmes par exemple pour détecteur de mouvements Alarm = sortie alarme par exemple pour avertisseur d’alarme (voir chapitre 5.4) 28
Branchement pour souris USB
2912V⎓Branchement pour bloc secteur livré 30I Interrupteur marche /arrêt
65
Français 4.3 Télécommande SEL
0ALLMENU
9
7
56
4
23
1
MUTE SUBMENU
8
Schéma 4-8 Télécommande TasteFonction 1 … 9, 0Sélection canal, touches numériques ALLImage divisée avec visualisation de tous les canaux MENUAppeler / Quitter le menu principal Masquer la barre de fonction ou barre de sélection rapide MUTE
Son activé /désactivé SUBMENUAppeler la barre de fonction 2ème pression : appeler la barre de sélection rapide pour l’image de caméra sélectionnée (chapitre 7.4) Vers le haut Vers le bas / Vers la gauche / droite ; diminuer / augmenter les paramètres SELActiver le point de menu sélectionné pour les réglage / confirmer la saisie (≙ touche Enter) Retour Appeler la recherche d’enregistrements, lire un enregistrement Avance -Démarrer un enregistrement manuel IIPause / Lecture image par image ■Arrêter la lecture ou l’enregistrement manuel 4.3.1 Insérer / remplacer les batteries Pour insérer les batteries (2 × 1,5 V, type R03), retirez le couvercle du compartiment batterie sur la face arrière de la télécommande. Insérez les batteries comme indiqué dans le compartiment, refermez le couvercle.En cas de non utilisation prolongée, retirez les batteries, elles pourraient couler et endommager la télécommande.
Ne jetez pas les batteries usagées dans la poubelle domestique. Déposez-les dans un container spécifique ou ramenez-les à votre revendeur pour un recyclage non polluant.
5 Branchement de l’enregistreur 5.1 Installer le disque dur Les enregistreurs des sets de surveillance (AXZ-…) sont dotés d’un disque dur. Il faut installer un disque dur dans les enregistreurs seuls (AXR-…). Vous trouverez dans la gamme MONACOR les disques durs adéquats (SATA-…) avec différentes capacités de stockage. Pour de disques durs d’autres fabricants, assurez-vous qu’ils soient bien adaptés pour la technologie de sécurité et surveillance.
Attention : En aucun cas, vous ne devez placer un disque dur ou le retirer alors que l’enregistreur est allumé !
1) Débranchez l’enregistreur de l’alimentation.
2) Dévissez le couvercle du boîtier.
3) Insérez le disque dur et revissez.
4) Branchez le cČble d’alimentation pour le disque dur et le cČble de données aux connexions du disque dur.
5) Replacez le couvercle et refermez l’enregistreur.
6) Une fois les branchements effectués et l’enregistreur allumé, formatez le disque dur (chapitre 6.2.2 et effectuez tous les réglages avec l’assistant d’installation (chapitre 6.4).
5.2 Caméras, moniteur, souris USB
Caméras prises BNC VIDEO INPUT (20) Sur les modèles de caméras AXC-…, reliez la sortie TVI pour pouvoir utiliser la résolution maximale.
Si vous utilisez des caméras PTZ, il est possible de gérer le Pan, Tilt et Zoom via la connexion RS485 (27) (branchement voir chapitre 5.4).
Moniteur prise HDMI (25) pour la résolution maximale de 1080p ; s’il n’y a qu’une connexion VGA sur le moniteur, vous pouvez utiliser également la prise VGA (24) (résolution plus faible) Souris livrée prise USB
(28) sur la face arrière ; la prise USB (11) en façade peut être utilisée pour la sauvegarde des données 5.3 Signaux audio Signaux audio (des caméras) prises RCA AUDIO INPUT (22) Sur l’enregistreur AXR-116, prise D-sub AUDIO INPUT (21) supplémentaire pour les canaux 9 – 16 ; un cordon adaptateur avec prises RCA est livré.
Signaux audio pour l’écoute Si le moniteur est relié via la prise HDMI (25), le signal audio est déjà dirigé vers le moni teur via cette prise. Pour d’autres possibilités de branchement, le signal audio est présent à la prise rouge RCA AUDIO
OUTPUT (23).
Il est toujours possible d’écouter le canal de caméra affiché en image plein écran ou, en mode visualisation multiple, d’écouter l’image entourée de bleu (sélectionnez avec la touche gauche de la souris).
5.4 Entrées et sorties alarme, connexion PTZ
Les branchements s’effectuent via la barrette de branchement verte (27).
Entrées alarme SENSOR
Vous pouvez relier ici les capteurs d’alarme (détecteurs de mouvements, barrières infrarouges …) pour p. ex., sauvegarder automatiquement une photo instantanée et pour afficher
66
Français l’image correspondante en mode plein écran ou pour envoyer automatiquement un email avec la photo instantanée.Reliez la connexion [–] d’un capteur avec le pin G (masse) et la connexion [+] du capteur avec l’entrée de canal concernée (1 – 16) de l’enregistreur. Branchez tous les autres capteurs de la même manière. Via le menu «Paramètres», sous-menu «Alarme», section «Alarme», vous pouvez régler la durée d’affichage de l’alarme, la durée audio de l’alarme, la durée de l’enregistrement, le contact d’alarme (ouverture ou fermeture) et autres réglages (chapitre 6.7).
Sortie ALARM
Un relais avec contact de fermeture est prévu comme sortie alarme sans potentiel (charge max. 30 V/ 1 A). Il est possible de relier ici un avertisseur acoustique ou optique d’alarme.
Connexion PTZ RS485
Via l’interface RS-485, il est possible de gérer à distance des caméras adaptées : par exemple rotation (Pan), inclinaison (Tilt), focale (Zoom), ouverture diaphragme (Iris) et vitesse de déplacement.
Reliez les contacts – (= RS-485-A) et + (= RS-485-B) avec les contacts correspondants de la caméra. Une autre caméra peut être reliée en parallèle aux branchements de la première …
jusqu’à ce que toutes les caméras soient reliées en une chaîne.
Pour diminuer les interférences, il convient d’utiliser des cČbles torsadés. Sur la dernière caméra, terminez les deux lignes avec une résistance 120 Ω (cela est souvent possible via un interrupteur sur la caméra).
Pour pouvoir adresser les caméras indépendamment de l’enregistreur, il faut attribuer une adresse individuelle aux caméras (via un menu ou interrupteur DIP sur la caméra). En conséquence, sur l’enregistreur, il faut régler l’adresse à utiliser pour gérer la caméra ainsi que les paramètres de transmission et le protocole elle a besoin (chapitre 6.12).
5.5 Réseau Pour la surveillance à distance, reliez l’enregistreur via la prise LAN (26) à un réseau local ou à un routeur. Veillez à respecter impérativement les conseils sur la sécurité des données au chapitre 2 !
5.6 Alimentation Reliez le bloc secteur à la prise 12 V⎓ (29) et à une prise secteur 230 V/ 50 Hz.
6 Utilisation Vous pouvez regarder une vidéo (uniquement en allemand) de MONACOR INTERNATIONAL sur «YouTube», décrivant les étapes les plus importantes pour le fonctionnement. Vous pourrez voir combien il est simple d’intégrer l’enregistreur dans le réseau.
https://youtu.be/13P1Y4PiBmk Une fois les caméras le moniteur la souris le bloc secteur de l’enregistreur le bloc secteur pour les caméras reliés, allumez l’enregistreur avec l’interrupteur à bascule (30) sur la face arrière. Après quelques secondes, le logo de la société s’affiche sur le moniteur relié : 15 secondes après environ, la page de démarrage avec l’assistant d’installation «Startup Wizard» s’affiche.
MR
MR
T-CH1
CH4
T-CH2
CH3
KEIN VIDEO
Sfarfuú Wizard Don‘f show fhis windoSw nexf fime.
Welcome to use the wizard of setup KEIN VIDEOkeine Kamerkeine Kamer 15/12/2016 09:53:S46
× ABBRUCH Weifer Schéma 6-1 Ecran de démarrage : l’assistant d’installation est affiché ; selon le modèle d’enregistreur, d’autres champs pour les images des caméras existent 6.1 Réglage de la langue du menu En usine, la langue du menu est l’allemand. Vous devez donc commuter la langue du menu : 1) Si un message d’avertissement s’affiche après l’allumage, fermez-le en cliquant sur la croix ×.
2) Dans la fenêtre «Startup Wizard» cliquez sur «ABBRUCH» et répondez par «OK« à la question «Are you sure you want to cancel Startup Wizard?».
3) Pour afficher la barre de fonction, faites un clic droit de la souris ou avec la souris, allez au centre du bord inférieur de l’écran.
Schéma 6-2 Barre de fonction 4) Cliquez sur le symbole .
i Analog Channels Anzeige AusgabeAusgabe NetzwerkPassageCH1
CH2
CH3
CH4Gerft CH1
CH2
CH3
CH4State EúN
EúN
EúN
EúN
IP Cafera Privat Zone úicherung ABBRUCH
Parafeter Aufnahfe úuche Gerät úystef Erweitert úchließung Analog Channels Live Ifage Control Capture Alarf CH1 CH2 CH3 CH4
Schéma 6-3 Menu principal 5) Cliquez en haut sur «System».
67
Français 30
i Allgemein Info Allgemein DST
NTP
Log Nutzef Sicherung ABBRUCH
Parameter Aufnahme Suche Gerät Sústem Erweitert Schließung Default DATUM0ú/15/ú017
MM/TT/JJ11:04:56
Zeit Datumsfofmatú4STD.
Zeitfofmat DEUTSCH
Spfache PAL
Video Fofmat 1MIN.
Anzeigezeit des MenüzsXVR
Modus Show wizafd Schéma 6-4 Menu «Système» 6) Dans la ligne «Sprache», commutez sur FRANÇAIS.
7) Cliquez en bas sur le bouton «Sicherung».
8) Cliquez sur «OK» pour confirmer le message «Speicherung erfolgreich».
9) Redémarrez l’enregistreur pour que les menus soient affichés dans la langue sélectionnée et pour que l’assistant d’installation démarre : a) Cliquez en haut dans le menu sur «Schließung».
b) Dans la fenêtre «Schließung» qui s’ouvre, cliquez sur «Wieder Starten» ; l’enregistreur redémarre, la langue du menu est désormais le français.
Dans le texte suivant, tous les menus sont affichés en français.
6.2 Messages d’erreur possibles après l’allumage En usine, l’enregistreur est réglé de telle sorte qu’un signal d’alarme retentit pendant 10 secondes en cas de problème.
6.2.1 Aucun disque dur intégré ×Avertissement 1
Aucun disque Schéma 6-5 Aucun disque dur intégré En plus, le message Pas de disque dur s’affiche en bas sur l’écran. Sur la page 65, dans le chapitre 5.1, vous trouverez la description de l’installation d’un disque dur. Tout d’abord, arrêtez l’enregistreur en respectant la procédure suivante : 1) Fermez la fenêtre d’avertissement en cliquant sur ×.
2) Dans la fenêtre «Assistant du démarrage», cliquez sur «Annuler» et répondez par «OK» à la question : «Etes-vous sûr de vouloir fermer l’assistant d’installation?» 3) Pour afficher la barre de fonction (schéma 6-2), faites un clic droit de la souris ou avec la souris, allez au centre du bord inférieur de l’écran.
4) Cliquez sur le symbole «Menu principal».
5) Dans le menu principal, cliquez sur le symbole «Eteindre». Les informations suivantes s’affichent : Avertissement!
L‘enregistrement àc été arrêté avec sfcccès, vofs úofvez éteindre le úcrodfit sans risqfe!
Schéma 6-6 L’enregistreur peut maintenant être éteint en toute sécurité 6) Eteignez l’enregistreur avec l’interrupteur à bascule.
6.2.2 Disque dur non formaté ×Avertissement 1
Non Formaté Schéma 6-7 Disque dur non formaté En plus, H s’affiche en bas sur l’écran. Pour formater : 1) Fermez la fenêtre d’avertissement en cliquant sur ×.
2) Dans la fenêtre «Assistant du démarrage», cliquez sur «Suivant» ; la fenêtre suivante s’affiche : Gestion du disque údur Temps restant 0s Disponibfe/Totaf 0M/1ú63G
État Non Formaté N° 1fection Ne pas afcher cette fenêtre úfa procheine fo× AnnuferSuivant Précédent Écraser AutomatiqúueFormater disque duúr Schéma 6-8 Fenêtre pour les réglages du disque dur Le disque dur inséré est affiché ; la colonne «Disponible/ Total» indique la capacité disponible (ici 0 car le disque dur n’est pas formaté) et la capacité totale.
3) Sélectionnez le disque dur : dans la colonne «Sélection», cliquez sur la ligne du disque (voir pointeur souris sur le schéma 6-8).
4) Cliquez sur le bouton «Formater disque dur». La fenêtre «Connexion» s’affiche.
Gestion du disque údur Temps restant 0s Disponibfe/Totaf 0M/1ú63G
État Non Formaté N° 1fection Ne pas afcher cette fenêtre úfa procheine fo× AnnuferSuivant Précédent Écraser AutomatiqúueFormater disque duúr Utifisateur Iadmin Mot de Passe Connexion Annufer Connexion Schéma 6-9 Fenêtre «Connexion» 5) Cliquez sur «Connexion». La fenêtre suivante s’affiche pour confirmation : Gestion du disque hdur Ne pas afcher cette fenftreh la procheine fo× AnnulerúuivantPrécédent Temps restant 0s Disponible/Total 0M/931G
État Unformat.
Nľ 1úEL.
Écraser AutomatihqueFormater disque duhr OK
Annuler Le formatage effacera toutes les hdonnées de votre disque eúATA
Remarques Schéma 6-10 Fenêtre pour confirmer un formatage 6) Cliquez sur «OK» : le processus de formatage s’affiche sous forme de bargraphe. Le message suivant s’affiche à la fin du formatage : Gestion du disque hdur Ne pas afcher cette fenftreh la procheine fo× AnnulerúuivantPrécédent Temps restant 920Heure Disponible/Total 922G/931G
État OK
Nľ 1lection Écraser AutomatihqueFormater disque duhr 100%OK
Formatage terminé h!
Remarques Schéma 6-11 Le disque dur est formaté
68
Français 7) Cliquez sur «OK» : la capacité et la durée d’enregistrement disponibles sont affichées. Pour d’autres réglages, poursuivez dans le chapitre 6.4 avec le point 2) ou pour arrêter, cliquez sur «Annuler» et répondez par «OK» à la question «Etes-vous sûr de vouloir fermer l’assistant d’installation ?».
6.3 Etat au premier allumage 1. L’enregistrement continu de tous les canaux auxquels une caméra est reliée, démarre immédiatement, indiqué par le symbole R (Record) sur l’image de la caméra.
2. S’il y a des canaux auxquels aucune caméra n’est reliée, un signal d’alarme de 10 secondes retentit (détection automatique d’une perte de signal vidéo).
3. Si le disque dur est plein, les enregistrements les plus anciens sont automatiquement écrasés (enregistrement en continu).
4. La détection de mouvement est activée : en cas de modification détectée du contenu d’une image, le symbole M
(Motion) s’affiche, une entrée est faite dans la liste d’événements (date, heure, canal de caméra).
5. La date et l’heure sont incorrectes. L’affichage de la date correspond à la typologie anglaise : mois / jour / année.
IMPORTANT : Modifiez impérativement l’affichage de la date selon la typologie française et actualisez la date et l’heure (chapitre 6.4 ou chapitre 6.5). Sinon, il ne sera pas possible de trouver des enregistrements d’un moment défini.
6.4 Assistant d’installation Si un disque dur formaté est installé dans l’enregistreur, l’assistant d’installation s’affiche après l’allumage (voir schéma 6-1).
Avec l’assistant, vous pouvez facilement effectuer tous les réglages nécessaires.
Conseil : si l’assistant ne s’affiche pas : 1) Par un clic droit de la souris, affichez la barre de fonction (schéma 6-2).
2) Cliquez sur le symbole «Menu principal».
3) Dans le menu principal, cliquez dans la barre supérieure sur «Système».
4) Dans la ligne inférieure «Montrer l’assistant», cochez le champ correspondant.
5) Cliquez en bas à droite sur «Enregistrer», et fermez le message suivant «Enregistrement de paramètres réussi !» en cliquant sur «OK».
6) Dans le menu principal, dans la barre supérieure, cliquez sur «Eteindre» et dans la nouvelle fenêtre, cliquez sur «Redémarrer». Après le redémarrage, l’assistant d’installation s’affiche.
Si vous ne voulez pas utiliser l’assistant d’installation, cliquez sur «Annuler» et répondez par «OK» à la question pour quitter l’assistant. Pour configurer l’enregistreur, vous trouverez dans le chapitre 6.5, sur la double page, une présentation de tous les menus.
1) Pour configurer l’enregistreur avec l’assistant, cliquez sur «Suivant». Le menu pour les réglages du disque dur s’affiche : Gestion du disque hdur Ne pas afcher cette fenftreh la prochaine fo× Annulerúuivant Précédent Temps restant 210Heure Disponible/Total 923G/931G
État OK
N° 1lection Écraser AuhtomatiqueFormater disque duhr Schéma 6-12 Réglages pour le disque dur 2) Des indications sur le disque dur sont affichées en haut dans la ligne d’information. Pour régler le mode d’écrasement, ouvrez le menu pop-up : cliquez sur le symbole .
Ligne d’information No.Numéro du disque dur ÉtatDisque dur OK ou non formaté Disponible / TotalCapacité disponible / totale du disque dur Temps restantDurée d’enregistrement encore disponible en heures SélectionColonne pour sélectionner un disque dur qui doit être formaté Réglages et fonctions Écraser Automatique (réglage usine)Les enregistrements les plus anciens sont écrasés lorsque le disque dur est plein.
FermerAucun enregistrement n’est écrasé. Dès que le disque dur est plein, le message «Avertissement Plein» s’affiche. Plus aucun enregistrement n’est possible.
1 Jour 3 Jours ⋮ 90 JoursLes enregistrements peuvent être écrasés selon la période de stockage sélectionnée.
Si malgré tout le disque dur est plein, aucun enregistrement ne peut être fait.
Formater disque durTouche pour formater le disque dur sélectionné dans la colonne «Sélection» 3) Une fois les réglages du disque dur définis, cliquez sur «Suivant». Le menu pour les réglages réseau s’affiche.
Conguration résealu PPPOEPort du Client f9fff Adresse IPú92.ú68.ffú.úffMasque de sous rés eau255.255.255.fffPasserelleú92.ú68.ffú.úffDNSúú92.ú68.ffú.úffDNS2ff8.ff8.ff8.ff8Port HTTP fff8f 3G
Statique DHCP
UPNPDésactiver Ne pas afcher cette fenêtrle la prochaine fo× AnnulerSuivant Précédent Schéma 6-13 Réglages pour le réseau 4) Si l’enregistreur n’est pas relié à un réseau, allez au menu suivant avec «Suivant» et lisez le point 5.
Pour la connexion réseau, le réglage statique est recommandé. Les possibilités de réglage sont les suivantes : Réglages PPPOE
Point-to-Point Protocol over Ethernet (pour modems DSL, encore peu utilisés)Avec l’option PPPOE, saisissez le nom utilisateur, le mot de passe communiqué par le fournisseur d’accès internet, le Port Client et le Port HTTP. L’accès à distance à l’enregistreur est ainsi possible via l’adresse IP qui a été saisie après l’enregistrement d’un nom de domaine et du port HTTP.
DHCP
Dynamic Horst Configuration Protocol (réglage usine)Avec l’option DHCP, une adresse IP est automatiquement attribuée par le routeur à l’enregistreur. A chaque nouveau démarrage, l’adresse IP attribuée peut être autre. C’est pourquoi, pour un accès à distance à l’enregistreur, il est impératif de rediriger le port (mettez UPNP sur «Activer»).
Statique (réglage conseillé)Avec l’option «Statique», saisissez correctement l’adresse IP, le masque de sous-réseau, le Gateway et le DNS
3G
Système téléphone mobileCette option est prévue pour les anciens téléphones mobiles et est peu utilisée.
UPNP
Universal Plug and PlaySi le routeur accepte la fonction UPnP et si UPNP est réglé sur ON, l’enregistreur redirige automatiquement les numéros de port vers le routeur. Pour le réglage recommandé «Statique» il faut conserver le réglage d’usine «Désactiver».
Après avoir configuré le réseau, cliquez sur «Suivant».
69
Français 5) Le menu pour ajouter des caméras réseau s’affiche : Réglage Caméra IP
CanalIP CA1
IP CA2
IP CA3
IP CA4
IP CA5
IP CAfEdiúer EúaúPorú Adresse IP/Domaine asque de sous résea5
Assign auúo les IP 5aux Cam.Supprimer CanalAjouúer úouúAjouúer un uúili. dén5iLargeur úoúale de ba5nde:8Mbps, Largeur 5de la bande uúilisée:50bps Ne pas afcher ceúúe fenêúre 5la prochaine fo× AnnulerSuivanú Précédenú Schéma 6-14 Ajout de caméras réseau Si aucune caméra réseau n’existe, allez au point suivant avec «Suivant» et lisez le point 7.
Pour pouvoir ajouter des caméras réseau, il faut qu’elles soient intégrées dans le réseau (voir notice de la caméra).
Pour ajouter des caméras réseau, les possibilités suivantes sont prévues : BoutonFonction IP CA… Cliquez sur le symbole Plus pour attribuer une caméra réseau donnée à un canal de caméra.
Dans la fenêtre qui s’ouvre «Ajouter rapide», cliquez sur «Rechercher» pour afficher toutes les caméras existantes dans le réseau. Repérez la caméra voulue en cliquant et cliquez sur «Ajouter».
Assign auto les IP aux Cam.Ajout automatique Supprimer CanalSupprimer une caméra (en cliquant, repérez toute la ligne de la caméra) Ajouter toutAjouter des caméras sur des canaux IP existants Ajouter un utili. définiAjout de caméras défini par l’utilisateur En plus des caméras analogiques, il est possible d’utiliser 2 caméras réseau avec l’enregistreur AXR-104
4 caméras réseau avec l’enregistreur AXR-108
8 caméras réseau avec l’enregistreur AXR-116
Si un canal pour une caméra analogique est désactivé, il est possible d’utiliser une caméra réseau supplémentaire.
Une fois les caméras réseau ajoutées, cliquez sur «Suivant».
6) Le menu pour l’enregistrement automatique des images de caméras s’affiche. En usine, tous les canaux de caméras auxquels une caméra est connectée, sont enregistrés de 0 heure à 24 heures : 020181614121022
2468
Planication enreg fopierA
fA1
fanal Norúalsur úvút alarúes fA1
Tousfopier Dimanche Lundi Mardi Mercredi Jeudi Vendredi SamediD
L
M
M
J
V
S
Ne pas afcher cette fenêtrge la prochaine fo× AnnulerSuivant Précédent Schéma 6-15 Calendrier hebdomadaire des enregistrements Pour modifier : a) Derrière «Canal», un canal de caméra est sélectionné (ici canal 1). Si l’horaire d’enregistrement pour un autre canal doit être modifié, cliquez sur le symbole .
b) Pour effacer des horaires d’enregistrement, allez sur la période voulue en maintenant la touche gauche de la souris enfoncée. On peut également effacer des blocs de demi-heures par un simple clic.
c) Des périodes effacées peuvent, de la même manière, être ajoutées.
d) Pour pouvoir démarrer automatiquement des enregistrements en cas de détection de mouvement ou d’alarme, cliquez tout d’abord sur le symbole ellipse jaune «sur mvmt» ou sur le symbole rouge «alarmes». Ensuite, allez sur la période voulue en maintenant la touche gauche de la souris enfoncée.
e) Si le réglage doit être repris pour d’autres canaux de caméras, effectuez la sélection dans la ligne «Copier CA …A Tous» en bas du menu et cliquez sur «Copier».
f) Il est possible, avec un Reset, de récupérer rapidement les réglages usine (chapitre 7.10).
Après le réglage, cliquez sur «Suivant».
7) Le menu pour date, heure, langue du menu et autres réglages de base s’affiche : 30
Conguration générEale système Engregistre fate 02/ú8/20ú7Heureú6:37:47Format dateMM/JJ/AAFormat heure24STf.LangueFRANÇAISFormat vidéoPALfisparition du menuEúMinModeXVR
Ne pas afcher cette fenêtrEe la prochaine fo× Annuler Précédent Schéma 6-16 Réglages de base du système Point menu Conseil DateActualisez impérativement la date et l’heure pour pouvoir ultérieurement rechercher des enregistrements selon des périodes données.
Heure Format dateModifiez impérativement l’affichage de la date selon la typologie française (JJ / MM /AA) sinon, les enregistrements à une période donnée ne seront trouvés que partiellement voire pas du tout.
Format heureFormat heure 12 heures ou 24 heures LangueSélection d’une des 17 langues de menu Format vidéoFormat couleur des caméras analogiques reliées : PAL (Europe) ou NTSC (Etats-Unis, Asie) Disparition du menuLe menu disparaît automatiquement après 30 s, 1, 2, 5 ou 10 minutes si aucune action n’est effectuée Fermer = le menu reste affiché jusqu’à ce que vous quittiez ou mémorisiez.
Mode DVR = mode simple, si l’enregistreur ne doit pas être intégré dans un réseau : les menus réseau ne sont pas affichés.
XVR = mode élargi avec tous les menus réseau.
8) Une fois les réglages effectués, cliquez en bas du menu dans le champ «Ne pas afficher cette fenêtre la prochaine fois», pour que l’assistant d’installation ne soit plus appelé lors du prochain allumage. Ensuite cliquez sur «Enregistrer» pour mémoriser les réglages.
9) Le message indiquant que le processus d’installation est terminé s’affiche. Confirmez avec «OK».
OKAssistant d‘insta llation terminé !
Schéma 6-17 Fin du processus d’installation 10) Les réglages les plus importants pour le fonctionnement sont désormais effectués. Si cependant, on peut accéder à l’enregistreur via internet, activez impérativement le mot de passe et modifiez-le (voir chapitre 6.6).
11) Ensuite, redémarrez l’enregistreur pour que toutes les modifications soient prises en compte (Menu Eteindre Redémarrer).
70
Français 6.5 Présentation de tous les menus 24/01/2017Canal ToufTouf00:00:00HeureTYPE
RechercherSauvegardeDate Canal Touf ToufHeureTYPE
Picture > 24/01/2017
00:00:00
PfctureCanal Analog Channels1Caméra fP23ú123ú56
01/19/2017 23:47:09
Canal CA1
CA2
CA3
CA4Record State Activer Activer Activer ActiverStream Tyúe Video Stream Video Stream Video Stream Video StreamiPS
15Fúf 15Fúf 25Fúf 15FúfRéf 192
192 96
192
Binaire 4095Kbúf 4095Kbúf 2048Kbúf 4095Kbúf PAL
Date de Début24/01/2017Date de Fin 24/01/2017Heure de Début 00:00:00Heure de Fin23:59:59TyúedeconnexToufRechercher > menus, bleu = sélecétionné Chamúf rougef = doiveint imúérativement êtire regléf !
zones (sans symboleé) blanc = sélectionnéé sous-menus (avec syémboles), vert = séléectionnéDateHeure01/19/2017 23:47:09
Menu Paramètres Legende J M
M
L
Coúier Coúier CA1
Canal Súort Alarme Exceútion CA1
A Touf D
CanalNormalalarmef CA1
V
SJ M
M
L
DSúort AlarmeAlarme Coúier Coúier ES-1 A Touf Alarm InES-1Statut ESNormale-OuvertDélai de verrouillagei10 fSonnerieFermerRetard vidéo30 fSortie alarmeAfcher le Meffage Afcher le MeffageEnvoyer Email Plein écranEnregistrer le canéal Analog Channels Caméra fP Enregistrer le canéal Caméra fP12 3 ú 1 2 3 ú 5 6
Súort AlarmeAlarme Coúier Coúier CA1 A Touf Canal CA1
ActiverSonnerie Latch TimeActiverDéfactiver 10 f Senfiblité 4
Zone Retard vidéo 30 f Sortie alarme Enoyer Email Plein écran Analog Channels12 3 ú 1 2 3 ú 5 6
Einft.
DHCP
Défactiver Encryútion00025
Port SMTP
Serveur SMTP
Nom d‘utilifateur Mot de Paffefhow Emetteur Email du deftinatairie 1
Email du deftinatairie 2
Email du deftinatairie 3
IntervalleTeft de l‘Email Automatiq.
3 MinFTP activé Défactiver ServerIP
00021
Port Nom d‘utilifateur Mot de Paffe Nom doffier TEST FTP
RTSP ActivéActiverVerierActiverPort RTSP00554Nom d‘utilifeur RTSPadminMot de úaffe RTSP******Inftruction: Analog Channel: rtfú://IP:Port/chA/B
IP Channel: rtfú://IPPort/iúA/B
A:01(ch1),02(ch1).i..
B:0(main ftream),1(ifub ftream) V
S J M
M
L
D
MM/JJ/ffD L M M J V S
1
2 3 ú 5 6 7 89 10 11 12 13 1ú 15
16 17 18 19 20 21 2223 2ú 25 26 27 28 2930 31Eteindre Eteindre Nom d‘utilifateur adminMot de Paffe Redémarrer Annuler CanalTYPEHeure CON.RelectureNREGISTRE
Taille Taille
71
Français 6.5 Présentation de tous les menus 24/01/2017
Canal Touf Touf00:00:00HeureTYPE
RechercherSauvegardeDate Canal Touf ToufHeureTYPE
Picture > 24/01/2017 00:00:00
PfctureCanal Analog Channels1Caméra fP2 3 ú 1 2 3 ú 5 6
01/19/2017 23:47:09
Canal CA1
CA2
CA3
CA4Record State Activer Activer Activer ActiverStream Tyúe Video Stream Video Stream Video Stream Video StreamiPS
15Fúf 15Fúf 25Fúf 15FúfRéf 192
192 96
192
Binaire 4095Kbúf 4095Kbúf 2048Kbúf 4095Kbúf PAL
Date de Début24/01/2017Date de Fin 24/01/2017Heure de Début 00:00:00Heure de Fin23:59:59TyúedeconnexToufRechercher > menus, bleu = sélecétionné Chamúf rougef = doiveint imúérativement êtire regléf !
zones (sans symboleé) blanc = sélectionnéé sous-menus (avec syémboles), vert = séléectionnéDateHeure01/19/2017 23:47:09
Menu Paramètres Legende J M
M
L
Coúier Coúier CA1
Canal Súort Alarme Exceútion CA1
A Touf D
CanalNormalalarmef CA1
V
SJ M
M
L
DSúort AlarmeAlarme Coúier Coúier ES-1 A Touf Alarm InES-1Statut ESNormale-OuvertDélai de verrouillagei10 fSonnerieFermerRetard vidéo30 fSortie alarmeAfcher le Meffage Afcher le MeffageEnvoyer Email Plein écranEnregistrer le canéal Analog Channels Caméra fP
Enregistrer le canéal Caméra fP
123ú123ú56
Súort AlarmeAlarme Coúier Coúier CA1 A Touf Canal CA1
ActiverSonnerie Latch TimeActiverDéfactiver 10 f Senfiblité 4
Zone Retard vidéo 30 f Sortie alarme Enoyer Email Plein écran Analog Channels123ú123ú56
Einft.
DHCP
Défactiver Encryútion 00025
Port SMTP
Serveur SMTP
Nom d‘utilifateur Mot de Paffefhow Emetteur Email du deftinatairie 1
Email du deftinatairie 2
Email du deftinatairie 3
IntervalleTeft de l‘Email Automatiq.
3 Min FTP activéDéfactiver ServerIP
00021
Port Nom d‘utilifateur Mot de Paffe Nom doffier TEST FTP
RTSP ActivéActiverVerierActiverPort RTSP00554Nom d‘utilifeur RTSPadminMot de úaffe RTSP******Inftruction: Analog Channel: rtfú://IP:Port/chA/B
IP Channel: rtfú://IPPort/iúA/B
A:01(ch1),02(ch1).i..
B:0(main ftream),1(ifub ftream) V
S J M
M
L
D
MM/JJ/ffD L M M J V S
1
2 3 ú 5 6 7 89 10 11 12 13 1ú 15
16 17 18 19 20 21 2223 2ú 25 26 27 28 2930 31Eteindre Eteindre Nom d‘utilifateur adminMot de Paffe Redémarrer Annuler CanalTYPEHeure CON.RelectureNREGISTRE
Taille Taille
72
Français 6.6 Activation du verrouillage, modifications des mots de passe, détermination des droits utilisateur En usine, l’accès à l’enregistreur n’est pas protégé. Le mot de passe préréglé «admin» n’est pas activé, c’est-à-dire qu’il n’est pas nécessaire de le saisir pour modifier un réglage. Si l’enregistreur est intégré dans un réseau, activez impérativement le mot de passe et modifiez-le (voir également chapitre 2
«Conseils importants pour la sécurité des donneés»).
1) Appelez le menu principal, sélectionnez le menu «Système» et cliquez à gauche sur le sous-menu «Utilisateurs».
i Général Editer Annuler ParamètresRecf. d‘enreú.Appareil Système Avancés Eteindre Infos Journal Utilisateurs N° 1
2
3
4
5
6
7Nom d‘utilisfteurfdminuser1
user2
user3
user4
user5
user6Niúefu Admin Utilisfteur 1
Utilisfteur 2
Utilisfteur 3
Utilisfteur 4
Utilisfteur 5
Utilisfteur 6Actiúer Actiúer Désfctiúer Désfctiúer Désfctiúer Désfctiúer Désfctiúer Désfctiúer Schéma 6-18 Menu pour les mots de passe et groupes d’utilisateurs 2) La ligne N°1 pour le mot de passe Administrateur est sélectionnée. Pour le modifier et activer le verrouillage d’utilisation, cliquez sur «Editer».
Editer l‘utilisatecur Nom d‘utilisateur Nom d‘utilisateur adminadmin Désactifer Actifer le mot de pacsseMot de úasse Conrmer úar défautEnregistrer Annuler Schéma 6-19 Fenêtre pour modifier les mots de passe 3) Si souhaité, modifiez le nom utilisateur «admin».
4) Mettez la ligne «Activer le mot de passe» sur «Activer». Le verrouillage d’utilisation s’active après 2 minutes si aucun menu n’est affiché et si l’enregistreur n’est pas utilisé.
5) Dans la ligne «Mot de Passe», saisissez un nouveau le mot de passe de 8 caractères au moins et répétez-le dans la ligne «Confirmer».
Important : Pour une surveillance à distance et un accès à distance à l’enregistreur via un réseau, le mot de passe doit exactement comporter 8 signes. Il est possible de saisir plus de caractères mais le logiciel pour l’accès à distance («ActiveX») ne reconnaît pas le mot de passe comme valable.
6) Cliquez sur «Enregistrer» pour mémoriser le nouveau mot de passe. Une fois la sauvegarde réussie, un message correspondant s’affiche, confirmez avec «OK».
7) Pour définir les droits utilisateur, saisissez tout d’abord comme décrit ci-dessus, un nom utilisateur et un mot de passe pour chaque utilisateur.
8) Si une ligne est sélectionnée pour un utilisateur, le bouton «Permission» s’affiche en bas du menu. Cliquez sur ce bouton pour définir les droits utilisateur.
Autorisation de l‘hutilisateurs SauvegardeAnalog Channels Caféra IP
Parafútres Recherche logMaintenirEnreg. fanuel Gérer disqueConnecion à dist.Contrôle séquenceManual Capture Nof d‘utilisateur user1
Tous Effacer Enregistrer Annuler 1234123456
DirectAnalog Channels Caféra IP
1234123456
RelectureAnalog Channels Caféra IP
1234123456
PTZAnalog Channels Caféra IP
1234123456
Schéma 6-20 Menu pour les droits utilisateur Ici, réglez et sauvegardez les droits pour l’utilisateur sélectionné. Répétez, si besoin pour d’autres utilisateurs.
9) Pour quitter le menu, cliquez sur «Annuler» ou attendez jusqu’à ce que le menu disparaisse, une fois la durée réglée écoulée.
6.7 Configurer les entrées alarme Si des capteurs d’alarme, par exemple détecteurs de mouvements ou barrières lumineuses, sont reliés aux contacts SENSOR (27), configurez les entrées d’alarme via le menu «Paramètres», sous-menu «Alarme», section «Alarme».
i 11234
23456
Afchage AlarmeEnregistrer Réseau far défaut Alarm InES-1Statut ESformalement-OuúertDélai de úerroulillauge10 SSonnerie Retard úidéo Sortie alarme Afcher le MessagePlein écran Enúoyer Email Fermer 30 S
CopierA
ES-1Tous Copier Enregistrer le canalu Analog Channels Caméra IPSúortCaúture Alarme Editer Annuler faramètresRech. d‘enreg.Aúúareil Système Avancés Eteindre Schéma 6-21 Menu pour les entrées alarme Point menu Fonction Alarm InSélection de l’entrée d’alarme Statut ESSélection du type de contact Normalement Ouvert Normalement Fermé Fermer = le signal d’entrée n’est pas évalué Délai de verroullageDurée du symbole I dans l’image Live et durée d’affichage de l’image de caméra en plein écran SonnerieDurée sonnerie alarme Retard vidéoDurée d’un enregistrement déclenché par une alarme Sortie alarmeL’alarme est dirigée vers la sortie ALARM (27) Affichage le MessageUne alarme est affichée dans l’image Live par le symbole I
Envoyer EmailEn cas d’alarme, un email est envoyé ; réglages email, voir le menu «Paramètres», sous-menu « Réseau», section «Email» Plein écran Le canal correspondant est affiché en image plein écran CopierLes réglages d’une entrée d’alarme sont repris pour d’autres entrées Par défautRéinitialisation sur le réglage usine EnregistrerSauvegarder le réglage AnnulerQuitter le menu
73
Français 6.8 Activation / désactivation des sons Diriger les événements vers la sortie alarme Pour les événements suivants, le buzzer interne d’alarme peut retentir et le relais d’alarme peut déclencher [sortie ALARM (27), charge 30 V (⎓), 1 A]. Vous pouvez régler la durée de l’alarme sonore et la réponse du relais via les menus correspondants et les points de menu «Sonnerie» et «Sortie alarme».
EvénementChemin menu Alarme déclenchée via les entrées SENSOR (27)Paramètres Alarme Alarme Mouvement dans l’imageParamètres Alarme Sport Disque dur pleinAvancés Evénements Type d’événement : Disque plein Erreur d’écriture sur le disqueAvancés Evénements Type d’événement : Erreur disque Signal vidéo interrompuAvancés Evénements Type d’événement : Perte vidéo 6.9 Réglages pour la surveillance Live : nom de la caméra, image et affichage temps Appelez le menu «Paramètres», cliquez sur le sous-menu «Affichage» et cliquez sur la section «Direct».
i Afchage SortieEnregistrer Réseau faméra Iú Zone privée úar défautCanalCA1NomCA1Afcher le nomActiverfurée dúenreg.Position OSf CouleurActiver CachéfésactiverAfcher lúheureActiver CopierA
CA1Tous Copier Congurer Congurer ftrl d‘images Direct fapture Alarme Analog fhannels Editer Annuler Rech. d‘enreg.
Appareil Système Avancés úaramètresEteindre Schéma 6-22 Menu pour la surveillance Live Point menuFonction CanalSélection du canal de caméra NomSaisie du nom de la caméra Afficher le nomAffichage du nom de la caméra Durée d’enregistrementAffichage de la date et de l’heure de l’enregistrement lors de la lecture Position OSDDéplacer la position du nom de la caméra et l’affichage de l’heure (touche gauche de la souris enfoncée ; quitter le réglage : appuyez sur la touche droite de la souris) CouleurOuverture de la fenêtre pour le réglage d’image (couleur, luminosité …) CachéL’image de la caméra n’est pas affichée en surveillance Live Afficher l’heureAffichage de l’heure CopierReprendre les réglages d’un canal de caméra sur d’autres canaux Par défautRéinitialisation sur le réglage usine EnregistrerSauvegarder le réglage AnnulerQuitter le menu 6.10 Cacher des zones d’images Si certaines zones d’images ne doivent pas être visibles (par exemple voies ou places du domaine public), elles peuvent être cachées. Pour ce faire, vous pouvez placer quatre rectangles noirs différents dans chaque image de caméra. Appelez le menu «Paramètres», cliquez dans le sous-menu «Affichage» et cliquez sur la section «Zone privée».
i CanalCA1Masquer la zoneDésactfverParamétraúe zone 1 2 3 4
Masquer la zone CopferA
CA1TousCopfer Conúurer Afchage SortieEnregistrer Réseau faméra Iú Zone privée úar défaut ftrl d‘images Direct fapture Alarme Analog fhannels Editer Annuler Rech. d‘enreg.
Appareil Système Avancés úaramètresEteindre Schéma 6-23 Menu pour masquer des zones d’images Point menuFonction CanalSélection du canal de caméra Masquer la zoneCommutez sur «Activer» pour pouvoir définir des zones pour le masquage Paramétrage zonePour définir un masque, cliquez sur son numéro Masquer la zone 1. Cliquez sur Configurer pour commuter sur l’image sélectionnée.
2. Pour déplacer, maintenez la touche gauche de la souris enfoncée dans le milieu du masque.
3. Pour modifier la taille, maintenez la touche gauche de la souris enfoncée dans le coin inférieur droit du masque.
4. Pour revenir au menu, cliquez dans l’image de la caméra avec la touche droite de la souris.
CopierReprendre les réglages d’un canal de caméra sur d’autres canaux Par défautRéinitialisation sur le réglage usine EnregistrerSauvegarder le réglage AnnulerQuitter le menu 6.11 Réglage de la détection de mouvements En usine, la détection de mouvements est activée pour chaque canal de caméra et réglée de telle sorte que toute la zone d’image soit sensible à une détection. En cas de mouvement dans l’image, le symbole M (Motion) s’affiche. S’il n’y a pas d’autre mouvement pendant 10 secondes, le symbole disparaît.
Appelez le menu «Paramètres», cliquez dans le sous-menu «Alarme» et cliquez sur la section «Sport».
i 11234
23456AlarmeRéseau CanalCA1Activer Sonnerie félai de verroillaúe Activerfésactiver 10 S
Sensibilité4Zone Retard vidéo Sortie alarme Afcher le MessaúePlein écran Envoyer Email 30 S
CopierA
CA-1Tous Copier Conúurer Enreúistrer le canalo Analoú Channels Caméra IPSportCapture Alarme Afchafe Enrefistrer úar défaut Editer Annuler Rech. d‘enref.
Appareil Système Avancés úaramètresEteindre Schéma 6-24 Menu pour la détection de mouvements Point menuFonction CanalSélection du canal de caméra Activer Activation / Désactivation de la détection de mouvements SonnerieLe buzzer d’alarme retentit en cas de détection de mouvement SensibilitéSensibilité de la détection
74
Français Point menuFonction Zone 1. Cliquez sur Configurer pour exclure des champs de la détection.
2. Les champs sensibles aux mouvements sont repérés en rouge. Pour désactiver plusieurs champs, allez sur les champs correspondants en maintenant la touche gauche de la souris enfoncée.
3. Chaque champ peut être cliqué directement.
4. Procédez de la même manière pour activer des champs.
5. Pour revenir au menu, cliquez dans l’image de la caméra avec la touche droite de la souris.
Retard vidéoDurée d’un enregistrement lorsqu’il a été déclenché par une détection de mouvement Délai de verrouillageDurée de l’alarme (affichage M, buzzer d’alarme, relais d’alarme déclenche) Sortie alarmeEn cas de détection de mouvement, le relais d’alarme déclenche (sortie ALARM, chapitre 5.4) Afficher le MessageUn mouvement détecté est signalé par l’affichage M (Motion) Envoyer EmailSi un mouvement est détecté, un email est automatiquement envoyé si les données nécessaires ont été saisies dans le menu «Paramètres», sous-menu «Réseau», zone «Email».
Plein écranL’image de la caméra avec un mouvement détecté est affichée en image plein écran.
Engegistrer le canalSaisie des canaux qui doivent être enregistrés en cas de détection de mouvement (plusieurs canaux peuvent être enregistrés bien que le mouvement ne soit détecté que dans un seul canal).
Les temps d’un enregistrement possible déclenché par un mouvement doivent être saisis dans le calendrier d’enregistrement (Menu «Paramètres», sous-menu «Enregistrer», section «Planification enreg», cliquez dans le champ de sélection entouré de jaune «sur mvmt» et en maintenant la touche gauche de la souris enfoncée, allez sur les jours / heures.) CopierReprendre les réglages d’un canal de caméra sur d’autres canaux Par défautRéinitialisation sur le réglage usine EnregistrerSauvegarder le réglage AnnulerQuitter le menu 6.12 Gestion à distance de caméra (PTZ) Pour une gestion à distance des caméras reliées à l’interface RS-485 (27), effectuez les réglages nécessaires sur l’enregistreur.
Appelez le menu «Appareil» et cliquez sur le sous-menu «PTZ».
i Disque Dur CloudCanalCA1
Protocole Pelco-D
Débit en baufs 96úú Bit fe fonnées 8
Bit f‘arrêt 1
ParitéAucun Balayage Activer Afresse úú1PTZ
Par défaut Copier CA1A TousCopierfditer Annuler Reúh. d‘enreg.
Appareil Système Avanúés Paramètresfteindre Schéma 6-25 Menu pour régler la gestion à distance de la caméra Point menuFonction CanalSélection du canal de caméra ProtocoleSélection du protocole de gestion de la caméra Débit en baudsSélection du débit des données Bit de donnésNombre de bits Bit d’arrêtNombre de bits d’arrêt ParitéType du bit de parité : Aucun, Impaire, Paire, Marque (toujours 1), Espace (toujours 0) BalayagePermettre (Activer) ou bloquer (Désactiver) le déplacement de la caméra Point menu Fonction AdresseAdresse de la caméra pour une gestion indépendante de toutes les caméras reliées CopierReprendre les réglages d’un canal de caméra sur d’autres canaux Par défautRéinitialisation sur le réglage usine EnregistrerSauvegarder le réglage AnnulerQuitter le menu Vous trouverez les réglages pour le protocole, débit, arrêt et adresse dans les caractéristiques techniques de la caméra.
6.13 Autoriser des enregistrements Capture (photographies instantanées) Avec la fonction Capture, il est possible de mémoriser des photographies instantanées d’images de caméra de manière programmée ou manuelle. Appelez le menu «Paramètres» et cliquez sur le sous-menu «Capture».
i Bewegung Capture PlanningEnregistrer Réseau CanalCA1Auto CaptureDésaftiverMoúe úe uxFlux PrimairesNormal Interval Alarm Interval Manual Capture5 S5 S
Désaftiver CopierA
CA1Tous Copier Alarme Capture Affchage Par úéfaut Eúiter Annuler Rech. ú‘enreg.
Appareil Système Avancés ParamètresEteinúre Schéma 6-26 Menu pour activer la fonction Capture Point menuFonction CanalSélection du canal de caméra Auto CapturePermettre les enregistrements Capture programmés (temps enregistrement dans la zone «Planning») Mode de flux «Flux Primaires» = résolution élevée, flux importants de données «Flux Secondaires» = résolution faible, flux faibles de données Normal IntervalIntervalles entre des enregistrements en mode normal Alarm IntervalIntervalles entre des enregistrements en cas d’alarme Manual CapturePermettre des enregistrements Capture manuels (déclencher un enregistrement, voir chapitre 7.6.2) CopierReprendre les réglages d’un canal de caméra sur d’autres canaux Par défautRéinitialisation sur le réglage usine EnregistrerSauvegarder le réglage AnnulerQuitter le menu Pour définir les heures auxquelles des enregistrements de photographies instantanées doivent être automatiquement effectués, cliquez sur la zone «Planning» : i Bewegung 020181614121022
2468
Capture PlanningEnregistrer Réseau Copier A
CA1ToufCopier CanalNorúalfur úvút alarúef CA1
Dimanche Lundi Mardi Mercredi Jeudi Vendredi SamediCapture AlarmeL D
M M
J
V
S
Affchage Par úéfaut Eúiter Annuler Rech. ú‘enreg.
Appareil Système Avancés ParamètresEteinúre Schéma 6-27 Calendrier pour les enregistrements de photographies instantanées programmés
75
Français 1) Après «Canal», un canal de caméra est sélectionné (ici canal 1). Si l’horaire d’enregistrement pour un autre canal doit être modifié, cliquez sur le symbole .
2) Pour régler les horaires d’enregistrement, allez sur la période voulue en maintenant la touche gauche de la souris enfoncée. Il est également possible de sélectionner des blocs distincts de demi-heures par un simple clic.
3) Des horaires d’enregistrement peuvent également être effacés.
4) Pour mémoriser automatiquement des enregistrements en cas de détection de mouvement et / ou d’alarme, cliquez tout d’abord dans l’ellipse jaune «sur mvm» ou dans l’ellipse rouge «alarmes». Ensuite, par un clic gauche de la souris, allez sur la période voulue.
5) Si le réglage doit être repris également pour d’autres canaux de caméras, sélectionnez dans la ligne «Copier CA… A
Tous» au bas du menu et cliquez sur «Copier».
6) Pour mémoriser le réglage, cliquez sur «Enregistrer» ; pour effacer tous les horaires, cliquez sur «Par défaut» et pour ne plus afficher le menu, cliquez sur «Annuler».
6.13.1 Sauvegarde Cloud pour des enregistrements Capture Si lors d’un cambriolage, l’enregistreur a été volé ou détruit, tous les enregistrements sont perdus. Il est cependant possible de sauvegarder automatiquement des enregistrements Capture (photographie instantanée) dans un Cloud (espace de stockage sur un serveur externe) lorsque l’enregistreur est relié à internet. Il est possible d’appeler les images depuis le Cloud avec un accès protégé.
1) Enregistrez-vous sur le site de «Dropbox» : https://www.dropbox.com/ 2) Appelez le menu «Appareil» et cliquez sur le sous-menu «Cloud».
1234123456
i Disque Dur CloudStorag. Cloud Dfsactiúer Pype de CloudDROPBOX
Temps de dfclenchemenDt1 MinDftection de mouúemenDtDfsactiúerNom du lecteurDeúiceActiúer le CloudUpgrade Cloud StorDageCong. aúancfe de l‘DEmail PTZ
Canal Analog Channels Camfra IP
Par défautfditer Annuler Reúh. d‘enreg.
Appareil Système Avanúés Paramètresfteindre Schéma 6-28 Menu pour mémoriser des images dans un Cloud 3) Dans le sous-menu «Cloud», effectuez les réglages.
Point menuFonction Storag. Cloud Fonction Cloud marche / arrêt Type de CloudMémorisation, pour l’instant uniquement possible sur «Dropbox» CanalSélection des canaux dont les images doivent être stockées dans le Cloud Temps de déclenchementIntervalles entre les enregistrements en mode normal Détection de mouvementStocker des enregistrements (en plus) si un mouvement est détecté Nom de lecteurDéfinir le nom sous lequel les images doivent être mémorisées dans le Cloud Activer le CloudPour activer la fonction Cloud, cliquez ici Point menuFonction Configuration avancée de l’EmailSi vous voulez recevoir un email lorsque des images sont stockées dans le Cloud, cliquez sur ce bouton et saisissez les données dans la fenêtre qui s’ouvre.
Par défautRéinitialisation sur le réglage usine EnregistrerSauvegarder le réglage AnnulerQuitter le menu 6.14 Mémoriser et appeler différentes configurations Il est possible de sauvegarder des différentes configurations d’enregistreurs pour différents utilisateurs ou différentes applications (par exemple sur une clé USB) et si besoin de les rappeler.
1) Connectez un support de mémoire externe (clé / disque dur) à un des deux ports USB de l’enregistreur.
2) Configurez l’enregistreur comme souhaité.
3) Appelez le menu «Avancés» ; le sous-menu «Maintenir» s’affiche : i MaintenirUtilisateur admin Redémarrage Activer Redémarrer Semaines fim.00:00
úise à jour Import la cong.
Cong Usine Cam Réglages d‘usineEnregistrer paramèSRedémarrer IPCIPC Upgrade Evènements Par défaut Enregistrer fnnuler Recú. d‘enreg.
fppareil Système fvancés ParamètresEteindre Schéma 6-29 Menu «Avancés», zone «Maintenir» 4) Cliquez sur «Enregistrer paramè» et dans la fenêtre qui s’ouvre, effectuez les saisies pour mémoriser et cliquez sur «OK». Le fichier de configuration s’appelle «DEVICE_Settings».
5) Pour des configurations différentes, sauvegardez-les dans des dossiers différents pour qu’une configuration de l’enregistreur déjà sauvegardée ne soit pas écrasée.
6) Pour appeler une configuration, cliquez sur «Import la config.» 6.15 Astuces AstuceChemin menu Commutation automatique entre heure d’été et d’hiverSystème Général DST
Réglage automatique de l’heure via le réseauSystème Général NTP
Limiter la détection de mouvementsParamètres Alarme Sport Envoyer automatiquement un email en cas d’alarmeParamètres Réseau Email Désactiver les canaux auxquels aucune caméra n’est reliée.
Pour chaque canal désactivé d’une caméra analogique, on peut en plus brancher une caméra réseau.Paramètres Affichage Analog Channels Si l’enregistreur n’est pas relié dans un réseau, désactivez les menus réseau pour obtenir une interface utilisateur plus simple.Système Général Général: Mode = DVR
76
Français 7 Utilisation L’enregistreur s’utilise très confortablement avec la souris.
C’est pourquoi, l’utilisation directement sur l’enregistreur et avec la télécommande n’est décrite dans cette notice que partiellement.
Allumez l’enregistreur avec l’interrupteur à bascule (30) sur la face arrière de l’appareil. Après quelques secondes, le logo de la société s’affiche sur le moniteur relié : Ensuite, les images de caméra pour une surveillance Live (chapitre 7.3) s’affichent. Le buzzer interne d’alarme sonne cinq fois pour contrôle. Voir chapitre 8 en cas de dysfonctionnement ou alarme.
7.1 Verrouillage Si le verrouillage a été activé pour l’enregistreur (chapitre 6.6), et si l’enregistreur n’est pas utilisé pendant 2 minutes environ, le verrouillage s’active automatiquement. Il doit protéger l’enregistreur de tout accès non autorisé et est signalé par le symbole du cadenas fermé dans la barre de fonction.
1) Affichez la barre de fonction : faites un clic droit avec la souris ou avec la souris, allez au centre du bord inférieur de l’écran.
Schéma 7-1 Barre de fonction 2) Pour activer le verrouillage avant la fin des deux minutes, cliquez sur le symbole du cadenas.
3) Si, lorsque le verrouillage est activé, une fonction est appelée (par exemple le menu principal), la fenêtre «Connexion» s’affiche.
Connexion Annuler Connexion Utiisateur adminCode appareil 000000 0 f 000000 ) Mot de Passe Schéma 7-2 Fenêtre pour désactiver le verrouillage 4) Dans le champ entouré de bleu, cliquez sur «Mot de Passe».
Une fenêtre s’ouvre avec un clavier. Saisissez alors, à l’aide du clavier, le mot de passe et cliquez sur «Connexion».
7.2 Changement utilisateur Si plusieurs comptes utilisateur sont créés pour l’utilisation de l’enregistreur, un nouvel utilisateur doit s’enregistrer avec son mot de passe pour pouvoir utiliser l’enregistreur avec ses droits utilisateur : 1) Affichez la barre de fonction (Schéma 7-1) : faites un clic droit avec la souris ou avec la souris, allez au centre du bord inférieur de l’écran.
2) Le symbole du cadenas doit être fermé. Si un cadenas ouvert s’affiche, cliquez sur le cadenas avec la touche gauche de la souris pour le fermer.
3) Cliquez sur le symbole fermé du cadenas : la fenêtre «Connexion» s’affiche (Schéma 7-2).
4) Dans le champ entouré de bleu, cliquez sur «Utilisateur».
Une fenêtre avec un clavier s’ouvre.
5) Effacez tout d’abord le nom utilisateur précédent avec la touche «Espace» dans la fenêtre du clavier. Ensuite, saisissez le nouveau nom sur la fenêtre du clavier.
6) Saisissez de la même manière le mot de passe et cliquez sur «Enter».
7) Enfin, cliquez sur «Connexion».
Si un mot de passe n’est pas actif, il suffit de cliquer sur «Connexion».
7.3 Surveillance Live Une fois l’enregistreur allumé, les images de caméras sont toujours visibles dans la visualisation Live : MR
MR
T-CH1
CH4
T-CH2
CH3
PERTE VIDÉO
PERTE VIDÉOAfcfne cúmérú IPAfcfne cúmérú IP
15/12/2016 09:53:4A6
Schéma 7-3 Surveillance Live avec l’AXR-104
CH1CH2
CH5CH6
CH3
CH8CH7
CH415/12/2016 13:45:V37
PERTE VfDÉOPERTE VfDÉOPERTE VfDÉOPERTE VfDÉO
úucune caméra fPúucune caméra fPúucune caméra fPúucune caméra fP
Schéma 7-4 Surveillance Live avec l’AXR-108
CH1
CH6
CH11
CH7
CH12
CH8
CH13
CH9
CH14
CH10
CH15
CH16
CH2CH3CH4CH515/12/2016 13:45:n37
Aucunf caméúa IPAucunf caméúa IPAucunf caméúa IPAucunf caméúa IP
PERTE VIDÉOPERTE VIDÉOPERTE VIDÉOPERTE VIDÉO
Schéma 7-5 Surveillance Live avec l’AXR-116
Chaque image de caméra est, en usine, dénommée par le nom «CH-» et le numéro du canal. Les noms peuvent être modifiés si besoin, par exemple «Entrepôt», «Entrée», «Caisse»…
(voir chapitre 6.9). Le type de caméra préréglé est également affiché :
77
Français Affichage Type caméra aucunCaméra analogique avec signal composite ACaméra AHD (Analog High Definition) C-Caméra CVI (Composite Video Interface) T-Caméra TVI (Transport Video Interface) La surveillance Live n’influe pas sur un enregistrement en cours (signalé par le symbole R dans l’image de la caméra).
Il est possible d’afficher chaque image de la caméra ou une sélection d’images de manière plus grande : VisualisationAction Image unique en plein écranAvec la touche gauche de la souris : Faites un double clic sur l’image voulue.
Sur l’appareil ou avec la télécommande : Appuyez sur la touche numérique correspondante 1 … 9 ou sur la touche CH – / CH + (AXR-104, AXR-108) ; canaux 10 … 16 : touche 1 et touche 0 …6
Retour à toutes les images de camérasAvec la touche gauche de la souris : Faites un double clic sur l’image plein écran.
Sur l’appareil ou avec la télécommande: Appuyez sur la touche ALL (plusieurs fois) ou sur la touche (AXR-116).
Différent nombre d’images de camérasAvec la souris : par un clic droit de la souris, affichez la barre de fonction. Sélectionnez la visualisation : Symbole ImagesAXR-104AXR-108AXR-116
4 9— 12— 16—— 25—— autres sub-divisions En cliquant plusieurs fois sur le symbole de visualisation, commutez sur les autres canaux de caméras.
Sur l’appareil ou avec la télécommande : Appuyez sur la touche ALL (plusieurs fois) ou sur la touche (AXR-116).
Défilement de toutes les images plein écran (séquence) Avec la souris : cliquez sur le symbole «Démarrer SEQ» dans la barre de fonction. Pour régler la durée d’affichage des images, voir chapitre suivant.
Pour quitter le défilement, cliquez à nouveau sur le symbole .
7.3.1 Durée d’affichage et réglage de l’affichage en défilement d’image En usine, une durée d’affichage est réglée à 5 secondes. Pour modifier la durée : 1) Affichez le menu principal. Soit appuyez sur la touche MENU sur l’enregistreur / la télécommande soit avec la souris : affichez la barre de fonction : Faites un clic droit avec la souris ou avec la souris, allez au centre du bord inférieur de l’écran.
Schéma 7-6 Barre de fonction et cliquez sur le symbole «Menu principal».
i Analog Channels Afchage SortieEnregistrer RéceauCanalCA1
CA2
CA3
CA4Nom CH1
CH2
CH3
CH4Sfafe Acfiveú Acfiveú Acfiveú Acfiveú faméra Iú Zone privée Analog fhannels Direct ftrl d‘images fapture Alarme Enregistrer Annuler Rech. d‘enreg.
Appareil Système Avancés úaramètresEteindre CA1 CA2 CA3 CA4
Schéma 7-7 Menu principal 2) Le sous-menu «Affichage» dans le menu «Paramètres» est sélectionné. Tout à gauche dans le sous-menu, cliquez sur «Sortie» (sans symbole).
0
i Afchage SortieEnregistrer Réseau faméra Iú Zone privéeSortie vidéoSortie DirecktMode SéquenceDisfosition1Durée SEQúRésolution VGA/HDMI
Transfarence Sufforte l‘overscan1280x1024
Analog fhannels Dircet ftrl d‘images fapture Alarmeúar défaut Annuler Rech. d‘enreg.
Appareil Système úaramètresEteindre Enregistrer Avancés Schéma 7-8 Menu «Paramètres», sous-menu «Affichage», section «Sortie» 3) Dans la ligne «Mode Séquence», vous pouvez commuter d’une image unique (Disposition 1) sur une visualisation multiple. Pour ce faire, cliquez sur le symbole à droite dans la ligne.
4) Pour modifier la durée d’affichage, cliquez, dans la ligne «Durée SEQ», dans le champ avec le numéro «5» et saisissez la durée en secondes.
5) Pour sauvegarder le réglage, cliquez sur «Enregistrer» et après le message «Enregistrement de paramètres reussi !», cliquez sur «OK».
6) Fermez la fenêtre en cliquant sur «Annuler».
7.3.2 Augmenter la taille d’un segment d’image 1) Avec la touche gauche de la souris, cliquez sur l’image Live pour laquelle un segment doit être agrandi. (Pour une visualisation image unique, faites simplement un clic gauche de la souris). La barre de séléction rapide s’affiche : Schéma 7-9 Barre de sélection rapide pour chaque image de caméra 2) Cliquez sur le symbole loupe . Dans le cas d’une visualisation multiple, on commute sur une visualisation image plein écran. Le symbole loupe s’affiche : avec ce symbole, tirez pour créer une fenêtre qui définit le segment à agrandir.
3) Pour revenir au mode normal image plein écran, faites un clic gauche sur la souris. La fonction Zoom reste active : il est possible d’agrandir une autre section d’image.
4) Pour désactiver la fonction Zoom, faites un clic droit avec la souris. Ensuite, par un double clic gauche, vous pouvez revenir à la visualisation précédente images multiples.
78
Français 7.3.3 Restitution audio Seul le son du canal de caméra qui est affiché en plein écran, ou dans le cas d’une visualisation images multiples, le son de l’image entourée de bleu (sélectionnez avec la touche gauche de la souris) est restitué.
1) Pour régler le volume, affichez la barre de fonction (Schéma 7-10) avec la touche droite de la souris.
2) Cliquez sur le symbole haut-parleur . Un réglage de volume s’affiche.
3) En maintenant la touche gauche de la souris enfoncée, modifiez le volume avec le réglage à glissières.
4) Pour couper le son, cliquez directement sur le symbole haut-parleur sous le réglage. De la même façon, vous pouvez réactiver le son.
Pour activer et désactiver le son, vous pouvez également utiliser la touche MUTE sur la télécommande ou sur l’appareil.
Cependant, le réglage de volume ne doit pas être affiché.
7.4 Barres de commande – accès rapide aux réglages et fonctions Pour un accès rapide aux menus de réglage et aux fonctions les plus importantes, la barre de fonction (pour afficher, faites un clic droit avec la souris) est disponible ; pour chaque image de caméra, la barre de sélection rapide (avec la touche gauche de la souris, cliquez dans l’image souhaitée de caméra) est prévue.
Schéma 7-10 Barre de fonction SymboleFonction Appelez le menu principal : est sélectionné : menu «Paramètres» sous-menu «Affichage» zone «Analog Channels» Le symbole du cadenas n’existe que si un mot de passe est activé (chapitre 6.6).
Si le symbole du cadenas est ouvert, activez le verrouillage en cliquant sur le symbole (chapitre 7.1).
Si le symbole du cadenas est fermé, le verrouillage est activé ; en cliquant sur le symbole, la fenêtre pour remplacer l’utilisateur s’ouvre (chapitre 7.2) Visualisation avec quatre images de caméras Pour les enregistreurs AXR-108 et AXR-116, d’autres symboles existent pour la visualisation de 9, 12, (16), (25) images.
Visualisation avec des images de taille différente Stream Switch pour l’image entourée de bleu : «Flux Primaires» = résolution élevée, flux importants de données «Flux Secondaires» = résolution plus faible, flux de données plus faibles Preview Policy règle les priorités pour une charge complète du système Temps réel = débit le plus élevé, qualité d’image moindre Equilibré = débit moyen, qualité d’image moyenne Régulier = qualité d’image élevée, moins d’images par seconde Démarrer / arrêter le défilement d’images (séquence) (chapitre 7.3) Régler le volume, activer / désactiver le son (chapitre 7.3.3) Ouvrir le menu pour la recherche d’enregistrements (chapitre 7.7.2) Schéma 7-11 Barre de sélection rapide avec les fonctions, séparément pour chaque image de caméra SymboleFonction Mémoriser un enregistrement Capture (chapitre 7.6.2) Démarrer ou arrêter manuellement un enregistrement (chapitre 7.6) Lire les 5 dernières minutes de l’enregistrement (chap. 7.7.1) Augmenter la section de l’image (chapitre 7.3.2) Réglage de la couleur, luminosité et contraste (chapitre 7.5) Afficher le menu de gestion pour une caméra PTZ (chap. 7.8) 7.5 Réglage de couleur, luminosité, contraste des images Live 1) Avec la touche gauche de la souris, cliquez sur l’image Live à régler. (Pour une visualisation image unique, cliquez simplement avec la touche gauche de la souris). La barre de sélection rapide s’ouvre (Schéma 7-11).
2) Cliquez sur le symbole de la palette de couleurs . L’image Live est affichée comme image unique, le menu pour le réglage de l’image s’affiche : 125130132100
Couleur Canal TEINTECA1
LfMINOSITú CONTRASTE
SATfRATION
Par défaultEnregistrerAnnuler Schéma 7-12 Menu pour le réglage d’image Point menuFonction CanalCommuter sur un autre canal de caméra TEINTERégler la teinte LUMINOSITÉRégler la luminosité CONTRASTERégler le contraste SATURATIONRégler la saturation Par défautRéinitialisation sur le réglage usine EnregistrerSauvegarder le réglage AnnulerQuitter le menu 3) Pour revenir à la visualisation précédente, une fois que le menu est quitté, faites un double clic avec la touche gauche de la souris.
7.6 Enregistrements En usine, l’enregistreur est réglé de telle sorte que tous les canaux auxquels une caméra est reliée soient enregistrés après l’allumage. Si le réglage a été modifié (menu «Paramètres», sous-menu «Enregistrer», section «Planification enreg»), on peut démarrer manuellement un enregistrement pour un canal qui n’a pas été enregistré automatiquement : 1) Avec la touche gauche de la souris, cliquez sur l’image Live qui doit être enregistrée. (Pour une visualisation image unique, faites simplement un clic gauche de la souris.) La barre de sélection rapide (Schéma 7-11) s’affiche.
2) Cliquez sur le symbole de caméra . Rapidement après, l’enregistrement démarre, le symbole R (Record) s’affiche.
3) Pour arrêter l’enregistrement, appuyez à nouveau sur le symbole .
A la place, il est possible de démarrer un enregistrement avec la touche sur l’enregistreur ou sur la télécommande et de l’arrêter avec la touche ■. Pour une visualisation images
79
Français multiples, l’enregistrement de la caméra dont l’image est encadrée de bleu, démarre. Si besoin, avant le démarrage de l’enregistrement, commutez, avec les touches numériques ou les touches CH − / CH +, sur la visualisation image plein écran du canal à enregistrer.
7.6.1 Modification des horaires d’enregistrement 1) Appelez le menu et dans le menu «Paramètres», sélectionnez le sous-menu «Enregistrer». Cliquez sur la zone «Planification enreg».
i 020181614121022
2468Afchage Enregistrer Planication enregFlfx Primaires Flfx secondaires Flfx moúilesEnregistrer Réseaf Par défaflt Copier A
CA1TousCopier Canalformalsur mvmú alarmes CA1
Dimanche Lundi Mardi Mercredi Jeudi Vendredi Samedi Captfre Alarme Enregistrer Annfler Rech. d‘enreg.
Appareil Système Avancés ParamètresEteindre L D
M M
J
V
S
Schéma 7-13 Calendrier hebdomadaire d’enregistrements En usine, tous les canaux de caméras auxquels une caméra est reliée, sont enregistrés de 0 heure à 24 heures. Pour modifier : 2) Un canal de caméra est sélectionné après «Canal» (ici canal 1). Si l’horaire d’enregistrement doit être modifié pour un autre canal, cliquez sur le symbole .
3) Pour effacer des horaires d’enregistrement, allez sur la période voulue en maintenant la touche gauche de la souris enfoncée. Il est possible d’effacer des blocs de demi-heures en cliquant.
4) Les périodes effacées peuvent être ajoutées de la même manière.
5) Pour un démarrage automatique des enregistrements en cas de détection de mouvements et / ou alarme, cliquez tout d’abord sur l’ellipse jaune «sur mvmt» ou sur l’ellipse rouge «alarmes». Ensuite, allez sur la période souhaitée en maintenant la touche gauche de la souris enfoncée.
6) Si le réglage doit être repris pour d’autres canaux de caméras, effectuez la sélection dans la ligne «Copier CA … A Tous» dans le bas du menu et cliquez sur le bouton «Copier».
7) Pour mémoriser les périodes, cliquez sur «Enregistrer».
Confirmez le message «Enregistrement de paramètres réussi ! » par «OK», le message disparaît.
8) Cliquez sur «Annuler» pour quitter le calendrier.
7.6.2 Images Capture écran (photographie instantanée) A tout moment, on peut mémoriser une photographie instantanée d’une image de caméra avec la fonction Capture, par exemple si un événement important doit être conservé pendant une surveillance Live. En usine, la fonction Capture n’est pas activée. Pour l’activer, voir chapitre 6.13. Pour mémoriser une photographie instantanée : 1) Avec la touche gauche de la souris, cliquez sur l’image Live qui doit être enregistrée. (Pour une visualisation image unique, faites simplement un clic gauche de souris). La barre de sélection rapide (Schéma 7-11) s’affiche.
2) Cliquez sur le symbole . La photographie instantanée est ainsi sauvegardée.
3) Pour afficher et exporter les images de Captures d’écran, voir chapitre 7.7.3.
7.7 Lecture des enregistrements La lecture d’un enregistrement n’interrompt pas un enregistrement en cours.
7.7.1 Lectures des 5 dernières minutes d’enregistrement d’une caméra 1) Avec la touche gauche de la souris, cliquez dans l’image Live de caméra dont l’enregistrement doit être lu. La barre de sélection rapide (Schéma 7-11) s’affiche.
2) Cliquez sur le symbole . La lecture des 5 dernières minutes enregistrées démarre, une barre de gestion s’affiche : Schéma 7-14 Barre de gestion de lecture 3) Avec les boutons et II, vous pouvez arrêter et reprendre la lecture.
4) Par plusieurs clics sur le symbole pause II, des images uniques peuvent être visualisées les unes après les autres.
5) En avançant et reculant le bouton de lecture avec la touche gauche de la souris enfoncée, on peut faire une avance ou un retour rapide dans l’enregistrement.
6) Pour arrêter avant terme la lecture, cliquez sur la croix × rouge.
7.7.2 Lecture d’un enregistrement d’une période donnée et si besoin, la sauvegarder sur un support externe Pour afficher le calendrier de recherche d’enregistrements, soit appuyez sur la touche sur l’appareil / la télécommande soit affichez la barre de fonction (Schéma 7-10) avec la touche droite de la souris, et cliquez sur le symbole de lecture sur la droite de la barre de fonction.
1234123456
i Relecture Canal Analof Channels Camúra IP
Général Lecture D
25 26 27 28 29 30 3112 3 4 5 67
14
21
284
8
9
16 17 18 19 20232425 26 27
30 311 2 3
10 11 12 13
15
22
29L M M J V S
Rechercher Canal TousJan.
2017
Heure de Dúbut 00:00:00Heure de Fin 23:59:59
TYPE Tous Picture Evènements Annuler Recf. dúenreg.
Appareil Système Avancés ParamètresEteindre Schéma 7-15 Calendrier pour la recherche d’enregistrement Une fois le calendrier affiché, le jour actuel est toujours sélectionné (repéré en jaune).
Les jours avec des enregistrements sont repérés par un triangle orange.
1) Cliquez sur le jour dont les enregistrements doivent être lus. Pour aller à un autre mois, cliquez sur la flèche blanche < ou > avant / après la donnée du mois. Pour sélectionner une autre année, cliquez sur la flèche bleue ou après le chiffre de l’année.
2) Dans la zone «Relecture Canal», on peut sélectionner ou désélectionner les canaux. Les canaux repérés en bleu sont lus.
3) Pour limiter la période de lecture, saisissez une heure de début et de fin dans les champs en bas du menu.
4) Pour lire, cliquez sur «Lecture».
80
Français 24h 2h 1h 30m CH2
CH1
00:00:0023:59:59
1702:00
0:0004:0006:0008:0010:0012:0014:0016:0018:0020:0022:0000
Lecture10/01/2017 07:16:4810/01/2017 07:16:48f 12 3 4 5 67
91011 12 1314
16 17 18 19 2021
23 24 25 26 2728
30 311 2 3 4
25 26 27 28 29 30 31
8
15
22
29L M M J V úJan.
Playback Type Généralúélectionner2017
úport úmart Normal IO Alarme CA1
CA2
CA3
CA4
IP CA1
IP CA2
IP CA3
IP CA4
IP CA5
IP CA6
07:16:48
Schéma 7-16 Visualisation lecture enregistrement 5) La visualisation lors de la lecture est très claire et très explicite. Dans le tableau suivant, les fonctions les plus fréquemment utilisées sont présentées : Symbole FonctionAffichage (champ vert en haut à droite) ✓ CH..
Afficher / masquer le canal— Masquer les menus ; pour les réafficher, allez au bord inférieur avec le pointeur de la souris et cliquez à nouveau sur le symbole— * Retour rapide> X 2 … 16
Augmenter la section vue précédente : clic droit de la souris— Sauvegarder un segment d’un enregistrement en externe : 1. Connectez un disque dur externe ou une clé USB à un des deux ports USB.
2. Lire l’enregistrement et au début de segment voulu et à la fin du segment, cliquez sur le symbole.
3. Au second clic, à la fin du segment, une fenêtre s’ouvre pour mémoriser le fichier vidéo. Sélectionnez le format vidéo et cliquez sur «Enregistrer».
4. Dans une autre fenêtre, sélectionnez le support de mémoire ou un dossier et cliquez sur «OK». Pour fermer la fenêtre, cliquez sur «Annuler».
Pour lire les fichiers vidéo, installez le programme «VideoPlayer…exe» (sur le CD livré) sur l’ordinateur.
Activer / désactiver le son ; réglez le volume avec le réglage à droite à côté du symbole Commutez le canal sélectionné (entouré de bleu) sur la visualisation image plein écran 24h 2h 1h 30mSélectionnez la zone pour l’échelle de temps : 24 heures, 2 heures, 1 heure, 30 minutes *Cliquez le cas échéant plusieurs fois sur le symbole 6) Pour arrêter la lecture et revenir au calendrier de recherche d’enregistrement, faites un double clic droit avec la souris ou cliquez en haut à droite sur la croix rouge × avec la touche gauche de la souris.
7) Pour rechercher un enregistrement dans le calendrier, par exemple déclenché par un mouvement détecté ou par une entrée d’alarme, cliquez sur le symbole dans le champ «TYPE» en haut du menu (préréglage «Tous»). Dans le menu pop-up, sélectionnez l’option voulue et cliquez sur «Rechercher» à droite. La procédure suivante et la lecture s’effectuent comme décrit dans les points 1 à 4.
7.7.3 Appeler des images Captures d’écran (photographie instantanée) 1) Appelez le menu «Rech. d’enreg.» : soit appuyez sur la touche sur l’appareil / la télécommande soit avec la touche droite de la souris, affichez la barre de fonction.
Schéma 7-17 Barre de fonction et cliquez sur le symbole de lecture . Le calendrier d’enregistrement s’affiche (Schéma 7-15).
2) Sur le calendrier, cliquez sur «Picture».
> 30
i GénéralSauvegarde RechercherDate Cafal15/0ú/ú017
Tous00:00:00
ú3:59:59Heure–TousTYPENľ1
3TYPE
N
MDate 1ú/0ú/ú017
1ú/0ú/ú017Heure ú3:38:0ú ú3:51:47Taille 378KB
38úKBRelectureCafalCA3
CA1Picture Evénements AnnulerSauvegarfe Rech.úf‘enreg.Appareil Système Avancés ParamètresEteinfre Schéma 7-18 Fenêtre pour rechercher des images Captures d’écran Point menuFonction DateDate de la recherche HeurePériode de la recherche CanalSélection des canaux de caméras TYPERaison pour déclencher la Capture All, Normal (programmé), Alarm, Motion, IO, Manual Rechercher Rechercher des images dans la période sélectionnée : Les images sont listées par ordre chronologique. Pour voir une image, cliquez sur sa date / heure et ensuite sur le symbole . Pour aller de l’image à la liste, faites un clic droit.
SauvegardeMémoriser les images sélectionnées (mettez un ✓ devant son numéro) sur un disque dur ou une clé USB.
AnnulerQuitter le menu
81
Français 7.8 Gestion de caméras PTZ
Si une ou plusieurs caméras, pouvant être gérées à distance (inclinaison, rotation, zoom, focus…), sont reliées, il est possible de les gérer de manière confortable via l’enregistreur.
1) Avec la touche gauche de la souris, cliquez sur l’image Live de la caméra, qui doit être gérée à distance. (Pour une visualisation image unique, faites simplement un clic gauche de la souris). La barre de sélection rapide s’affiche : Schéma 7-19 Barre de sélection rapide 2) Cliquez sur le symbole . La fenêtre de gestion s’ouvre : Vitesse : ZOOM
20CA1
+– Accent+– fRfS+– Schéma 7-20 Fenêtre pour la gestion PTZ
Point menu SymbolFonction CA…Sélection du canal de caméra PfeileRotation, inclinaison, rotation et inclinaison simultanément Fonction rotation panorama automatique marche / arrêt VitesseVitesse rotation / inclinaison Démarrage /Arr êt déplacement caméra Ouvrir une fenêtre pour mémoriser les positions de caméras pour le déplacement de caméra ZOOMFonction Zoom AccentRéglage netteté IRISRéglage diaphragme 3) Pour quitter la fenêtre de gestion, cliquez avec la touche droite de la souris dans l’image.
7.9 Effacer des données Si vous souhaitez donner l’enregistreur à une tierce personne (par exemple le vendre ou le louer), ou le mettre au rebut, effacez impérativement tous les enregistrements et mots de passe en formatant le disque dur et en réinitialisant l’enregistreur sur les réglages usine. Sinon, vous communiquez tous les enregistrements, données personnelles et mots de passe avec l’enregistreur.
1) Affichez le menu principal. Soit appuyez sur la touche MENU sur l’enregistreur ou la télécommande soit avec la souris : pour afficher la barre de fonction, faites un clic droit avec la souris ou allez avec la souris au centre de la barre inférieure de l’écran.
Schéma 7-21 Barre de fonction Dans la barre de fonction, cliquez à gauche sur le symbole «Menu principal».
i Analog Channels Afchage SortieEnregistrer RéceauCanalCA1
CA2
CA3
CA4Nom CH1
CH2
CH3
CH4Sfafe Acfiveú Acfiveú Acfiveú Acfiveú faméra Iú Zone privée Analog fhannels Direct ftrl d‘images fapture Alarme Enregistrer Annuler Rech. d‘enreg.
Appareil Système Avancés úaramètresEteindre CA1 CA2 CA3 CA4
Schéma 7-22 Menu principal 2) Dans la barre, en haut du menu, cliquez sur «Appareil».
i Disque Dur Par défaut Cloud Temps restant 209Heure Disponibfe/Totafe 891ú/931ú État OK
Nľ 1*fection Écraser AutoúmatiqueFormater disque duúr PTZ
fnregistrer Annuler úech. d‘enreg.
Appareil Système Avancés Paramètresfteindre Schéma 7-23 Menu «Appareil», sous-menu «Disque Dur» 3) Sélectionnez le disque dur : dans la colonne «Sélection», cliquez sur la ligne du disque dur (voir pointeur de la souris sur le schéma).
4) Cliquez sur le bouton «Formater disque dur». La fenêtre «Connexion» s’affiche.
i PTZCloud Disque Dur Par défaut Temps restant 209Heure Disponibfe/Totafe 891ú/931ú État OK
Nľ 1*fection Formater disque duúr fnregistrer Annuler úech. d‘enreg.
Appareil Système Avancés Paramètresfteindre Écraser Autoúmatique Connexion Utifisateur IadminMot de PasseConnexionAnnufer Schéma 7-24 Fenêtre «Connexion» 5) Si un mot de passe a été défini, saisissez-le. Cliquez sur «Connexion». La fenêtre suivante de confirmation s’affiche : OKAnnuler Le formatage effacera toutes les ddonnfes de votre disque eúATA
Remarques Schéma 7-25 Fenêtre pour confirmer le formatage 6) Cliquez sur le bouton «OK». Le processus de formatage est indiqué sous forme de bargraphe. A la fin du formatage, le message suivant s’affiche : 100%OK
Formatage terminé R!
Remarfues Schéma 7-26 Disque dur formaté 7) Cliquez sur «OK» : la capacité disponible et la durée disponible d’enregistrement sont indiquées.
8) Pour effacer tous les mots de passe et autres données, faites un Reset (voir chapitre suivant).
82
Français 7.10 Réglage usine (Reset) Pour réinitialiser l’enregistreur sur le réglage usine : 1) Affichez le menu principal : soit appuyez sur la touche MENU sur l’enregistreur / la télécommande ou faites un clic droit de la souris pour afficher la barre de fonction et cliquez sur le symbole «Menu principal».
2) Dans la barre, en haut du menu, cliquez sur «Avancés».
i MaintenirUtilisateur admin Redémarrage Activer Redémarrer Semaines fim.00:00
úise à jour Import la cong.
Cong Usine Cam Réglages d‘usineEnregistrer paramèSRedémarrer IPCIPC Upgrade Evènements Par défaut Enregistrer fnnuler Recú. d‘enreg.
fppareil Système fvancés ParamètresEteindre Schéma 7-27 Menu «Avancés» 3) Cliquez sur le champ «Réglages d’usine».
Réglages d‘usine Afchage Enfegistfef Réseau AlafmeAppafeil úystème Avancés Tous Effacef Enfegistfef Annulef Schéma 7-28 Fenêtre réglage d’usine 4) La réinitialisation sur les réglages usine peut se faire pour tous les types de réglage ou pour des types donnés.
Les types de réglage listés correspondent aux menus ou sous-menus de même nom. Pour sélectionner les types de réglage, cliquez avec la souris sur les champs correspondants.
Point menuFonction (Affichage etc.)Sélectionner un type donné TousSélectionner tous les types EffacerDésélectionner tous les types sélectionnés EnregistrerRéinitialiser les types sélectionnés sur le réglage usine AnnulerFermer la fenêtre 7.11 Appeler une liste d’événements L’enregistreur mémorise tous les événements, par exemple signal de caméra manquant, marche et arrêt de l’enregistreur, enregistrement manuel, lecture d’un enregistrement, modifications dans les réglages menu et plus encore.
Appelez le menu «Système» et cliquez sur le sous-menu «Journal».
3030
> i Générai Infos Journal Utilisateurs Sauvegarfe Rechercher Date de Début Tfpe de conneúion 15/02/201700:00:00Heure de DébutDate de Fin15/02/2017
Tous23:59:59Heure de Fin TYPE
SfstèmeAlarme Alarme Alarme Alarme StockageAlarme Conguration Heure 15/02/2017 11:17:5T4
15/02/2017 11:17:5T4
15/02/2017 11:17:5T4
15/02/2017 11:17:5T4
15/02/2017 11:17:5T4
15/02/2017 11:23:0T7
15/02/2017 11:30:4T1
15/02/2017 12:02:3T6CON.
Démarrage du sfstèmTePERTE VIDÉO
PERTE VIDÉO
PERTE VIDÉO
PERTE VIDÉO
No. 1 Formater disquTe durDébut du mouvementes de planiction d‘enreg NREGISTRE
Non Non Non NonOuielecturCanalCA1
CA2
CA3
CA4
CA4
Annuler Recú. f‘enreg.
Appareil Système Avancés ParamètresEteinfre Schéma 7-29 Liste d’événements après une demande de recherche Point menuFonction Date de DébutPremier jour de la recherche Date de Fin Dernier jour Heure de DébutHeure début Heure de FinHeure fin Type de connexion Sélection du groupe d’événements : Tous, Système, Configuration, Alarme, Compte, Enregistrer, Stockage La groupe s’affiche dans la colonne «TYPE».
RechercherDémarrer la recherche SauvegardeFenêtre pour mémoriser la liste par exemple sur une clé USB
AnnulerFermer la fenêtre Pour que toute manipulation sur l’enregistreur soit présente dans la liste d’événements, la liste ne peut être effacée ni par le formatage du disque dur ni par une réinitialisation sur les réglages usine.
7.12 Afficher les informations système Modifier les ID des appareils et les noms des appareils Appelez le menu «Système» et cliquez sur le sous-menu «Infos». La zone «Infos» est sélectionnée : i Général Infos Infos Info canal Record Info Journal UtflfsatursCode appareil000000Nom de l‘appareil1080P-Hf04NType d‘appareilHf-úVRVersion du matérielHúM-284Version du logicielHV7.1.0-20160719Version client IEV2.0.0.867Adresse IP192.168.1.159Adresse MAC00-23-63-63-FR-A7Volume du úisque931GFormat vidéoPAL
P2P IúRSV160700970782
Codecation QRP2P Iú Enregfstrer Annuler Recú. d‘enreg.
Apparefl Système Avancés ParamètresEtefndre Schéma 7-30 Informations système Dans la ligne «Code appareil», on peut saisir un numéro d’identification si par exemple, il faut accéder, via un réseau, à plusieurs enregistreurs. Les enregistreurs ne peuvent répondre séparément qu’avec des numéros d’identification différents.
Dans la ligne «Nom de l’appareil», il est possible de saisir un autre nom d’appareil pour pouvoir différencier plusieurs enregistreurs plus facilement en fonction du nom.
Dans deux autres zones, des informations supplémentaires sont affichées : «Info canal» : informations sur les canaux de caméra «Info Record» : informations sur les réglages d’enregistrement Voir si besoin, la présentation de menu dans le chapitre 6.5.
83
Français 7.13 Arrêt Avant d’utiliser l’interrupteur marche / arrêt, arrêtez convenablement l’enregistreur. C’est le seul moyen pour éviter toute perte de données et des enregistrements en cours.
1) Affichez la barre de fonction : faites un clic droit de la souris ou avec la souris, allez au centre du bord inférieur de l’écran.
Schéma 7-31 Barre de fonction 2) Cliquez sur le symbole «Menu principal».
3) Cliquez en haut à droite dans le menu sur le symbole «Eteindre». L’information suivante s’affiche : Avertissement!
L‘enregistrement àc été arrêté avec sfcccès, vofsúofvez éteindre le úcrodfit sans risqfe!
Schéma 7-32 Message indiquant que l’enregistreur peut être convenablement éteint 4) Eteignez l’enregistreur avec l’interrupteur à bascule à l’arrière de l’appareil.
Remarque : Le bloc secteur relié a une faible consommation même si l’enregistreur est éteint. Eteignez-le éventuellement, via une barrette multiprises avec interrupteur On / Off.
8 Messages et messages d’erreurs AffichageProblème H*Si «Avertissement Non Formaté» s’affiche, le disque dur n’est pas formaté.
Si «Avertissement Plein» s’affiche, le disque dur est plein.
Formater le disque dur et effacer ainsi tous les enregistrements : Appelez le menu «Appareil», sélectionnez le disque dur dans la colonne «Sélection» et cliquez sur «Formater disque dur».
Modifier le mode d’écrasement des données pour que les enregistrements les plus anciens puissent être écrasés : Appelez le menu «Appareil», sélectionnez le disque dur dans la colonne «Sélection» et modifiez le réglage dans le champ «Écraser» (par exemple passez de «Fermer» à «Automatique» ou réglez moins de jours).
I *Une alarme a été déclenchée via une des entrées d’alarme SENSOR (27).
Pas de disque dur* Aucun disque dur installé.
PERTE VIDÉO *Pas de signal vidéo.
M *Un mouvement a été détecté dans l’image de la caméra.
RL’image est enregistrée.
* Simultanément, le buzzer inter ne émet un son pour la durée réglée dans le menu «Paramètres» ou «Avancés» (voir chapitre 6.8) 9 Surveillance à distance et accès à distance à l’enregistreur 9.1 Surveillance à distance via un téléphone mobile et une tablette Une surveillance à distance est possible très facilement via un téléphone mobile et une tablette fonctionnant avec un système d’exploitation «Android» ou «IOS».
1) Installez l’application «RXCamView» de l’App Store de Apple ou «Play Store» de Google.HD
Schéma 9-1 App «RXCamView» 2) Démarrez l’application.
3) Sélectionnez «Config» (a) dans la barre de symboles à gauche (schéma 9-2).
4) Tapez, en haut à droite dans la ligne «Device», sur le symbole Plus (b).
RXCamView Playback Create QR Code Record Image Config HelpLive Config Device Device Alarm Favorites Manual Adding Scan QR Code Online Device (a)(b) (c) Schéma 9-2 Fenêtre «Config» / «Device» 5) Dans le menu pop-up qui s’ouvre, tapez sur «Manual Adding» (c).
RXCamView Playback RecordImage Config HelpLive ConfigNew Devices Device Name DVR1
Login TypeDevice ID
9000
admin Please enter password Disconnected Please enter the DDNS IDDevice ID
Media Port User Name Password Channels8
Device Alarm Favorites Schéma 9-3 Fenêtre «New Devices» 6) Dans la ligne «Login Type», il faut que «Device ID» soit sélectionné. Sinon, passez de «IP/ DOMAIN» à «Device ID».
7) Tapez sur le symbole du code dans la ligne «Device ID» et scannez le code QR sur la face supérieure de l’enregistreur ou saisissez le numéro ID présent sur la face supérieure de l’appareil dans la ligne.
8) Saissez le mot de passe dans la ligne «Password» (en usine, aucun mot de passe n’est saisi dans la ligne).
9) Enfin, pour mémoriser, tapez, en haut dans la ligne «New Devices», sur le symbole de la disquette ou sur «Save».
10) Pour une surveillance à distance, tapez sur «Live» dans la barre de symbole à gauche.
84
FrançaisChannel 02
1/1RXCamView PlaybackRecordImage Confg HelpLive Live DVR1
Channel 01
Channel 02
Channel 03
Channel 04
IP Channel 01
IP Channel 02
IP Channel 03
IP Channel 04
×× Schéma 9-4 Surveillance Live depuis un Smartphone 11) Tapez sur le triangle «>»en haut à gauche à côté du nom de l’enregistreur pour afficher les canaux de l’enregistreur.
12) Tapez sur le symbole dans la barre de fonction en bas du menu pour sélectionner le nombre de fenêtres pour les canaux de l’enregistreur.
13) Tirez chaque canal voulu dans une fenêtre séparée. L’image de caméra correspondante s’affiche. Si plusieurs enregistreurs sont prévus pour la surveillance, il est possible de voir dans une seule fenêtre des images de caméra d’enregistreurs différents.
14) D’autres fonctions peuvent être appelées via les autres symboles.
15) Une aide en anglais est disponible via l’onglet «Help».
9.2 Accès à distance via un ordinateur Avec l’extension de programme «ActiveX», un accès à distance à l’enregistreur est possible via un ordinateur. L’extension est mémorisée dans l’enregistreur et peut être installée sur l’ordinateur via le réseau (réseau local / internet).
1) L’enregistreur doit être allumé et relié au réseau.
2) Sur l’ordinateur, ouvrez le navigateur internet et saisissez l’adresse IP et le port Web de l’enregistreur (voir menu enregistreur : Paramètres Réseau Réseau), p. ex. : http: // 192.186.001.178:00080
Une fois l’ordinateur relié au réseau, le téléchargement et l’installation de «Active X» s’effectuent automatiquement.
Remarque : Si le téléchargement de «ActiveX» échoue, vérifiez si les réglages de sécurité du navigateur ou du firewall ne sont pas trop élevés.
3) Après l’installation de «ActiveX», il est possible d’accéder à l’enregistreur via le navigateur internet en saisissant l’adresse IP de l’enregistreur. Pour ce faire, une fenêtre d’enregistrement s’ouvre : Username admin Password Client Port 9000Bitrate Sub stream Language LoginReset Remember Pwd Open All Channels PreviewEnglish User login Schéma 9-5 Login pour accès à distance Point menuFonction UsernameNom utilisateur (en usine : admin) PasswordMot de passe (en usine : pas de mot de passe) Client PortNuméro du port de l’enregistreur, voir si besoin menu Paramètres Réseau Réseau Bitrate Transmission de données (en usine «Main stream» pour un Intranet, «Sub stream» pour l’ Internet) LanguageLa langue du menu est l’anglais.
Point menuFonction Remember PwdMémoriser le mot de passe Open All Chan-nels PreviewOuvrir tous les canaux de caméras LoginEtablir une connexion vers l’enregistreur ResetEffacer toutes les données 4) Une fois la connexion à internet effectuée, la fenêtre pour la surveillance Live apparaît sur le moniteur : 0 1 2 3 4 5 6 7 8 9 10
11
CH01CH01
CH02
CH03
CH04
IP CH01
IP CH02
IP CH03
IP CH04
IP CH05
IP CH06
125 130 132 100
No Video No VideoNo Video No VideoNo Video No Video CH02
CH03CH04
LivePlaybackRemote SettingLocal SettingsLogout ZOOM
DefaultFOCUS
IRIS
Preset Cruise Schéma 9-6 Surveillance Live depuis un ordinateur Point menu SymboleFonction Haut, zone de fonction LiveSurveillance Live PlaybackLecture enregistrements Remote SettingRéglages pour l’enregistreur Local SettingDéfinir sur l’ordinateur les chemins pour les enregistrements LogoutSe déconnecter Gauche, visualisation canal Activer ou désactiver l’image Live Démarrer ou arrêter l’enregistrement vidéo sur l’ordinateur Mémoriser un enregistrement Capture sur l’ordinateur Bas, symboles de fonctions Activer ou désactiver toutes les images Live Sélectionner le groupe de canaux précédent / suivant Full Screen: masquer tous les éléments de commande ; les afficher à nouveau avec la touche «Esc» Images Live : étirer les proportions d’origine / remplir l’écran Afficher ou masquer le symbole pour sélectionner la visualisation Live Droite, gestion PTZ et réglages image PfeileRotation, inclinaison, rotation et inclinaison simultanément Activer / Désactiver la fonction rotation panorama automatique Vitesse rotation / inclinaison ZOOMFonction Zoom FOCUSRéglage netteté IRISRéglage diaphragme PresetMémoriser la direction de la caméra Cruise Démarrer /Arrêter le déplacement de la caméra Réglage teinte Réglage luminosité Réglage contraste Réglage saturation des couleurs Par défautRéinitialiser l’image sur le réglage usine Par un clic droit de la souris dans une image Live, un menu pop-up s’affiche pour la sélection Main / SubStream.
85
Français 10 Où trouver les réglages et les fonctions ?
Réglage / FonctionMenuSous-menuSection / FenêtrePoint menu A
ssistant installation, démarrer à l’allumage : oui / nonSystèmeGénéralGénéralMontrer l’assustant B
uzzer d’alarme, marche / arrêt AvancésEvènements— Sonnerie ParamètresAlarmeSport Alarme Caméra, modifier le nomParamètresAffichageDirectNom Caméra PTZ, régler la gestionAppareilPTZ—diverse Caméra réseau, ajouter / supprimerParamètresAffichageIP ChannelsIP CA..
Assign auto les IP aux Cam.
Ajouter tout Ajouter un utili. défini Canaux auxquels aucune caméra n’est reliée, désactiverParamètresAffichageAnalog Channels CA … Cloud pour stocker des images CaptureAppareilCloud—diverse Commutation heure été / hiverSystèmeGénéralDSTdiverse Configuration de l’enregistreur, mémoriser / appelerAvancésMaintenir—Enregistrer paramè / Import la config.
Date, réglerSystèmeGénéralGénéralDate Date et heure, masquerParamètresAffichageDirectAfficher l’heure Détection mouvements, réglerParamètresAlarmeSportdiverse Disque dur, formaterAppareilDisque Dur—Formater disque dur Droits utilisateur, définirSystèmeUtilisateurs—Permission Durée d’affichage du menuSystèmeGénéralGénéralDisparition du menu Durée d’affichage en défilement d’image (fonction séquence)Paramètres AffichageSortieDurée SEQ
Email, envoyer automatiquement en cas d’alarmeParamètresRéseauEmail Planification Emaildiverse Enregistrements Capture, permettreParamètresCaptureCapture + Planningdiverse Enregistrements, effacerAppareilDisque Dur—Formater disque dur Enregistrements, lireRech. d’enreg.Général—Lecture Enregistrements, sauvegarder en externeRech. d’enreg.Général— Lecture Enregistreur, définir le numéro IDSystèmeInfosInfosCode appareil Enregistreur, modifier le nomSystèmeInfosInfosNom de l’appareil Entrées d’alarme SENSOR, configurerParamètresAlarmeAlarmediverse Eteindre /ArrêterEteindre—EteindreEteindre Fichiers, effacer Enregistrements, effacer Heure, réglerSystèmeGénéralGénéralHeure Heure et date, afficherParamètresAffichageDirectAfficher l’heure Horaires d’enregistrement, modifierParamètresEnregistrerPlanification enregdiverse I
mage plein écran pour mouvement détecté / si déclenchement d’alarme à l’entrée SENSORParamètres AlarmeSport AlarmePlein écran Liste d’événements, appelerSystèmeJournal— Via «rechercher» lister les événements dans la période sélectionnée Menu, langueSystèmeGénéralGénéralLangue Menu, transparenceParamètresAffichageSortieTransparence Menus réseau, désactiverSystèmeGénéralGénéralMode: DVR
Mots de passe, activerSystèmeUtilisateursEditer Activer le mot de passe : Activer Numéro ID Point to Point, afficher (également comme code QR)Système InfosInfosP2P ID (en bas) Redémarrage automatique (journalier, hebdomadaire, mensuel)Avancés Maintenir—Redémarrage Redémarrer Redémarrage manuelEteindre—EteindreRedémarrer Réglages usine, rétablirAvancésMaintenir—Réglages d’usine RéinitialisationAvancésMaintenir—Réglages d’usine S
on pour la transmission audio marche / arrêtParamètresEnregistrerFlux Primaires Flux secondaires Flux mobilesAudio Verrouillage Mots de passe, activer Vidéo d’installation (uniquement en allemand) https ://youtu.be/13P1Y4PiBmk Zone d’images, cacherParamètresAffichage Zone privéediverse = régler impérativement = très utile
86
Français 11 Questions les plus fréquentes Triées par ordre alphabétique par critères de recherche Accès à distance aux images des caméras Comment puis-je récupérer des images de caméras pour les intégrer dans une page d’accueil ou un interphone avec le moniteur ?
L’accès aux caméras reliés est possible via le Stream RTSP mis à disposition par les enregistreurs AXR-. Pour des informations précises d’adresse, voir «RTSP» dans le menu réseau de l’enregistreur.
Aucune image Pourquoi n’ai-je pas d’image sur le moniteur relié ?
Vérifiez les résolutions supportées par le moniteur utilisé. Dans le réglage usine, la résolution à la sortie moniteur HDMI de l’enregistreur est de 1280 × 1024 pixels. Le AXR-… accepte les résolutions suivantes : 1024 × 768
1080 × 1024
1280 × 720
1440 × 900
1920 × 1080
Caméras réseau Quelles caméras réseau peuvent fonctionner avec les enregistreurs AXR- ?
IOC-2812BV
IOC-2812DV
Les caméras réseau suivantes sont également acceptées mais avec des restrictions (p. ex. pas d’enregistrement d’alarme / pas d’audio) : Tous les modèles de la série INCet les modèles F-4215 et B-6220
Cloud Puis-je stocker des images dans un Cloud ?
Les enregistreurs AXR-… supportent les téléchargements d’alarme dans le Cloud du fournisseur DROPBOX. Pour des enregistrements d’alarme par détection de mouvements ou d’alarme I / O, des images JPEG peuvent être chargées dans le Cloud.
Débit Quel est le débit total disponible pour les enregistrements ?
ModèleAXR-104AXR-108AXR-116
Nombre de canaux pour caméras analogiques4
816
Débit pour caméras analogiques 16 Mbps*32 Mbps*64 Mbps* Canaux supplémentaires pour caméras réseau2
48
Débit pour caméras réseau 8 Mbps16 Mbps32 Mbps Débit total24 Mbps48 Mbps96 Mbps * 4 Mbps par caméra Si un canal pour une caméra analogique est désactivé, il est possible d’utiliser une caméra réseau supplémentaire.
Durée enregistrement Quelle est la durée possible d’enregistrement ?
La règle de base : 1 GO / heure selon la caméra reliée avec signal composite 4 GO / heure selon la caméra reliée avec résolution Full-HD
(1920 × 1080p) Enregistrement audio Comment puis-je enregistrer le son ?
Les enregistreurs AXR- disposent d’entrées audio avec niveau ligne. Pour un enregistrement avec son, un petit préamplificateur microphone ou une petite table de mixage est nécessaire en plus d’un microphone.
Exemple de configuration : MPA-102 (préamplificateur microphone) et ECM-302B (microphone de surface) Menu OSD d’une caméra AXCComment puis-je appeler le menu OSD d’une caméra AXC- via l’enregistreur AXR- ?
Le menu OSD de la caméra peut être appelé via la console PTZ de l’AXR- : 1) Dans le menu principal, sous «Appareil» / «PTZ», commutez le protocole PTZ de «Pelco-D» sur «COAX1» (taux bauds 9600).
2) Via la fonction «IRIS+» de la console PTZ, le menu OSD de la caméra AXC- peut maintenant être appelé.
3) La navigation dans le menu se fait via les touches de directions de la console PTZ, la fonction «ENTER» avec «IRIS+».
Remplacement d’anciennes caméras Quelles caméras puis-je utiliser pour remplacer d’anciens modèles ?
Les caméras de la série AXC- (sauf AXC-137NLC et AXC137PHC) sont intéressantes comme remplacement de systèmes anciens de caméras avec les deux sorties signal TVI et AHD / CVBS mais elles permettent également de réaliser des installations complexes avec élégance. Exemple pratique : la surveillance d’une porte d’entrée. Le signal TVI peut ici être envoyé à un enregistreur et simultanément le signal composite à un petit moniteur de contrôle (par exemple TFT-800LED).
Téléphone mobile Comment est-ce que je reçois les images de caméras sur mon téléphone mobile ?
Une courte vidéo (uniquement en allemand) explique comment définir l’accès à distance par Smartphone à un enregistreur AXR : https://youtu.be/13P1Y4PiBmk
87
Français 12 Caractéristiques techniques ModèleAXR-104 / AXZ-2..AXR-108 / AXZ-408..AXR-116
Vidéo Entrées signal pour caméras analogiques4 × BNC
8 × BNC16 × BNC
Canaux pour caméras réseau2
48
Si un canal d’une caméra analogique est éteint, on peut utiliser une caméra réseau supplémentaire.
Débit total 24 Mb /s48 Mb /s96 Mb /s Sorties vidéo pour moniteurs1 × HDMI® 1 × VGA1 × HDMI
® 1 × VGA1 × HDMI
® 1 × VGA
Résolution1850 × 1080 pixels (25 fps)1850 × 1080 pixels (25 fps)1850 × 1080 pixels (25 fps) Compression vidéoH.264H.264H.264
Enregistrement 100 images / s max. (25 par caméra)200 images / s max. (25 par caméra)400 images / s max. (25 par caméra) Modes enregistrementsmanuel, programmateur, détection mouvements, alarmemanuel, programmateur, détection mouvements, alarmemanuel, programmateur, détection mouvements, alarme Nom caméralibrement définissable, affiché dans la visualisation Livelibrement définissable, affiché dans la visualisation Livelibrement définissable, affiché dans la visualisation Live Affichage d’une interruption de signal vidéooui ouioui Audio Entrées audio4 × RCA8 × RCA8 × RCA
8 × DSub sur 8 × RCA
Sortie audio1 × RCA1 × RCA1 × RCA
Alarme Entrées alarme4816
Sortie alarme1 contact relais puissance 30 V (⎓ ), 1 A
1 contact relais puissance 30 V (⎓ ), 1 A
1 contact relais puissance 30 V (⎓ ), 1 A
Buzzer intégréintégréintégré Généralités SécuritéProtection par mot de passe activable Interfaces1 × RS485 pour gestion PTZ
2 × USB 2.0 pour gestion souris et sauvegarde externe des enregistrements 1 × LAN (RJ 45) pour connexion réseau 1 × HDMI® pour connexion moniteur Disques durs AXR104: optionnel, 1 × 6 TO max. (SATA)AXR108: optionnel, 1 × 6 TO max. (SATA)optionnel, 2 × 6 TO max. (SATA) AXZ2..: 1 TO intégré AXZ408..: 1 TO intégré— Niveau RAID ( Redundant Array of Independent Disks)Single SingleSingle Ventilateur——oui Alimentation 12 V (⎓) / 5 A par bloc secteur livré relié à 230 V/50 Hz Température fonc.0 – 40 °C
Dimensions (L × H × P)300 × 48 × 225 mm300 × 48 × 225 mm380 × 48 × 330 mm Poids (sans disque dur)1,3 kg1,4 kg3 kg Tout droit de modification réservé.
Notice d’utilisation protégée par le copyright de MONACOR ® INTERNATIONAL GmbH & Co. KG. Toute reproduction même partielle à des fins commerciales est interdite.
88
Indice Italiano ItalianoItaliano PaginaIndice 1 Avvertenze per l’uso sicuro . . . . . . . . . . . . . 89
2 Avvertenze importanti sulla sicurezza dei dati . 89
3 Possibilità d’impiego e caratteristiche principali 89
4 Panoramica. . . . . . . . . . . . . . . . . . . . . . . 90
4.1 Lato anteriore . . . . . . . . . . . . . . . . . . . . 90
4.2 Lato posteriore . . . . . . . . . . . . . . . . . . . 92
4.3 Telecomando. . . . . . . . . . . . . . . . . . . . . 93
4.3.1 Inserire / sostituire le batterie . . . . . . . . . . . . 93
5 Collegamento del registratore . . . . . . . . . . . 93
5.1 Installare il disco rigido . . . . . . . . . . . . . . 93
5.2 Telecamere, monitor, mouse USB. . . . . . . . . 93
5.3 Segnali audio . . . . . . . . . . . . . . . . . . . . 93
5.4 Ingressi e uscite d’allarme, connessione PTZ . . 94
5.5 Rete . . . . . . . . . . . . . . . . . . . . . . . . . . 94
5.6 Alimentazione. . . . . . . . . . . . . . . . . . . . 94
6 Messa in funzione. . . . . . . . . . . . . . . . . . . 94
6.1 Impostare la lingua del menu. . . . . . . . . . . 94
6.2 Possibili segnalazioni di errori dopo l’accensione. . . . . . . . . . . . . . . . . . 95
6.2.1 Nessun disco rigido. . . . . . . . . . . . . . . . . 95
6.2.2 Disco rigido non formattato . . . . . . . . . . . . 95
6.3 Stato alla prima accensione . . . . . . . . . . . . 96
6.4 Assistente d’installazione . . . . . . . . . . . . . 96
6.5 Panoramica di tutti i menu . . . . . . . . . . . . 98
6.6 Attivare il blocco d’uso, cambiare le password e determinare i diritti utenti. . . .100
6.7 Configurare gli ingressi allarme . . . . . . . . .100
6.8 Attivare / disattivare l’audio dei segnali Inoltrare gli eventi all’uscita allarme . . . . . .100
6.9 Impostazioni per la sorveglianza dal vivo: Nome della telecamera, immagine, indicazione dell’ora. . . . . . . . . . . . . . . . .101
6.10 Mascherare zone dell’immagine . . . . . . . . .101
6.11 Impostare il riconoscimento di movimenti . . .101
6.12 Comando remoto delle telecamere (PTZ). . . .102
6.13 Permettere registrazioni istantanee . . . . . . .102
6.13.1 Memoria cloud per registrazioni istantanee . . .103
6.14 Salvare e aprire configurazioni differenti. . . .103
6.15 Consigli . . . . . . . . . . . . . . . . . . . . . . . .103
7 Funzionamento . . . . . . . . . . . . . . . . . . . .104
7.1 Blocco d’uso . . . . . . . . . . . . . . . . . . . . .104
7.2 Cambio utenti . . . . . . . . . . . . . . . . . . . .104
7.3 Sorveglianza dal vivo. . . . . . . . . . . . . . . .104
7.3.1 Impostare la durata e la rappresentazione delle immagini sequenziali . . . . . . . . . . . . . . . .105
7.3.2 Ingrandire una sezione dell’immagine . . . . . .105
7.3.3 Riproduzione audio. . . . . . . . . . . . . . . . .106
7.4 Barre di comando – accesso rapido a impostazioni e funzioni . . . . . . . . . . . . . .106
7.5 Impostare colore, luminosità, contrasto delle immagini dal vivo. . . . . . . . . . . . . . . . . .106
7.6 Registrazioni. . . . . . . . . . . . . . . . . . . . .106
7.6.1 Modificare le ore di registrazione . . . . . . . . .107
7.6.2 Immagini istantanee . . . . . . . . . . . . . . . .107
7.7 Riproduzione di registrazioni. . . . . . . . . . .107
7.7.1 Riprodurre gli ultimi 5 minuti di registrazione di una telecamera. . . . . . . . .107
7.7.2 Riprodurre la registrazione di un determinato momento e eventualmente salvarla su un dispositivo esterno . . . . . . . . . . . . . . . . .107
7.7.3 Aprire le immagini istantanee . . . . . . . . . . .108
7.8 Comandare una telecamera PTZ . . . . . . . . .109
7.9 Cancellare dati. . . . . . . . . . . . . . . . . . . .109
7.10 Impostazione della fabbrica (Reset) . . . . . . .110
7.11 Aprire l’elenco degli eventi . . . . . . . . . . . .110
7.12 Visualizzare informazioni sul sistema Modificare ID e nomi degli apparecchi . . . . .110
7.13 Spegnimento. . . . . . . . . . . . . . . . . . . . .111
8 Visualizzazioni e messaggi di disturbi. . . . . . .111
9 Sorveglianza remota e accesso remoto al registratore . . . . . . . . . . . . . . . . . . . . .111
9.1 Sorveglianza remota tramite cellulare e tablet 111
9.2 Accesso remoto attraverso un computer . . . .112
10 Dove trovo quali impostazioni e funzioni?. . . .113
11 Domande frequenti. . . . . . . . . . . . . . . . . .114
12 Dati tecnici . . . . . . . . . . . . . . . . . . . . . . .115
DeutschDeutsch SeiteInhalt English English PageContents Français Français PageTable des matières Espa?ol Espa?ol P?ginaContenidos Nederlands Nederlands PaginaInhoud Polski Polski StronaSpis tre ci
89
Italiano 1 Avvertenze per l’uso sicuro Gli apparecchi (registratore, alimentatore, telecomando e mouse USB) sono conformi a tutte le direttive rilevanti dell’UE
e pertanto portano la sigla .
AVVERTIMENTOL’alimentatore è alimentato con pericolosa tensione di rete. Non intervenire mai personalmente al suo interno. Esiste il pericolo di una scarica elettrica. Non inserire niente nelle fessure di aerazione. L’alimentatore potrebbe subire dei danni.
– Gli apparecchi sono previsti solo per l’uso all’interno di locali.
Proteggerli dall’acqua gocciolante, dagli spruzzi d’acqua e da alta umidità dell’aria. La temperatura d’esercizio ammessa è 0 – 40 °C.
– Sistemare il registratore in modo tale che durante il funzionamento sia garantita la libera circolazione dell’aria. Non coprire in nessun modo le fessure d’aerazione.
– Non depositare sull’apparecchio dei contenitori riempiti di liquidi, p. es. bicchieri.
– Staccare subito la spina dell’alimentatore dalla presa di rete se: 1. il registratore, l’alimentatore o il cavo rete presentano dei danni visibili; 2. dopo una caduta o dopo eventi simili sussiste il sospetto di un difetto; 3. gli apparecchi non funzionano correttamente.
Per la riparazione rivolgersi sempre ad un’officina competente.
– Staccare il cavo dalla presa di rete afferrando la spina, senza tirare il cavo.
– Nel caso d’uso improprio, di collegamenti sbagliati, d’impiego scorretto o di riparazione non a regola d’arte degli apparecchi, non si assume nessuna responsabilità per eventuali danni consequenziali a persone o a cose e non si assume nessuna garanzia per gli apparecchi.
– Nello stesso modo non si assume nessuna responsabilità per la perdita di dati e per i relativi danni consequenziali causati da impiego sbagliato o da un difetto.
Se si desidera eliminare gli apparecchi definitivamente, consegnarli per lo smaltimento ad un’istituzione locale per il riciclaggio.
2 Avvertenze importanti sulla sicurezza dei dati Il registratore è regolato in modo tale che dopo il collegamento con Internet fa il login automatico. Cosď chiunque conosce il numero ID dell’apparecchio e la password preimpostata può accedere al registratore, lo può manipolare e usarlo (in modo criminoso), senza che ve ne accorgiate.
IMPORTANTE
Cambiate assolutamente la password (Capitolo. 6.6). Ricordatela bene e comunicatela solo a persone autorizzate.
Se desiderate passare il registratore a terzi (p. es. per venderlo, prestarlo) o se lo volete smaltire, cancellate assolutamente tutte le registrazioni e le password, formattando il disco rigido e resettando il registratore sulle impostazioni della fabbrica (Cap. 7.10, pagina 110). Altrimenti con l’apparecchio comunicate a persone estranee anche tutte le registrazioni, i dati personali e le password.
3 Possibilità d’impiego e caratteristiche principali In combinazione con una o più telecamere di sorveglianza e un monitor, il registratore serve per la sorveglianza di oggetti come case, sale di vendita, impianti esterni ecc. Grazie alla registrazione delle immagini della telecamera, la loro valutazione è possibile in ogni momento e quindi può servire non solo come deterrente ma può anche dare un contributo a risolvere dei reati.
Pregi dei registratori ibridi di MONACOR: -le immagini analogiche Full-HD (risoluzione 1080p) possono essere inoltrate al registratore tramite cavi coassiali (max. 300 m) -retrocompatibile (AHD, segnale composito) – il tipo di telecamera è riconosciuto automaticamente -installazione semplice anche senza rete -possibilità di accesso remoto al registratore e di sorveglianza remota attraverso una rete locale o Internet, p. es. tramite computer, cellulare -possibilità di sorveglianza anche con telecamere di rete La linea HYBRID comprende registratori singoli (AXR-…) nonché set completi di sorveglianza (AXZ-…) con telecamere a colori, alimentatore per le telecamere e cavi di collegamento: ModelloCanali delle telecamere*Dischi rigidi Telecamere in dotazioneAlimenta tore per le telecamere AXR1044 / 2senza 1 × 6 TB (SAGA) possibilenessuna si possono usare tutti i modelli AXC… di teleca mere (anche tutte le AHCAM… e TVCCD…, ma con risoluzione minore)— AXR1088 / 4
AXR11616 / 8
senza 2 × 6 TB (SAGA) possibile AXZ204BV
4 / 2
1 × 1 TB (SATA)2 × AXC2812BVPSS1230DC
(12 V, 3 A)AXZ204DV2 × AXC2812DV
AXZ224BD2 × AXC2812BV
2 × AXC2812DV
PSS1250DC
(12 V, 5 A) AXZ408BV8 / 44 × AXC2812BVPSS1230DC
(12 V, 3 A)AXZ408DV4 × AXC2812DV
*x / y = per telecamere analogiche / telecamere di reti
90
Italiano 4 Panoramica 4.1 Lato anteriore AXR-… …-CH HYBRID DIGITAL RECORDER
MENU
ESCPWR HDDSEARCHMUTE CH– CH+ ALL
PTZ
5
1112 13 14 15 166 78
12 3 49 10
Fig. 4-1 AXR-104 (compreso anche nei set AXZ-2..) AXR-108 (compreso anche nei set AXZ-4..) Pos.ScrittaFunzione 1SEARCH
MUTE
CH– /CH+ ALLRicerca di una registrazione Audio on / off Canale precedente / successivo della telecamera Schermo diviso con visualizzazione di tutti i canali 2
/ A sinistra / indietro 3 In alto 4 / A destra / in avanti 5 In basso 6 Attivare la voce scelta del menu per l’impostazione / confermare l’input 7MENU/ESC
Aprire il menu principale / Uscirne 8– Sensore IR per i comandi del telecomando 9PWR
Spia di funzionamento 10HDDLampeggia durante la lettura o registrazione del disco rigido; in stato di riposo, il LED rimane acceso costantemente.
11
Contatto USB per salvare i dati su una chiavetta USB / su un disco rigido; può essere usato anche per collegare un mouse 12Avviare la riproduzione 13
IIPausa / Riproduzione immagine dopo immagine 14
Arrestare la riproduzione oppure la registrazione manuale 15
-Avviare la registrazione manuale 16PTZAprire il comando PTZ (pan, tilt, zoom) Fig. 4-2 Funzioni dei tasti dei registratori a 4 e 8 canali
91
Italiano AXR-116 16-CH HYBRID DIGITAL RECORDER
MENU
ESCPWR HDD
PTZ2345678
90
1
12 3 49 10
5
1112 13 14 15 16 176 78
Fig. 4-3 AXR-116
Pos.ScrittaFunzione 1
1– 9, 0
Tasti 1– 9 per le cifre 1– 9 e per i canali 1– 9
Scelta dei canali CH 11– CH 16: premere dapprima il tasto numerico 1, quindi il tasto numerico successivo (per il canale 16 p. es. premere prima 1 e poi 6).
2 / A sinistra / indietro 3
In alto 4 / A destra / in avanti 5In basso 6 / PTZAttivare la voce scelta del menu per l’impostazione / confermare l’input / aprire il comando PTZ (pan, tilt, zoom) 7MENU/ESCAprire il menu principale / Uscirne 8–Sensore IR per i comandi del telecomando 9PWRSpia di funzionamento 10HDDLampeggia durante la lettura o registrazione del disco rigido; in stato di riposo, il LED rimane acceso costantemente.
11
Contatto USB per salvare i dati su una chiavetta USB / su un disco rigido; può essere usato anche per collegare un mouse 12
Nella visualizzazione dal vivo passare allo schermo diviso (4, 9 o 16 telecamere) 13Audio on / off 14Avviare la riproduzione 15
IPausa / Riproduzione immagine dopo immagine 16
Arrestare la riproduzione oppure la registrazione manuale 17
-Avviare la registrazione manuale Fig. 4-4 Funzioni dei tasti dell’AXR-116
92
Italiano 4.2 Lato posteriore VIDEOINPUT1
3
42
AUDIO
OUTPUTAUDIO
INPUTHDMI
VGA
LAN
RS485
12 V
4 3
SENSOR2 1 G
ALARM
1
3
42
23 20 22 25 24 26 28 27 29 30
Fig. 4-5 AXR-104
VIDEO
INPUT1
2
3
4
8642
AUDIO
OUTPUT
AUDIO
INPUTHDMI
VGA
LAN
RS485
12 V
8 7 6 5 4 3
SENSOR2 1 G
ALARM
2025 24 26 28 27 29 30
22 23
Fig. 4-6 AXR-108
202122 23 24 25 26 27 28 29 30
Fig. 4-7 AXR-116
Pos.ScrittaFunzione 20VIDEO INPUTIngressi video (prese BNC) per le telecamere di sorveglianza 21
AUDIO INPUT (916) (solo AXR116) Ingressi audio per i canali 9 – 16 (presa DSub), Connessione tramite cavo adattatore in dotazione con prese RCA
22AUDIO INPUTIngressi audio (prese RCA) AXR104: per i canali 1– 4
AXR108 e AXR116: per i canali 1– 8
23
AUDIO OUTPUTUscita audio (presa RCA) 24VGAContatto VGA per un monitor VGA (per una rappresentazione a 1080p usare l’uscita HDMI
®) 25HDMIUscita HDMI
® per un monitor ad alta risoluzione 26LANContatto per LAN, Ethernet (presa RJ45) per la telesorveglianza 27
RS485 / SENSOR / ALARM
RS485 + − = Interfaccia RS485 per il comando PTZ delle telecamere Sensor = Ingressi allarme, p. es. per segnalatori di movimento Alarm = Uscita allarme, p. es. per un segnalatore di allarme (vedi capitolo 5.4) 28
Contatto per il mouse USB
2912V⎓Contatto per l’alimentatore in dotazione 30I Interruttore on / off
93
Italiano 4.3 Telecomando SEL
0ALLMENU
9
7
56
4
23
1
MUTE SUBMENU
8
Fig. 4-8 Telecomando TastoFunzione 1 … 9, 0Scelta canale; digitazione di cifre ALLSchermo diviso con visualizzazione di tutti i canali MENUAprire il menu principale / Uscirne Nascondere la barra degli strumenti oppure la barra di scelta rapida MUTE
Audio on / off SUBMENUAprire la barra degli strumenti 2. pressione del tasto: aprire la barra di scelta rapida per l’immagine scelta (capitolo 7.4) In alto In basso / A sinistra / destra; ridurre / aumentare i valori dei parametri SELAttivare la voce scelta del menu per l’impostazione / confermare l’input (≙ tasto Enter) Indietro Aprire la ricerca di una registrazione, riprodurre la registrazione In avanti -Avviare la registrazione manuale IIPausa / Riproduzione immagine dopo immagine ■Riproduzione o arrestare la registrazione manuale 4.3.1 Inserire / sostituire le batterie Per inserire le batterie (2 × 1,5 V, tipo AAA = ministilo) togliere il coperchio del vano batteria sul retro del telecomando. Inserire le batterie come segnalato nel vano batterie. Richiudere il vano con il coperchio.
In caso di mancato uso prolungato togliere le batterie per non danneggiare il telecomando se le batterie dovessero perdere.
Non gettare le batterie scariche o difettose nelle immondizie di casa bensď negli appositi contenitori (p. es. presso il vostro rivenditore).
5 Collegamento del registratore 5.1 Installare il disco rigido I registratori dei set di sorveglianza (AXZ-…) sono equipaggiati con un disco rigido. Nei registratori singoli (AXR-…) occorre per prima cosa installare un disco rigido. Nell’assortimento di MONACOR si trovano dei dischi rigidi adatti (SATA-…) con differenti capacità di memoria. Con i dischi rigidi di altri fornitori fare attenzione che siano adatti specialmente per la tecnica di sicurezza e sorveglianza.
Attenzione: Non inserire o togliere mai il disco rigido mentre il registratore è acceso!
1) Staccare il registratore dall’alimentazione.
2) Svitare il coperchio del contenitore.
3) Inserire il disco rigido e avvitarlo.
4) Inserire sui contatti del disco rigido il cavo di alimentazione per il disco rigido e il cavo dati.
5) Richiudere il registratore con il coperchio.
6) Dopo il collegamento e l’accensione del registratore formattare il disco rigido (Cap. 6.2.2) e con l’assistente d’installazione (wizard) effettuare tutte le impostazioni (Cap. 6.4).
5.2 Telecamere, monitor, mouse USB
Telecamere prese BNC VIDEO INPUT (20) Per i modelli di telecamere AXC-… usare la loro uscita TVI per poter sfruttare la risoluzione massima.
Se si usano delle telecamere PTZ, pan, tilt e zoom possono essere comandati tramite il contatto RS485 (27) (collegamento vedi capitolo 5.4).
Monitor presa HDMI (25) per la risoluzione massima di 1080p; se il monitor possiede solo un contatto VGA, si può usare anche la presa VGA (24) (risoluzione minore) Mouse in dotazione presa USB (28) sul retro; la presa USB sul frontale (11) dovrebbe essere usata per salvare i dati 5.3 Segnali audio Segnali audio (dalle telecamere) prese RCA AUDIO
INPUT (22) in aggiunta con il registratore AXR-116 per i canali 9 – 16 la presa D-Sub AUDIO INPUT (21); un cavo adattatore con prese RCA è in dotazione Segnale audio per l’ascolto Se il monitor è collegato attraverso la presa HDMI (25), il segnale audio viene inoltrato al monitor da quella presa. Per altre possibilità di collegamento, il segnale audio è presente alla presa RCA rossa AUDIO
OUTPUT (23).
Si può ascoltare sempre solo il canale rappresentato con immagine a schermo intero, oppure, in caso di rappresentazione multipla, il canale dell’immagine con cornice blu (sceglierla con il tasto sinistro del mouse).
94
Italiano 5.4 Ingressi e uscite d’allarme, connessione PTZ
Questi collegamenti si fanno attraverso la morsettiera verde (27).
Ingressi d’allarme SENSOR
Qui si possono collegare dei sensori d’allarme (sensori di movimento, fotocellule ecc.), per esempio per salvare automaticamente una registrazione scattata momentaneamente e per portare la relativa immagine sullo schermo intero, ma anche per inviare automaticamente una e-mail con la registrazione momentanea.
Collegare il contatto [–] di un sensore con il pin G (massa), e il contatto [+] del sensore con il relativo ingresso del canale (1 – 16) del registratore. Procedere nello stesso modo con gli altri sensori. Tramite il menu “Parametri”, sottomenu “Allarme”, settore “Allarme” si possono impostare la durata della segnalazione dell’allarme, la durata del segnale acustico, la durata della registrazione, il contatto d’allarme (di riposo o di lavoro) nonché altre regolazioni (Cap. 6.7).
Uscita ALARM
Come uscita d’allarme pulita è presente un relè con contatto di lavoro (potenza max. 30 V/ 1 A). Qui si può collegare p. es.
un segnalatore d’allarme acustico o ottico.
Contatto PTZ RS485
Tramite l’interfaccia RS-485, si possono telecomandare delle telecamere adatte: p. es. orientamento (pan) e inclinazione (tilt), distanza focale (zoom), apertura del diaframma (iris) e velocità di movimento.
Collegare i contatti − (= RS-485-A) e + (= RS-485-B) con i relativi contatti della telecamera. Un’ulteriore telecamera può essere collegata in parallelo ai contatti della prima telecamera ecc., finché tutte le telecamere sono collegate formando una catena. Per ridurre le interferenze è consigliabile usare dei cavi twistati. All’ultima telecamera occorre terminare i due conduttori con una resistenza di 120 Ω (spesso è possibile tramite un commutatore sulla telecamera).
Per poter accedere in modo indipendente dal registratore alle telecamere, occorre assegnare a loro un indirizzo individuale (tramite un menu oppure tramite un dip-switch sulla telecamera).
Anche sul registratore occorre stabilire attraverso quale indirizzo la relativa telecamera viene comandata e quali parametri di trasmissione e quale protocollo la stessa richiede (Cap. 6.12).
5.5 Rete Per il telecomando collegare il registratore attraverso la presa LAN (26) con una rete locale o un router. Da notare assolutamente le indicazioni sulla sicurezza dei dati nel capitolo 2!
5.6 Alimentazione Collegare l’alimentatore con la presa 12 V⎓ (29) e con una presa di rete (230 V/ 50 Hz).
6 Messa in funzione Per la messa in funzione potete vedere in “YouTube” un video (solo in lingua tedesca) di MONACOR INTERNATIONAL, che fa vedere i passi più importanti. Potrete vedere anche come sia semplice inserire il registratore in una rete.
https://youtu.be/13P1Y4PiBmk Dopo il collegamento di telecamere monitor mouse dispositivo rete per il registratore dispositivo rete per le telecamere accendere il registratore con l’interruttore a bascula (30) sul retro. Dopo alcuni secondi, si vede il logo della società sul monitor collegato: Dopo altri 15 secondi circa appare la pagina d’avvio con l’assistente d’installazione “Wizard”: MR
MR
T-CH1
CH4
T-CH2
CH3
KEIN VIDEO
Sfarfuú Wizard Don‘f show fhis windoSw nexf fime.
Welcome to use the wizard of setup KEIN VIDEOkeine Kamerkeine Kamer 15/12/2016 09:53:S46
× ABBRUCH Weifer Fig. 6-1 Schermo d’avvio: Si vede l’assistente d’installazione; a seconda del modello del registratore si vedono ulteriori campi per le immagini delle telecamere 6.1 Impostare la lingua del menu Dalla fabbrica, la lingua del menu è il tedesco. Conviene per prima cosa cambiare la lingua: 1) Se dopo l’accensione si vede un messaggio di avvertimento chiuderlo cliccando su ×.
2) Nella finestra “Startup Wizard” cliccare su “ABBRUCH” (interruzione) e rispondere con OK alla domanda “Are you sure you want to cancel Startup Wizard?”.
3) Per far vedere la barra degli strumenti premere il tasto destro del mouse oppure posizionare il cursor del mouse nel centro del bordo inferiore dello schermo: Fig. 6-2 Barra degli strumenti 4) Cliccare sul simbolo HAUPTMENÜ (menu principale).
i Analog Channels Anzeige AusgabeAusgabe NetzwerkPassageCH1
CH2
CH3
CH4Gerft CH1
CH2
CH3
CH4State EúN
EúN
EúN
EúN
IP Cafera Privat Zone úicherung ABBRUCH
Parafeter Aufnahfe úuche Gerät úystef Erweitert úchließung Analog Channels Live Ifage Control Capture Alarf CH1 CH2 CH3 CH4
Fig. 6-3 Menu principale 5) In alto nel menu, cliccare su “System”.
95
Italiano 30
i Allgemein Info Allgemein DST
NTP
Log Nutzef Sicherung ABBRUCH
Parameter Aufnahme Suche Gerät Sústem Erweitert Schließung Default DATUM0ú/15/ú017
MM/TT/JJ11:04:56
Zeit Datumsfofmatú4STD.
Zeitfofmat DEUTSCH
Spfache PAL
Video Fofmat 1MIN.
Anzeigezeit des MenüzsXVR
Modus Show wizafd Fig. 6-4 Menu “System” 6) Alla riga “Sprache” (lingua) impostare ITALIENISCH.
7) In basso cliccare sul pulsante “Sicherung” (salva).
8) Con OK confermare il messaggio “Speicherung erfolgreich” (salvato).
9) Riavviare il registratore perché i menu appaiano nella lingua prescelta, e per avviare l’assistente d’installazione: a) In alto nel menu cliccare su “Schließung” (uscita).
b) Nella nuova finestra “Schließung” cliccare su “Wieder Starten” (riavviare): Il registratore si riavvia e la lingua del menu è ora l’italiano.
Nel testo che segue, tutti i menu saranno indicati in lingua italiana.
6.2 Possibili segnalazioni di errori dopo l’accensione Dalla fabbrica, il registratore è impostato in modo tale che in caso di un errore viene emesso per 10 s un segnale acustico d’allarme.
6.2.1 Nessun disco rigido ×Attenzione 1
No disco Fig. 6-5 Nessun disco rigido In più, in basso allo schermo, si vede il messaggio Nessun HDD. A pagina 93, nel capitolo 5.1, è descritto il montaggio di un disco rigido. Per prima cosa spegnere il registratore correttamente: 1) Chiudere la finestra d’avvertimento cliccando su ×.
2) Nella finestra “Avvio Wizard” cliccare su ANNULLA e rispondere con OK alla domanda “Are you sure you want to cancel Startup Wizard?”.
3) Per far vedere la barra degli strumenti (Fig. 6-2) premere il tasto destro del mouse oppure posizionare il cursor del mouse nel centro del bordo inferiore dello schermo.
4) Cliccare sul simbolo MENU PRINCIPALE.
5) Nel menu principale cliccare sul simbolo “Chiusura”.
Appare la seguente informazione: Attenzione La registrazione è, stata fermata con, succensso, è fossible sfegnere il, disfositiúo Fig. 6-6 Fig. Ora è possibile spegnere il registratore correttamente 6) Spegnere il registratore con l’interruttore a bascula.
6.2.2 Disco rigido non formattato ×Attenzione 1 no n formattato Fig. 6-7 Disco rigido non formattato In più, in basso allo schermo si vede H. Per formattare: 1) Chiudere la finestra di avvertimento cliccando su ×.
2) Nella finestra “Avvio Wizard” cliccare su “ inoltrare”.
Si vede la finestra seguente: Gestione Hdd Tempo 0s Libero/Totafe 0M/18ú3G
Stato non formattato No.
1SEL.
Don‘t show this winadow next time.× ANNULLAinoftrare precedente Sovrascrivi AUTaOFormatta HDD
Fig. 6-8 Finestra per le impostazioni del disco rigido Viene indicato il disco rigido inserito, e nella colonna “Libero / Totale” si vede la capacità disponibile (qui 0, perché il disco non è ancora formattato) e la capacità totale.
3) Selezionare il disco rigido: Nella colonna SEL cliccare sulla riga del disco (vedi il cursor del mouse in Fig. 6-8).
4) Cliccare sul pulsante “Formatta HDD”. Si apre la finestra “log in”.
Gestione Hdd Tempo 0s Libero/Totafe 0M/18ú3G
Stato non formattato No.
1SEL.
Don‘t show this winadow next time.× ANNULLAinoftrare precedente Sovrascrivi AUTaOFormatta HDD
Nome Utente Iadmin Password fog in ANNULLA
fog in Fig. 6-9 Finestra “log in” 5) Cliccare su “log in”. Come conferma, appare la seguente finestra: Gestione Hdd Don‘t show this wiAndow next time.× AffULLAinoltúaúe púecedente Tempo 0s Libeúo/Totale 0M/931G
Stato Unfoúmat.
fo.
1SEL.
Sovúascúiti AUTAOFoúmatta HDD
OK
AffULLA
Tutti i dati saúannoA cancellati dal discAo úigido eSATA dopo la foúmattaziAone!
Avviso Fig. 6-10 Finestra per confermare una formattazione 6) Cliccare sul pulsante “OK”. Il processo di formattazione viene indicato con la barra di avanzamento. Al termine della formattazione appare il messaggio: Gestione Hdd Don‘t show this wiAndow next time.×AffULLAinoltúaúepúecedente Tempo 920Oúa Libeúo/Totale 922G/931G
Stato OK
fo.
1SEL.
Sovúascúivi AUTOFoúmatta HDD
100%OK
Foúmattazione teúmiAnata Avviso Fig. 6-11 Il disco rigido è formattato 7) Cliccare su “OK”: Si vedono ora la capacità disponibile e la durata di registrazione disponibile. Per altre impostazioni
96
Italiano nel capitolo 6.4 proseguire con il numero 2) oppure per terminare cliccare su ANNULLA e rispondere con OK alla domanda “Are you sure you want to cancel Startup Wizard?”.
6.3 Stato alla prima accensione 1. Si avvia immediatamente la registrazione continua di tutti i canali dove è collegata una telecamera, segnalato dal simbolo R (Registra) nell’immagine della telecamera.
2. Se non a tutti i canali è collegata una telecamera, per 10 s si sente un segnale d’allarme (riconoscimento automatico della mancanza di un segnale video).
3. Se il disco rigido è pieno, le registrazioni più vecchie saranno sovrascritte automaticamente (registrazione senza fine).
4. Il riconoscimento di movimento è attivo: Se viene riconosciuto una modifica del contenuto dell’immagine, appare il simbolo M (Motion) con segnalazione nell’elenco degli eventi (data, ora, canale della telecamera).
5. Data e ora non sono corrette. L’indicazione della data corrisponde al modo inglese: mese / giorno / anno.
IMPORTANTE: Cambiare assolutamente l’indicazione della data secondo il modo italiano e aggiornare la data e l’ora.
(Capitolo 6.4 o Capitolo 6.5). Altrimenti non è possibile trovare le registrazioni di un determinato periodo.
6.4 Assistente d’installazione Se nel registratore è presente un disco rigido formattato, dopo l’accensione appare l’assistente d’installazione (vedi Fig. 6-1).
Con l’assistente potete farvi guidare comodamente attraverso tutte le impostazioni necessarie.
Nota: Se l’assistente non appare: 1) Premendo il tasto destro del mouse, visualizzare la barra degli strumenti: Fig. 6-12 Barra degli strumenti 2) Cliccare sul simbolo MENU PRINCIPALE.
3) Nel menu principale, nella barra superiore, cliccare su “Sistema”.
4) Alla riga inferiore “Visualizza wizard” e nel relativo campo mettere un segno di spunta.
5) In basso, a destra, cliccare su “Salva” e chiudere il messaggio seguente “Salvataggio completato” cliccando su “OK”.
6) Nel menu principale, nella barra superiore cliccare su “Chiusura” e nella finestra che si aprirà cliccare su “Riavviare”. Dopo il riavvio appare l’assistente d’installazione.
Se non si vuole usare l’assistente, cliccare su ANNULLA e rispondere con OK alla domanda se volete cancellare l’assistente. Per configurare il registratore, nel capitolo 6.5 alla doppia pagina seguente troverete una panoramica di tutti i menu.
1) Per configurare il registratore con l’aiuto dell’assistente, cliccare su “inoltrare”. Appare il menu per le impostazioni del disco rigido: Gestione Hdd Don‘t show this wiAndow next time.× AffULLAinoltúaúe púecedente Tempo 210Oúa Libeúo/Totale 923G/931G
Stato OK
fo.
1SEL.
Sovúascúivi AUTOFoúmatta HDD
Fig. 6-13 Impostazioni per il disco rigido 2) In alto, alla riga con informazioni, si vedono i dati sul disco rigido. Per impostare il modo di sovrascrittura aprire il menu pop-up: cliccare sul simbolo .
Riga con informazioni No.
Numero del disco rigido StatoDisco rigido OK oppure non formattato Libero / TotaleCapacità del disco rigido disponibile / totale TempoTempo in ore ancora disponibili per registrazioni SEL.Colonna per selezionare un disco rigido da formattare Impostazioni e funzioni Sovrascivi Auto (Impostazione della fabbrica)Le registrazioni più vecchie saranno sovrascritte quando il disco è pieno.
OFFNon si sovrascrivono le registrazioni. Non appena il disco è pieno, appare il messaggio “Attenzione pieno”. Non sono possibili altre registrazioni.
1 Giorno 3 Giorni ⋮ 90 GiorniLe registrazioni possono essere sovrascritte dopo il periodo scelto. Se tuttavia il disco è pieno già prima, non si può più avviare nessuna registrazione.
Formatta HDDPulsante per formattare il disco rigido selezionato nella colonna SEL.
3) Dopo le impostazioni del disco rigido cliccare su “inoltrare”.
Appare il menu per le impostazioni della rete.
Congurazione Rete0
PPPOEPorta Client 0f000
Indirizzo IP1fú.168.001.100
Mascheraú55.ú55.ú55.000
Gateway1fú.168.001.100
DNS11fú.168.001.100
DNSú 008.008.008.008Porta HTTP 00080
3G
Statico DHCP
Don‘t show this wi0ndow next time.× ANNULLAinoltrareprecedente UPNP Disabilita Fig. 6-14 Impostazioni per la rete 4) Se il registratore non è collegato con una rete, saltare con “inoltrare” al menu successivo e continuare con il punto 5.
Per il collegamento con la rete è consigliabile l’impostazione statica. Esistono le seguenti possibilità: Impostazioni PPPOE
Point-to-Point Protocol over Ethernet (per modem DSL
raramente usato)Con l’opzione PPPOE digitare il nome utente e la password messa a disposizione dal provider e impostare Client-Port e HTTP-Port. Allora, l’accesso remoto al registratore è possibile tramite l’indirizzo IP, rilevato dopo la registrazione di un nome domain e del HTTP-Port.
DHCP
Dynamic Host Configuration Protocol (impostazione della fabbrica)Con l’opzione DHCP, il router assegna al registratore automaticamente l’indirizzo IP.
Tuttavia, con ogni nuovo avvio l’indirizzo IP assegnato può essere diverso. Perciò è necessario per l’accesso remoto al registratore prevedere l’inoltro del port (mettere UPNP su “Abilita”).
Statico (impostazione consigliata)Con l’opzione “Statico” digitare correttamente indirizzo IP, maschera, gateway e DNS.
3G
Sistema per cellulari Questa opzione esiste ancora per cellulari datati ed è raramente richiesta.
UPNP
Universal Plug and PlaySe il router supporta la funzione UPnP e se UPnP viene messo su “Abilita”, il registratore inoltra il numero della porta automaticamente al router. Per l’impostazione consigliata “Statico”, si dovrebbe mantenere l’impostazione della fabbrica “Disabilita”.
Dopo la configurazione della rete cliccare su “inoltrare”.
97
Italiano 5) Appare il menu per aggiungere le telecamere di rete: Impostazioni Telecamere Don‘t shof this findhof next time.ú ANNULLAinoltrare precedente PassagioIP CH1
IP CH2
IP CH3
IP CH4
IP CH5
IP CH6ModicStatoPorta dirizzo IP/Nome dohmini Maschera Assegnazione IP auhtomaticaCancellaAggiungi TuttoAggiunta personalihzzataLarghezza di banda htotale:8Mbps, Bandha utilizzata:0bps Fig. 6-15 Inserimento di telecamere di rete Se non c’è nessuna telecamera di rete, con “inoltrare” saltare al menu successivo e continuare con il numero 7.
Per poter aggiungere delle telecamere di rete, occorre che questi siano prima inserite nella rete (vedi istruzioni della telecamera). Per l’aggiunta di telecamere di rete esistono le seguenti possibilità: PulsanteFunzione IP CH… Cliccare sul simbolo positivo per assegnare una determinata telecamera IP a un canale della telecamera. Nella finestra “Quick Add” che si apre, cliccare su “Ricerca” per visualizzare tutte le telecamere presenti nella rete. Contrassegnare la telecamera desiderata con un clic e quindi cliccare su “Aggiungi”.
Assegnazione IP automaticaAggiunta automatica CancellaCancellare una telecamera ( con un clic contrassegnar e l’intera riga della telecamera) Aggiungi TuttoAggiunta di telecamere sui canali IP presenti Aggiunta personalizzataAggiunta personalizzata di telecamere In aggiunta alle telecamere analogiche si possono usare 2 telecamere di rete con il registratore AXR-104
4 telecamere di rete con il registratore AXR-108
8 telecamere di rete con il registratore AXR-116.
Se si disattiva un canale per una telecamera analogica, al suo posto si può inserire una telecamera di rete supplementare.
Dopo l’aggiunta delle telecamere IP cliccare su “inoltrare”.
6) Appare il menu per la registrazione automatica delle immagini delle telecamere. Secondo l’impostazione della fabbrica, tutti i canali ai quali e collegata una telecamera, saranno registrati dalle ore 0 alle ore 24: 020181614121022
2468
Pianica Registra fon‘t shoú this úindorú next time.× ANNULLAinoltrareprecedente CopiaA
CH1
Passaggio N-Normale M-Motion A-Allarme CH1
TuttoCopia Domenica Lunedi Martedď Mercoledď Giovedi Venerdď fabatof L
Ma Me G
V
S
Fig. 6-16 Calendario settimanale per le registrazioni Per fare delle modifiche: a) Dietro a “Passaggio” è selezionato il canale di una telecamera (qui il canale 1). Se si vuole modificare l’ora di registrazione per un altro canale, cliccare sul simbolo .
b) Per cancellare delle ore di registrazione, con il tasto sinistro premuto del mouse passare sopra il periodo desiderato. Singoli blocchi di mezz’ora possono essere cancellati anche cliccando sugli stessi.
c) Le ore cancellate possono essere inserite nuovamente nello stesso modo.
d) Per l’avvio automatico di una registrazione in caso di riconoscimento di movimento e/o allarme, cliccare dapprima rispettivamente sull’ovale giallo “M-Motion” e sull’ovale rosso “A-Allarme”. Quindi con il tasto sinistro premuto del mouse passare sopra il periodo desiderato.
e) Se l’impostazione deve essere valida anche per altri canali, in basso, alla riga “Copia CH… A Tutto” effettuare la selezione e cliccare sul pulsante “Copia”.
f) L’impostazione della fabbrica può essere ripristinata velocemente con un reset (Cap. 7.10).
Dopo l’impostazione cliccare su “inoltrare”.
7) Appare il menu per data, ora, lingua del menu e per altre impostazioni di base: 30
Congurazione sisthema generale Don‘t shof this findhof next time.ú ANNULLASalva precedente DATA02/18/2017Ora16:37:47Formato DataMM/GG/AAFormato Ora24OraLinguaITALIANOFormato VideoPALMenu Timeout1MinModalitàXVR
Fig. 6-17 Impostazioni base del sistema Voce del menuNota DATAAggiornare assolutamente data e ora per poter cercare in un secondo tempo le registrazioni di un certo periodo.
Ora Formato DataUsare assolutamente il modo italiano per le date (TT/ MM
/JJ); altrimenti sarà difficile o addirittura impossibile trovare le registrazioni di un certo periodo.
Formato OraFormato di 24 o 12 ore LinguaScelta di una delle 17 lingue per il menu Formato VideoFormato video delle telecamere analogiche collegate PAL (Europa) o NTSC (USA, Asia) Menu TimeoutIl menu si chiude automaticamente se non segue nessun’azione, e cioè dopo 30
s, 1, 2, 5 o 10 min.
OFF = Il menu rimane attivo fino all’interruzione o al salvataggio.
Modalità DVR = Modo semplice se il registratore non deve essere inserito in una rete: I menu per rete non saranno visualizzati.
XVR = Modo allargato con tutti i menu della rete.
8) Dopo l’impostazione in basso, a sinistra, cliccare sul campo “Don’t show this window next time”, affinché l’assistente d’installazione non venga più chiamato alla prossima accensione. Quindi, per salvare le impostazioni, cliccare su “Salva”.
9) Si vede il messaggio dicendo che il corso dell’impostazione è terminato. Confermare con “OK”.
OKWizard Complete !
Fig. 6-18 Impostazione terminata 10) A questo punto, le impostazioni più importanti per la messa in funzione sono state fatte. Tuttavia, se esiste la possibilità d’accesso al registratore attraverso Internet, conviene assolutamente attivare e cambiare la password (vedi capitolo 6.6).
11) Alla fine effettuare un riavvio per rendere attive tutte le modifiche (Menu Principale Chiusura Riavviare).
98
Italiano 6.5 Panoramica di tutti i menu 24/01/2017PassaggioTuttoTutto00:00:00
Ora TIPO
Backup Ricerca DATA
PassaggioTutto Tutto Ora TIPO
Picture Backup fDD
ANNULLA
Sistema Avaúzate Chiusura Parametri Geúeraleúventi Picture > 24/01/2017
00:00:00
Passaggio Analog Channels1felecamera IPú341ú3456
01/19/2017 23:47:09
PassaggioCf1
Cf2
Cf3
Cf4Record State Abilita Abilita Abilita AbilitaStream Type Video Stream Video Stream Video Stream Video StreamFPS
15Fps 15Fps 25Fps 15FpsRisp 192
192 96
192
Bit-Rate 4095Kbps 4095Kbps 2048Kbps 4095Kbps PAL
Start Date 24/01/2017
Eúd Date 24/01/2017Ora iúizio: 00:00:00
Ora úe: 23:59:59
Tipo di registroTuttoRicerca > Menu, blu = selezio1nati Campi rossi = impotstare assolutameúte!t Settori (senza simb1oli)Bianco = selezionat1o Sottomenu (con simb1oli), verde = selez1ionatiDATA
Ora 01/19/2017 23:47:09
Menu Parametri Legenda GMe Ma L
Copia Copia Cf1
PassaggioMotioú Allarme Eccezioúe Cf1
A Tutto D
PassaggioN-Normale M-Motioú A-AllarmeCf1
Default Alarm Iú IO-1
Alarm Type Normalmeúte-Aperto Ritardo 10 s Buzzer OFF
Messaggio 30 s Analog Channels1ú 3 4
1 ú 3 4 5 6
Motioú AllarmeAllarme Default Copia Copia Cf1
Copia IO-1 A Tutto Passaggio Cf1
Switch Caúale Buzzer Ritardo AbilitaDisabilta 10 s Seúsibiltà 4
Area Messaggio 30 s Uscita Allarme Mostra MessaggioIúvio Email Pop-UpCanale registrato Analog Channels felecamera IP
Copia A Tutto Uscita AllarmeMostra MessaggioIúvio Email Pop-UpCanale registrato felecamera IP
1ú 3 4
1 ú 3 4 5 6
Imosta DfCP
Disabilita Eúcryptioú00025
Porta SMTP
Server SMTP
Nome Uteúte Passwordshow Email Mitteúte Destiúatario 1
Destiúatario 2
Destiúatario 3
IútervalloTest Email Default Auto 3 Miú Abilita FTP Disabilita ServerIP00021
Porta Nome Uteúte Password úome directory Default FTP TEST
Abilita RTSP Abilita Verica Abilita Porta RTSP
00554RtspUserNameadmiúRtspUserPwd******striúga: Aúalog Chaúúel: rtsp://IP:Port/chA/B
IP Chaúúel: rtsp://IPPort/ipA/B
A:01(ch1),02(ch1)..t.
B:0(maiú stream),1(tsub stream) Default Registra Cattura fete fete fete MoúitorMoúitor MoúitorMoúitor MoúitorMoúitor MoúitorMoúitor Registra Piaúicazioúe EmDDNS
RTSP
FTP Email Email Email Rete Allarme Cattura Registra ANNULLA
Salva Piaúicazioúe EmDDNS
RTSP
FTP Rete Allarme Cattura Registra Cattura Rete Registra Motioú AllarmeAllarme Cattura Rete Registra ANNULLA
Salva Piaúicazioúe EmDDNS
RTSP
FTP Rete Allarme Cattura fete Registra Ricerca VideoParametrifDDAvaúzate Chiusura Sistema ANNULLA
Salva Ricerca VideoParametrifDDAvaúzate Chiusura Sistema ANNULLA
Salva Ricerca VideoParametrifDDAvaúzate Chiusura Sistema Piaúicazioúe EmDDNS
RTSP
FTP
EmailRete Allarme Cattura fete Registra Default V
S G
Me Ma L
D
MM/GG/AAD L Ma Me G V S1
ú 3 4 5 6 7 89 10 11 1ú 13 14 15
16 17 18 19 ú0 ú1 úúú3 ú4 ú5 ú6 ú7 ú8 ú930 31Chiusura Chiusura NomeUteúte admiúPassword RiavviareANNULLA
PassaggioTIPO Ora CON.ReproduizioúRegistra DIME.
DIME.
99
Italiano 6.5 Panoramica di tutti i menu 24/01/2017PassaggioTutto Tutto 00:00:00
Ora TIPO
Backup Ricerca DATA
PassaggioTutto Tutto Ora TIPO
Picture Backup fDD
ANNULLA
Sistema Avaúzate Chiusura Parametri Geúeraleúventi Picture > 24/01/2017 00:00:00
Passaggio Analog Channels1felecamera IPú 3 4
1 ú 3 4 5 6
01/19/2017 23:47:09
PassaggioCf1
Cf2
Cf3
Cf4Record State Abilita Abilita Abilita AbilitaStream Type Video Stream Video Stream Video Stream Video StreamFPS
15Fps 15Fps 25Fps 15FpsRisp 192
192 96
192
Bit-Rate 4095Kbps 4095Kbps 2048Kbps 4095Kbps PAL
Start Date 24/01/2017Eúd Date 24/01/2017Ora iúizio: 00:00:00Ora úe: 23:59:59Tipo di registroTuttoRicerca > Menu, blu = selezio1nati Campi rossi = impotstare assolutameúte!t Settori (senza simb1oli)Bianco = selezionat1o Sottomenu (con simb1oli), verde = selez1ionatiDATAOra 01/19/2017 23:47:09
Menu Parametri Legenda GMe Ma L
Copia Copia Cf1
PassaggioMotioú Allarme Eccezioúe Cf1
A Tutto D
PassaggioN-Normale M-Motioú A-AllarmeCf1
Default Alarm Iú IO-1
Alarm Type Normalmeúte-Aperto Ritardo 10 s Buzzer OFF
Messaggio 30 s Analog Channels1ú341ú3456
Motioú AllarmeAllarme Default Copia Copia Cf1
Copia IO-1 A Tutto Passaggio Cf1
Switch Caúale Buzzer Ritardo AbilitaDisabilta 10 s Seúsibiltà 4
Area Messaggio 30 s Uscita Allarme Mostra MessaggioIúvio Email Pop-UpCanale registrato Analog Channels felecamera IP
Copia A Tutto Uscita AllarmeMostra MessaggioIúvio Email Pop-UpCanale registrato felecamera IP
1ú341ú3456
Imosta DfCP
Disabilita Eúcryptioú 00025
Porta SMTP
Server SMTP
Nome Uteúte Passwordshow Email Mitteúte Destiúatario 1
Destiúatario 2
Destiúatario 3
IútervalloTest Email Default Auto 3 Miú Abilita FTPDisabilita ServerIP
00021
Porta Nome Uteúte Password úome directory Default FTP TEST
Abilita RTSPAbilita VericaAbilita Porta RTSP00554RtspUserNameadmiúRtspUserPwd******striúga: Aúalog Chaúúel: rtsp://IP:Port/chA/B
IP Chaúúel: rtsp://IPPort/ipA/B
A:01(ch1),02(ch1)..t.
B:0(maiú stream),1(tsub stream) Default Registra Cattura fete fete fete MoúitorMoúitor MoúitorMoúitor MoúitorMoúitor MoúitorMoúitor Registra Piaúicazioúe EmDDNS
RTSP
FTP Email Email Email Rete Allarme Cattura Registra ANNULLA
Salva Piaúicazioúe EmDDNS
RTSP
FTP Rete Allarme Cattura Registra Cattura Rete Registra Motioú AllarmeAllarme Cattura Rete Registra ANNULLA
Salva Piaúicazioúe EmDDNS
RTSP
FTP Rete Allarme Cattura fete Registra Ricerca VideoParametrifDDAvaúzate Chiusura Sistema ANNULLA
Salva Ricerca VideoParametrifDDAvaúzate Chiusura Sistema ANNULLA
Salva Ricerca VideoParametrifDDAvaúzate Chiusura Sistema Piaúicazioúe EmDDNS
RTSP
FTP
EmailRete Allarme Cattura fete Registra Default V
S G
Me Ma L
D
MM/GG/AAD L Ma Me G V S1
ú 3 4 5 6 7 89 10 11 1ú 13 14 15
16 17 18 19 ú0 ú1 úúú3 ú4 ú5 ú6 ú7 ú8 ú930 31Chiusura Chiusura NomeUteúte admiúPassword RiavviareANNULLA
PassaggioTIPO Ora CON.ReproduizioúRegistra DIME.
DIME.
100
Italiano 6.6 Attivare il blocco d’uso, cambiare le password e determinare i diritti utenti Dalla fabbrica, l’accesso al registratore non è protetto. La password preimpostata “admin” non è attivata e pertanto per la modifica delle impostazioni non deve essere digitata. Se il registratore viene inserito in una rete, occorre assolutamente attivare e cambiare la password (vedi anche capitolo 2
“Avvertenze importanti sulla sicurezza dei dati”).
1) Aprire il menu principale, scegliere il menu “Sistema” e a sinistra cliccare sul sottomenu “Utenti”.
i Generale Modica ANNULLA
Parametrificerca VideoHúú Sistema Avanzata Chiusura Info Log Utenti No.
1
2
3
4
5
6
7Nome Utente adminfser1
fser2
fser3
fser4
fser5
fser6LúVELLO
AdminUser 1
User 2
User 3
User 4
User 5
User 6Abilita Abilita Disabilita Disabilita Disabilita Disabilita Disabilita Disabilita Fig. 6-19 Menu per password e gruppi di utenti 2) E’ attivata la riga n. 1 per la password dell’amministratore.
Per cambiarla e per attivare il blocco d’uso, cliccare sul pulsante “Modifica”.
Modica Nome Utente Nome Utente adminadmin Disabilita Abilita fassword fassword Conúerma DeúaultSalva ANNULLA
Fig. 6-20 Finestra per cambiare le password 3) Se desiderato, modificare il nome utente “admin”.
4) Alla riga “Abilita Password” attivare “Abilita”. In questo modo si inserisce il blocco d’uso se non si vede nessun menu e se il registratore non è stato usato per 2 minuti.
5) Alla riga “Password” digitare una nuova password con non meno di 8 caratteri e ripeterla alla riga “Conferma”.
Importante: Per una sorveglianza remota e per l’accesso remoto al registratore attraverso una rete, la password deve essere composta di esattamente 8 caratteri. ť sď possibile digitare più caratteri, ma il software per l’accesso remoto (“ActiveX”) non riconoscerà la password come corretta.
6) Per salvare la password cliccare su “Salva”. Dopo il salvataggio avvenuto si vede il messaggio corrispondente che si deve confermare con “OK”.
7) Per determinare i diritti utenti, per prima cosa assegnare per ogni utente un nome utente e una password come descritto sopra.
8) Se una riga è selezionata per un utente, in basso nel menu si vede il pulsante “Permission”. Cliccare sul pulsante per determinare i diritti utente.
Diritti Backup Analog Channelf Telecamera Iú parametri Ricerca LogManutenzione Regiftra manuale Geftione Difc. Acceffo Remot.Controllo CiclataManual Capture Nome Utente ufer1
Tutto Elimina Salve ANNULLA
1234123456
LiveAnalog Channelf Telecamera Iú 1234123456
riproduzioneAnalog Channelf Telecamera Iú 1234123456
úTZAnalog Channelf Telecamera Iú 1234123456
Fig. 6-21 Menu per i diritti utente Impostare e salvare qui i diritti per l’utente selezionato.
Ripetere la procedura eventualmente per altri utenti.
9) Per uscire dal menu cliccare su ANNULLA o aspettare che si chiuda da solo dopo il tempo impostato.
6.7 Configurare gli ingressi allarme Se ai contatti SENSOR (27) sono collegati dei sensori d’allarme, come p. es. segnalatori di movimento o fotocellule, configurare gli ingressi allarme tramite il menu “Parametri”, sottomenu “Allarme”, settore “Allarme”.
i 11234
23456
Monitor AllarmeRegistra Rete Salva ANNULLA
farametri Ricerca Viúeo HDDSistema AvanzateChiusura Default Alarm InIO-1Alarm TypfNormalmfntf-Apfrtoúitardo10 sBuzzfr Mfssaggio Uscita Allarmf Mostra MfssaggioPop-Up Invio Email OFF
30 s CopiaA
IO-1Tutto Copia Canalf rfgistrato Analog Channfls Tflfcamfra IPMotionCattura Allarme Fig. 6-22 Menu per gli ingressi allarme Voce del menu Funzione Alarm InScelta dell’ingresso allarme Alarm TypeScelta del tipo di contatto Normalmente aperto = di lavoro Normalmente chiuso = di riposo OFF = il segnale all’ingresso non viene elaborato RitardoDurata del simbolo I nell’immagine dal vivo e immagine della telecamera con schermo intero BuzzerDurata del segnale d’allarme MessaggioDurata di una registrazione attivata da un allarme Uscita AllarmeL’allarme viene inoltrato sull’uscita ALARM (27) Mostra MessaggioUn allarme viene indicato dal simbolo I nell’immagine dal vivo Invio EmailIn caso d’allarme viene inviata una e-mail; per le impostazioni e-mail vedi menu “Parametri”, sottomenu “Rete”, settore “Email” Pop-UpIl canale corrispondente viene visualizzato come immagine a schermo intero Copia Copiare le impostazioni di un ingresso allarme ad altri ingressi DefaultReset all’impostazione della fabbrica SalvaSalvare le impostazioni ANNULAUscire dal menu 6.8 Attivare / disattivare l’audio dei segnali Inoltrare gli eventi all’uscita allarme Nel caso degli eventi seguenti, il buzzer d’allarme può emettere un suono e attivare il relè d’allarme [uscita ALARM (27), potenza max. 30 V (⎓), 1 A]. La durata del suono d’allarme e l’attivazione del relè possono essere impostate attraverso i relativi menu e le voci del menu “Buzzer” e “Uscita Allarme”.
EventoPercorso del menu Allarme attivato tramite gli ingressi SENSOR (27)Parametri Allarme Allarme Movimento nell’immagineParametri Allarme Motion Disco rigido pienoAvanzate Eventi Tipo Eventi: disco pieno Errore di scrittura sul disco rigidoAvanzate Eventi Tipo Eventi: Errore HDD
Segnale video interrottoAvanzate Eventi Tipo Eventi: PERDITA VIDEO
101
Italiano 6.9 Impostazioni per la sorveglianza dal vivo: Nome della telecamera, immagine, indicazione dell’ora Aprire il menu “Parametri”, cliccare sul sottomenu “Monitor” e cliccare sul settore “Live”.
i Monitor UscitaRegistra Rete Telecamera IP
Prifacy Zone DeúaultPassaggioCH1NomeCH1Mostra NomeAbilitafempoRegistraPosizioúe OSD
ColoreAbilita CoprireDisabilitafempo LIVEAbilita CopiaA
CH1futto Copia Imposta Imposta Salfa ANNULLA
Parametri Ricerca Video HDD
Sistema Afanzate Chiusura ControlloImmagine Life Cattura Allarme Analog Channels Fig. 6-23 Menu per la sorveglianza dal vivo Voce del menu Funzione PassaggioSelezione del canale della telecamera NomeDigitare il nome della telecamera Mostra NomeVisualizzazione del nome della telecamera Tempo RegistraVisualizzazione della data e dell’ora della registrazione durante la riproduzione Posizione OSDSpostare la posizione del nome della telecamera e dell’indicazione dell’ora (con il tasto sinistro premuto del mouse; terminare l’impostazione: premere il tasto destro del mouse) ColoreAprire la finestra per l’impostazione dell’immagine (colore, luminosità ecc.) CoprireNon mostrare l’immagine della telecamera durante la sorveglianza dal vivo Tempo LIVEIndicazione dell’ora CopiaCopiare le impostazioni di un canale su altri canali DefaultReset delle impostazioni della fabbrica SalvaSalvare le impostazioni ANNULLAUscire dal menu 6.10 Mascherare zone dell’immagine Se determinate zone dell’immagine non devono essere visibili (p. es. strade o piazze pubbliche), è possibile mascherarle. Per tale scopo, in ogni immagine si possono posizionare quattro rettangoli neri differenti. Aprire il menu “Parametri”, cliccare sul sottomenu “Monitor” e quindi cliccare sul settore “Privacy Zone”.
i Salva ANNULLA
Default PassaggioCH1Area MascheraDisabilifaImposfa Area 1 ú 3 4
Area Maschera CopiaA
CH1TuffoCopia Imposfa MonitorParafetri Ricerca úideo HDDSistefa Avanzate Chiusura Uscita Registra Rete Telecafera IP
Privacy ZoneControllo Iffagine Live Cattura Allarfe Analog Channels Fig. 6-24 Menu per mascherare zone dell’immagine Voce del menu Funzione PassaggioScelta del canale della telecamera Area MascheraAttivare Enable per poter determinare le zone da mascherare Imposta AreaPer fissare una maschera cliccare sul suo numero Voce del menuFunzione Area Maschera 1. Cliccare su Imposta per attivare l’immagine scelta.
2. Per spostare tener premuto il tasto sinistro del mouse nel centro della maschera.
3. Per modificare le dimensioni tener premuto il tasto sinistro del mouse nell’angolo basso di destra.
4. Per ritornare al menu cliccare con il tasto destro del mouse sull’immagine.
CopiaCopiare le impostazioni di un canale su altri canali DefaultRitorno alle impostazioni della fabbrica SalvaSalvare l’impostazione ANNULLAUscire dal menu 6.11 Impostare il riconoscimento di movimenti Dalla fabbrica, il riconoscimento di movimenti è attivato per ogni canale delle telecamere ed è impostato in modo tale che l’intera immagine sia sensibile per un riconoscimento. Nel caso di un movimento nell’immagine appare il simbolo M
(Motion). Se per 10 s non ha luogo più nessun movimento, il simbolo sparisce.
Aprire il menu “Parametri”, cliccare sul sottomenu “Allarme” e quindi cliccare sul settore “Motion”.
i 11234
23456AllarmeRegistra Rete Default PassaggioCH1SwitchfCanale úuzzer RitardoAbilitaDisabilita 10fsSensibilità4Area Messaggio UscitafAllarme MostrafMessaggioPop-Up InviofEmail 30fs CopiaA
CH-1Tutto Copia Imposta Canalefregistrato AnalogfChannels TelecamerafIPMotionCattura Allarme Salfa ANNULLA
Monitorúarametri Ricerca Video HDD
Sistema Afanzate Chiusura Fig. 6-25 Menu per il riconoscimento di movimenti Voce del menuFunzione PassaggioScelta del canale della telecamera Switch Canale Dis / attivare il riconoscimento di movimenti BuzzerCon movimento riconosciuto il buzzer d’allarme emette un segnale acustico SensibilitàSensibilità del riconoscimento Area 1. Cliccare su Imposta per escludere dei campi controllati dal riconoscimento.
2. I campi sensibili al riconoscimento sono contrassegnati di rosso. Per disattivare più campi singoli, con il tasto sinistro premuto del mouse passare sopra questi campi.
3. ť possibile anche cliccare direttamente sui campi singoli.
4. Nello stesso modo si possono riattivare i campi.
5. Per ritornare al menu cliccare con il tasto destro del mouse sull’immagine.
MessaggioDurata di una registrazione attivata dal riconoscimento di un movimento RitardoDurata dell’allarme (si vede M, segnale acustico d’allarme, il relè d’allarme reagisce) Uscita AllarmeCon un movimento riconosciuto, il relè d’allarme reagisce (uscita ALARM, Capitolo 5.4) Mostra MessaggioUn movimento riconosciuto viene segnalato da M (Motion) Invio Email Con un movimento riconosciuto si invia auto-maticamente una e-mail, se nel menu “Parametri”, sottomenu “Rete”, settore “Email” sono state digitate le indicazioni necessarie.
102
Italiano Voce del menuFunzione Pop-UpL’immagine con il movimento riconosciuto viene rappresentata a schermo intero.
Canale registratoIndicazione dei canali da registrare in caso di movimento riconosciuto (si possono registrare più canali anche se il movimento è stato riconosciuto su un solo canale).
Le ore di una registrazione possibile attivata da un movimento devono essere segnalate nel calendario delle registrazioni (menu “Parametri”, sottomenu “Registra”, settore “Pianifica Registra”, cliccare sul campo rotondo giallo “M-Motion” e con il tasto sinistro premuto passare sopra i giorni/le ore.) CopiaCopiare le impostazioni di un canale su altri canali DefaultRitorno all’impostazione della fabbrica SalvaSalvare l’impostazione ANNULLAUscire dal menu 6.12 Comando remoto delle telecamere (PTZ) Per il comando remoto delle telecamere collegate all’interfaccia RS-485 (27), eseguire le impostazioni necessarie sul registratore. Aprire il menu HDD e cliccare sul sottomenu PTZ.
i HDD
Salva DefaultANNULLA
Cloud PassaggioCH1ProtocolloPelco-DBaudfRate96úúDatafBit8StopfBit1ParitàNessunoCruiseAbilitaIndirizzoúú1
CopiaA
CH1TuttoCopia PTf Parametri úicerca Video HDDSistema Avanzate Chiusura Fig. 6-26 Menu per impostare il comando remoto delle telecamere Voce del menuFunzione PassaggioScelta del canale della telecamera ProtocolloScelta del protocollo di comando della telecamera Baud RateScelta dalla velocità di trasmissione dati Data BitNumero dei data bit Stop BitNumero dei stop bit ParitàTipo del bit di parità: Nessuno, Odd (dispari), Even (pari), Mark (sempre 1), Space (sempre 0) CruiseAttivare (Abilita) o disattivare (Disabilita) il movimento della telecamera IndirizzoIndirizzo della telecamera per il comando indipendente di tutte le telecamere collegate CopiaCopiare le impostazioni di un canale su altri canali DefaultRitorno all’impostazione della fabbrica SalvaSalvare l’impostazione ANNULLAUscire dal menu Le impostazioni per Protocollo, Baudrate, Data Bit, Stop Bit e Indirizzo si trovano nei dati tecnici della telecamera.
6.13 Permettere registrazioni istantanee Con la funzione registrazione istantanea si possono salvare in modo temporizzato e manuale delle registrazioni momentanee di immagini delle telecamere. Aprire il menu “Parametri” e cliccare sul sottomenu “Cattura”.
i Bewegung Monitor Cattura ScheduleRegistra Rete Salva fNNULLf úefault PassaggioCH1Auto Capturefisabilitàúodalità Streamingúain StreamNormal IntervalAlarm Interval úanual Capture5 s5 s fisabilità CopiaA
CH1Tutto Copia fllarme Cattura Parametri Ricerca Video HúúSistema fvanzate Chiusura Fig. 6-27 Menu per attivare la funzione di registrazione istantanea Voce del menuFunzione PassaggioScelta del canale della telecamera Auto CapturePermettere delle registrazioni istantanee temporizzate (impostare le ore nel settore “Schedule”) Modalità Streaming „Main Stream” = alta risoluzione, ma grande quantità di dati “Sub-stream” = risoluzione minore, ma anche quantità minore di dati Normal IntervalIntervalli di tempo delle registrazioni nel funzionamento normale Alarm IntervalIntervalli di tempo delle registrazioni con allarme Manual CapturePermettere delle registrazioni istantanee manuali (Attivare la registrazione vedi capitolo 7.6.2) CopiaCopiare le impostazioni di un canale su altri canali DefaultRitorno all’impostazione della fabbrica SalvaSalvare l’impostazione ANNULLAUscire dal menu Per stabilire le ore per le registrazioni istantanee automatiche cliccare sul settore “Schedule”: i Bewegung 020181614121022
2468Monitor Cattura ScheduleRegistra Rete Salva fNNULLf úefault CopiaA
CH1futtoCopia Passaggioú-úormale M-Motion A-Allarme CH1
Domenica Lunedi Martedď Mercoledď Giovedi Venerdď fabatoCattura fllarmeL D
Me Ma G
V
S
Parametri Ricerca Video HúúSistema fvanzate Chiusura Fig. 6-28 Calendario per registrazioni istantanee temporizzate 1) Dietro a “Passaggio” è scelto un canale della telecamera (qui il canale 1). Per modificare l’ora di registrazione per un altro canale, cliccare sul simbolo .
2) Per impostare le ore di registrazione, con il tasto sinistro premuto del mouse passare sul periodo richiesto. Singoli blocchi di mezz’ora possono essere scelti anche con un semplice clic.
3) Nello stesso modo si possono cancellare le ore di registrazione.
103
Italiano 4) Per registrare automaticamente le registrazioni in caso di riconoscimento di un movimento e / o di allarme, cliccare dapprima rispettivamente sull’ovale giallo “M-Motion” e sull’ovale rosso “A-Allarme”. Quindi, con il tasto sinistro premuto del mouse passare sul periodo richiesto.
5) Se l’impostazione deve essere copiata anche su altri canali, alla riga inferiore “Copia CH… A Tutto” effettuare la selezione e cliccare sul pulsante “Copia”.
6) Per salvare l’impostazione, cliccare su “Salva”, per cancellare tutte le ore cliccare su “Default” e per uscire dal menu cliccare su ANNULLA.
6.13.1 Memoria cloud per registrazioni istantanee Se in caso di effrazione si ruba o distrugge il registratore, tutte le registrazioni sono perse. Tuttavia, è possibile salvare automaticamente delle registrazioni istantanee in un cloud (locazione di memoria su un server esterno) se il registratore è collegato con Internet. Tramite un accesso protetto si può accedere alle immagini.
1) Registrarsi sul website di “Dropbox”: https://www.dropbox.com 2) Aprire il menu HDD e cliccare sul sottomenu “Cloud”.
1234123456
i HDD
Default Cloud Archiviazione CfoudDiúabifita Tipo CfoudDROPBOX
Time Trigger1 Min Motion Detection Diúabifita Nome DriverDevice Attiva CfoudUpgrade Cfoud StoragCeSetup emaif avanzatCo PTZ
Paúúaggio Anafog Channefú Tefecamera IP
Salva ANNUffA
Parametri úicerca Video HDD
Sistema Avanzate Chiusura Fig. 6-29 Menu per salvare delle immagini sul cloud 3) Nel sottomenu “Cloud” effettuare le impostazioni.
Voce del menuFunzione Archiviazione Cloud Funzione cloud On / Off Tipo CloudSalvataggio attualmente possibile solo presso “Dropbox” PassaggioSelezione dei canali le cui immagini devono essere salvate nel cloud Time TriggerIntervalli di tempo delle registrazioni nel funzionamento normale Motion DetectionSalvare le registrazioni (in più) in caso di movimento riconosciuto Nome DriverDeterminare il nome con il quale le immagini devono essere salvate nel cloud Attiva CloudPer attivare la funzione Cloud cliccare qui Setup email avanzatoSe desiderate ricevere una e-mail quando delle immagini sono salvate nel cloud, cliccare su questo pulsante e digitare i dati nella finestra che si aprirà.
DefaultRitorno all’impostazione della fabbrica SalveSalvare l’impostazione ANNULLAUscire dal menu 6.14 Salvare e aprire configurazioni differenti Per vari utenti oppure per impieghi differenti si possono salvare e aprire in caso di necessità varie configurazioni del registratore (p. es. su una chiavetta USB).
1) Collegare una memoria esterna (chiavetta, disco rigido) con una delle due prese USB del registratore.
2) Configurare il registratore secondo desiderio.
3) Aprire il menu “Avanzate”; si vede il sottomenu “Manutenzione”: i Manutenzione Salva DefaultANNULLA
Utente di defaultadminAuto RiavvioAbilitaRiavviareOfni settima. Domúú:úúAffiornamentoCarica parametri IPC Carica DefaultCarica Default Salva parametriIPC Riavvio Affiornamento Cam Eventi farametri Riúerúa Video HDDSistema Avanzate Chiusura Fig. 6-30 Menu “Avanzate”, Settore “Manutenzione” 4) Cliccare su “Salva parametri” e nella finestra “Salva parametri” che si aprirà, fare tutte le impostazioni per il salvataggio e quindi cliccare su “OK”. Il file di configurazione prenderà il nome “DEVICE_Settings”.
5) Per configurazioni differenti, salvarle in cartelle differenti per non sovrascrivere una configurazione già memorizzata.
6) Per aprire una configurazione, cliccare su “Carica parametri”.
6.15 Consigli ConsiglioPercorso del menu Cambio automatico fra ora legale e ora solareSistema Generale DST
Impostazione automatica dell’ora tramite la rete Sistema Generale NTP
Limitare il riconoscimento di movimentoParametri Allarme Motion Invio automatico di una e-mail in caso d’allarmeParametri Rete Email Disattivare i canali dove non è collegata nessuna telecamera Per ogni canale disattivato di una telecamera analogica si può inserire in più una telecamera di rete.Parametri Monitor Analog Channels Se il registratore non è inserito in una rete, disattivare i menu per reti per avere un’interfaccia utente più semplice.Sistema Generale Generale: Modalità = DVR
104
Italiano 7 Funzionamento Il modo più comodo di usare il registratore è con il mouse. Per questo motivo, queste istruzioni parlano solo marginalmente dell’uso direttamente sul registratore e con il telecomando.
Accendere il registratore con l’interruttore a bascula (30) sul retro. Dopo alcuni secondi si vede il logo della società sul monitor collegato: Quindi appaiano le immagini delle telecamere per la sorveglianza dal vivo (Cap. 7.3). Il segnalatore interno d’allarme emette 5 beep come controllo. In caso di disturbo o di allarme, vedi capitolo 8.
7.1 Blocco d’uso Se per il registratore è stato attivato il blocco d’uso (Cap. 6.6) e se il registratore non viene usato per 2 minuti circa, si attiva automaticamente il blocco d’uso che deve proteggere il registratore dall’accesso non autorizzato e che viene visualizzato con il simbolo del lucchetto chiuso nella barra degli strumenti.
1) Visualizzare la barra degli strumenti: Premere il tasto destro del mouse oppure portare il cursor del mouse nel centro del bordo inferiore dello schermo.
Fig. 7-1 Barra degli strumenti 2) Per attivare il blocco anzitempo, (prima che scadano i 2 minuti) cliccare sul simbolo del lucchetto.
3) Se con il blocco attivo si vuole attivare una funzione (p. es.
il menu principale), appare la finestra “log in”.
log in ANNULLA
log in Nome Utente adminID Periferica 000000 r ( 000000 ú Password Fig. 7-2 Finestra per annullare il blocco d’uso 4) Cliccare sul campo con la cornice blu “Password”. Si apre una finestra con una tastiera con la quale si può digitare la password. Quindi cliccare su “log in”.
7.2 Cambio utenti Se per l’uso del registratore sono stati preparati più conti utenti, un nuovo utente deve registrarsi con la sua password per poter usare il registratore secondo i suoi diritti d’utente: 1) Visualizzare la barra degli strumenti (Fig. 7-1): Premere il tasto destro del mouse oppure portare il cursor del mouse nel centro del bordo inferiore dello schermo.
2) Il simbolo del lucchetto dovrebbe essere chiuso. Se mostra un lucchetto aperto, per chiuderlo cliccare sullo stesso con il tasto sinistro del mouse.
3) Cliccare sul simbolo chiuso del lucchetto: Si apre la finestra “log in” (Fig. 7-2).
4) Cliccare nel campo con la cornice blu “Nome Utente”. Si apre una finestra con una tastiera.
5) Per prima cosa, cancellare il nome utente precedente con il tasto “Backspace” nella finestra con la tastiera. Quindi digitare il nuovo nome nella finestra.
6) Procedere nello stesso modo per la password e cliccare su “enter”.
7) Per concludere cliccare su “log in”.
Se una password non è attiva, basta cliccare su “log in”.
7.3 Sorveglianza dal vivo Dopo l’accensione si vedono sempre le immagini delle telecamere nella visualizzazione dal vivo: MR
MR
T-CH1
CH4
T-CH2
CH3
PERDITA VIDEO
PERDITA VIDEONfssunú tflfcúmfrúNfssunú tflfcúmfrú 15/12/2016 09:53:46N
Fig. 7-3 Sorveglianza dal vivo con AXR-104
CH1CH2
CH5CH6
CH3
CH8CH7
CH415/12/2016 13:45:I37
PERDIfA VIDEOPERDIfA VIDEOPERDIfA VIDEOPERDIfA VIDEO
úessuna telecamera úessuna telecamera úessuna telecamera úessuna telecamera Fig. 7-4 Sorveglianza dal vivo con AXR-108
CH1
CH6
CH11
CH7
CH12
CH8
CH13
CH9
CH14
CH10
CH15
CH16
CH2CH3CH4CH5
Nessuna felecameúaNessuna felecameúaNessuna felecameúaNessuna felecameúa PERDITA VIDEOPERDITA VIDEOPERDITA VIDEOPERDITA VIDEO
15/12/2016 13:45:3 7
Fig. 7-5 Sorveglianza dal vivo con AXR-116
Dalla fabbrica, ogni immagine è contrassegnata con il nome “CH-” e il numero del canale. I nomi possono essere cambiati secondo necessità, p. es. “Magazzino”, “Ingresso”, “Cassa” ecc. (vedi capitolo 6.9). In più, davanti al nome è indicato il tipo di telecamera:
105
Italiano Indicazione davanti al nomeTipo di telecamera nessunaTelecamera analogica con segnale composito A-Telecamera AHD
(Analog High Definition) C-Telecamera CVI
(Composite Video Interface) T-Telecamera TVI
(Transport Video Interface) La sorveglianza dal vivo non ha influenza sulla registrazione in corso (segnalata dal simbolo R nell’immagine). ť possibile rappresentare in maniera ingrandita singole immagini o una selezione di immagini: Rappresenta-zioneAzione Immagine singolo a schermo interoCon il tasto sinistro del mouse: Fare doppio clic sull’immagine.
Sull’apparecchio o con il telecomando: Premere il relativo tasto numerico 1 … 9 oppure il tasto CH – / CH + (AXR-104, AXR-108); canale 10 … 16: tasto 1 e tasto 0 …6
Ritorno a tutte le immaginiCon il tasto sinistro del mouse: Fare doppio clic sull’immagine a schermo intero.
Sull’apparecchio o con il telecomando: Premere (più volte) il tasto ALL oppure il tasto (AXR-116).
Numero vario di immaginiCon il mouse: Con una pressione del tasto destro del mouse visualizzare la barra degli strumenti e scegliere la visualizzazione: SimboloImmagini AXR-104AXR-108AXR-116
4 9— 12— 16—— 25—— Ulteriori sud-divisioni Cliccando più volte sul simbolo della rappresentazione passare agli altri canali.
Sull’apparecchio o con il telecomando: Premere (più volte) il tasto ALL oppure il tasto (AXR-116).
Tutte le immagini a schermo intero come sequenzaCon il mouse cliccare nella barra degli strumenti sul simbolo “Start SEQ”. Per impostare la durata delle immagini vedi il capitolo successivo.
Per terminare la sequenza, cliccare nuovamente sul simbolo .
7.3.1 Impostare la durata e la rappresentazione delle immagini sequenziali Dalla fabbrica è impostata una durata di 5 secondi. Per modificare la durata: 1) Visualizzare il menu principale. Premere il tasto MENU sul registratore/telecomando Oppure con il mouse: Visualizzare la barra degli strumenti: Premere il tasto destro del mouse oppure portare il cursor del mouse nel centro del bordo inferiore dello schermo Fig. 7-6 Barra degli strumenti e cliccare sul simbolo MENU PRINCIPALE.
i Analog Channels Monitor UscitaRegistra RetePassaggioCH1
CH2
CH3
CH4Nofe CH1
CH2
CH3
CH4Abilita Abilita Abilita Abilita Abilita Telecamera IP
Prifacy Zone Salfa úNNULLú Parametri Ricerca Video HDD
Sistema úfanzate Chiusura únalog Channels Life ControlloImmagine Cattura úllarme CH1 CH2 CH3 CH4
Fig. 7-7 Menu principale 2) ť attivo il sottomenu “Monitor” nel menu “Parametri”.
Tutto a sinistra nel sottomenu cliccare su “Uscita” (senza simbolo).
0
i Monitor UscitaRegistra Rete Telecamera IP
Prifacy ZoneUscita VideoLIVE-OUTModafità sequeúzaLayout1Tempo rotazioúe5Risofuzioúe VGA/HDMI
Traspareúza Support Overscaú1280×1024
DeúaultSalfa ANNULLA
Parametri Ricerca Video HDD
Sistema Afanzate Chiusura Analog Channels Life Cattura Allarme ControlloImmagine Fig. 7-8 Menu “Parametri”, sottomenu “Monitor”, Settore “Uscita” 3) Alla riga “Modalità sequenza” si può cambiare da immagine singola (Layout1) alla rappresentazione di più immagini. Per fare ciò, cliccare sul simbolo tutto a destra della riga.
4) Per modificare la durata, alla riga “Tempo rotazione” cliccare sul campo con il numero 5 e digitare la durata in secondi.
5) Per salvare l’impostazione cliccare su “Salva” e dopo il messaggio “Salvataggio completato” cliccare su “OK”.
6) Chiudere la finestra del menu cliccando su ANNULLA.
7.3.2 Ingrandire una sezione dell’immagine 1) Con il tasto sinistro del mouse cliccare sull’immagine dal vivo di cui si desidera ingrandire una sezione. (In caso di un’immagine singola premere semplicemente il tasto sinistro del mouse.) Appare la barra di scelta rapida: Fig. 7-9 Barra di scelta rapida per ogni immagine 2) Cliccare sul simbolo della lente . Con una rappresentazione multipla, si passa alla rappresentazione a schermo intero. Appare un simbolo della lente con la quale si apre una finestra che determina la sezione da ingrandire.
3) Per ritornare a un’immagine normale a schermo intero, premere il tasto sinistro del mouse. La funzione di zoom continua ad essere attiva: Si può ingrandire un’altra sezione.
4) Per disattivare la funzione zoom, premere il tasto destro del mouse. Quindi con un doppio clic con il tasto sinistro del mouse si può ritornare alla rappresentazione multipla precedente.
106
Italiano 7.3.3 Riproduzione audio Si ascolta sempre quel canale che è rappresentato a schermo intero, oppure, nel caso di rappresentazione multipla, il canale dell’immagine con la cornice blu (selezionarla con il tasto sinistro del mouse).
1) Per impostare il volume, con il tasto destro del mouse visualizzare la barra degli strumenti (Fig. 7-10).
2) Cliccare sul simbolo dell’altoparlante . Sarà visualizzato un regolatore volume.
3) Con il tasto sinistro premuto del mouse modificare il volume tramite il regolatore a cursore.
4) Per spegnere l’audio, cliccare sul simbolo dell’altoparlante direttamente sotto il regolatore. Allo stesso modo si può anche riattivare l’audio.
Per attivare e disattivare l’audio, si può usare anche il tasto MUTE sul telecomando o sull’apparecchio. Tuttavia, in questo caso non deve essere visualizzato il regolatore volume.
7.4 Barre di comando – accesso rapido a impostazioni e funzioni Per un accesso rapido ai menu d’impostazione e alle funzioni più importanti esistono la barra degli strumenti (per visualizzarla cliccare con il tasto destro del mouse) e per ogni immagine la barra di scelta rapida (cliccare con il tasto sinistro del mouse sull’immagine richiesta).
Fig. 7-10 Barra degli strumenti SimboloFunzione Aprire il menu principale; è scelto: Menu “Parametri” Sottomenu “Monitor” Settore “Analog Channels” Il simbolo del lucchetto è presente solo se è stata attivata una password (Cap. 6.6).
Se il lucchetto è aperto, cliccando sul suo simbolo si attiva il blocco d’uso (Cap. 7.1).
Se il lucchetto è chiuso, è attivo il blocco d’uso; cliccando s ul simbolo si apre la finestra per un cambio utente (Cap. 7.2) Vista con quattro immagini Nei registratori AXR-108 e AXR-116 esistono ulteriori simboli per la vista di 9, 12, (16), (25) immagini.
Vista con immagini di dimensioni differenti Stream switch per l’immagine con la cornice blu: “Main stream” = alta risoluzione, ma grande quantità di dati “Sub-stream” = risoluzione minore, ma anche quantità minore di dati Preview Policy regola le priorità col carico massimo sul sistema Realtime = imm. / sec. più alto possibile, ma qualità minore dell’immagine Bilanciamento = imm. / sec. medio e qualità media dell’immagine Fluidità = qualità più alta possibile dell’immagine, ma meno immagini / secondo Avviare/terminare rotazione (sequenza) (Cap. 7.3) Impostare il volume, dis- / attivare audio (Cap. 7.3.3) Aprire il menu per la ricerca di registrazioni (Cap. 7.7.2) Fig. 7-11 Barra di scelta rapida per le funzioni, separatamente per ogni immagine SimboloFunzione Salvare la registrazione istantanea (Cap. 7.6.2) Avvio e fine manuale della registrazione (Cap. 7.6) Riprodurre gli ultimi 5 minuti della registrazione (Cap. 7.7.1) Ingrandire una sezione dell’immagine (Cap. 7.3.2) Impostare colore, luminosità e contrasto (Cap. 7.5) Visualizzare il menu di comando per una telecamera PTZ (Cap. 7.8) 7.5 Impostare colore, luminosità, contrasto delle immagini dal vivo 1) Con il tasto sinistro del mouse cliccare sull’immagine dal vivo da regolare. (Con rappresentazione di immagine singola premere semplicemente il tasto sinistro del mouse.) Appare la barra di scelta rapida (Fig. 7-11).
2) Cliccare sul simbolo della tavolozza . L’immagine dal vivo viene rappresentata come immagine singola, e si apre il menu per regolare l’immagine: 125130132100
Colore PassaggioTINTACf1
LUMINúSITA
CúNTRASTú SATURAZIúNE
DefaultSalvaANNULLA
Fig. 7-12 Menu per la regolazione dell’immagine Voce del menuFunzione PassaggioCambio a un altro canale della telecamera TINTAImpostare la tonalità LUMINOSITAImpostare la luminosità CONTRASTOImpostare il contrasto SATURAZIONEImpostare la saturazione DefaultReset alle impostazioni della fabbrica SalvaSalvare l’impostazione ANNULLAUscire dal menu 3) Per ritornare alla visualizzazione precedente dopo essere uscito dal menu, fare un doppio clic con il tasto sinistro del mouse.
7.6 Registrazioni Dalla fabbrica, il registratore è impostato in modo tale che dopo l’accensione si registrano tutti i canali dove è collegata una telecamera. Se quest’impostazione è stata cambiata (menu “Parametri”, sottomenu “Registra”, settore “Pianifica Registra”), per un canale che non viene registrato automaticamente, si può avviare una registrazione in modo manuale: 1) Con il tasto sinistro del mouse cliccare sull’immagine dal vivo da registrare. (In caso di rappresentazione a immagine singola premere semplicemente il tasto del mouse). Appare la barra di scelta rapida (Fig. 7-11).
2) Cliccare sul simbolo della telecamera . Dopo poco tempo la registrazione si avvia e si vede il simbolo R (Registra).
3) Per terminare la registrazione cliccare nuovamente sul simbolo .
107
Italiano In alternativa è possibile avviare una registrazione con il tasto sul registratore o sul telecomando, e con il tasto ■ la si ferma. In caso di rappresentazione multipla, si avvia sempre la registrazione della telecamera la cui immagine è incorniciata di blu. Se necessario, prima dell’avvio della registrazione, con i tasti numerici o con i tasti CH − / CH + attivare la rappresentazione a schermo intero del canale da registrare.
7.6.1 Modificare le ore di registrazione 1) Aprire il menu principale e nel menu “Parametri” scegliere il sottomenu “Registra” e cliccare sul settore “Pianifica Registra”.
i 020181614121022
2468Monitor Registra Pianica Registra Main Stream Subfstream MobilstreamRegistra Rete Default Copia A
CH1TuutoCopia Passaggiof-formaúe M-Motion A-Aúúarme CH1
úattura Allarme Salva ANNULLA
Domenica Lunedi Martedď Mercoledď Giovedi Venerdď fabato Parametri Ricerca Video HDDSistema Avanzate úhiusura M S
W T
T
F
S
Fig. 7-13 Calendario settimanale delle registrazioni Con l’impostazione della fabbrica, tutti i canali dove è collegata una telecamera, vengono registrati dalle ore 0 fino alle ore 24. Per fare delle modifiche: 2) Dietro a “Passaggio” è selezionato un canale (qui il canale 1). Se si deve modificare l’ora per un altro canale, cliccare sul simbolo .
3) Per cancellare le ore di registrazione, con il tasto sinistro premuto del mouse passare sul periodo richiesto. Singoli blocchi di mezz’ora possono essere cancellati anche con un semplice clic.
4) Nello stesso modo si aggiungono ore cancellate.
5) Per avviare automaticamente le registrazioni in caso di riconoscimento di movimento e/o di allarme, cliccare dapprima rispettivamente sull’ovale giallo “M-Motion” e sull’ovale rosso “A-Allarme”. Quindi, con il tasto sinistro premuto del mouse, passare sopra il periodo richiesto.
6) Se l’impostazione deve essere copiata su altri canali, alla riga inferiore “Copia CH… A Tutto” effettuare la selezione e cliccare sul pulsante “Copia”.
7) Per memorizzare le ore cliccare su “Salva”. Confermare con “OK” il messaggio “Salvataggio completato” e uscire.
8) Per uscire dal calendario cliccare su ANNULLA.
7.6.2 Immagini istantanee In qualsiasi momento è possibile memorizzare con la funzione di immagine istantanea la registrazione momentanea di un’immagine, p. es. se durante la sorveglianza dal vivo si vuole conservare un evento importante. La funzione immagine istantanea non è attivata dalla fabbrica. Per attivarla vedi capitolo 6.13. Per salvare una registrazione istantanea: 1) Con il tasto sinistro del mouse cliccare sull’immagine dal vivo da registrare. (In caso di rappresentazione a immagine singola premere semplicemente il tasto del mouse). Appare la barra di scelta rapida (Fig. 7-11).
2) Cliccare sul simbolo dell’immagine istantanea . In questo modo, la registrazione momentanea è memorizzata.
3) Per visualizzare e esportare delle immagini istantanee vedi il capitolo 7.7.3.
7.7 Riproduzione di registrazioni La riproduzione di una registrazione non interrompe una registrazione in corso.
7.7.1 Riprodurre gli ultimi 5 minuti di registrazione di una telecamera 1) Con il tasto sinistro del mouse cliccare sull’immagine dal vivo la cui registrazione deve essere riprodotta. Appare la barra di scelta rapida (Fig. 7-11).
2) Cliccare sul simbolo . Si avvia la riproduzione degli ultimi 5 minuti registrati e si visualizza la barra di comando: Fig. 7-14 Barra di comando della riproduzione 3) Con i pulsanti e II si può arrestare o continuare la riproduzione.
4) Con dei clic ripetuti sul simbolo di pausa II si possono osservare una dopo l’altra le immagini singole.
5) Con lo spostamento in avanti o indietro del pomello di riproduzione mentre è premuto il tasto sinistro del mouse, è possibile l’avanzamento o ritorno veloce della registrazione.
6) Per terminare anzitempo la riproduzione, cliccare sulla × rossa.
7.7.2 Riprodurre la registrazione di un determinato momento e eventualmente salvarla su un dispositivo esterno Per visualizzare il calendario per la ricerca di registrazioni premere il tasto sull’apparecchio / telecomando oppure con il tasto destro del mouse visualizzare la barra degli strumenti (Fig. 7-10) e cliccare, tutto a destra, sul simbolo della riproduzione .
1234123456
i riproduzone Passaffiso Analof Cúannels Telecamera IP
Generale PLAY
D
25 26 27 28 29 30 3112 3 4 5 67
14
21
284
8
9
16 17 18 19 20232425 26 27
30 311 2 3
10 11 12 13
15
22
29L Ma Me G V S
Ricerca Passaffio Tutto GEN.2017
Ora inizio: 00:00:s00 Ora ne: 23:59:59TIPO Tutto Picture Eventi ANNULLA
Parametri RicercafVideo úDD
Sistema Avanzate Chiusura Fig. 7-15 Calendario per la ricerca di registrazioni Dopo la visualizzazione del calendario è sempre scelto il giorno odierno (segnalato di giallo).
I giorni con registrazioni sono contrassegnati con un triangolo arancione.
1) Cliccare sul giorno le cui registrazioni devono essere riprodotte. Per saltare a un altro mese, cliccare sulla freccia bianca < o > che si trova davanti/dietro all’indicazione del mese. Per scegliere un anno differente, cliccare sulla freccia blu o dietro il numero dell’anno.
2) Nel campo “riproduzione Passaggio” si possono attivare o disattivare dei canali. I canali contrassegnati di blu saranno riprodotti.
3) Per delimitare il periodo di riproduzione, digitare in basso nella finestra un’ora di inizio e di fine.
4) Per la riproduzione cliccare su PLAY.
108
Italiano 24h 2h 1h 30m CH2
CH1
00:00:0023:59:59
1702:00
0:0004:0006:0008:0010:0012:0014:0016:0018:0020:0022:0000
PLAY10/01/2017 07:16:4810/01/2017 07:16:48S
12 3 4 5 67
91011 12 1314
16 17 18 19 2021
23 24 25 26 2728
30 311 2 3 4
25 26 27 28 29 30 31
8
15
22
29M f W f F SGúN.
Playback fype GeneraleSúL.2017
Motion Astuto Normale IO Allarme CH1
CH2
CH3
CH4
IP CH1
IP CH2
IP CH3
IP CH4
IP CH5
IP CH6
07:16:48
Fig. 7-16 Visione riproduzione di una registrazione 5) La visione durante la riproduzione è molto chiara e si spiega da sola. La tabella che segue elenca le funzioni più frequenti: SimboloFunzioneIndicazione (campo verde in alto a destra) ✓ CH..Visualizzare e spegnere il canale— Uscire dai menu; per visualizzarli, portare il cursor del mouse sul bordo inferiore dell’immagine e cliccare sul simbolo— * Ritorno veloce> X 2 … 16
Ingrandire una sezione; visione precedente: tasto destro del mouse— Salvataggio esterno di una parte della registrazione: 1. Collegare un disco rigido esterno oppure una chia-vetta USB con una delle due porte USB.
2. Riprodurre la registrazione e all’inizio della parte richiesta e alla sua fine cliccare sul simbolo.
3. Al 2. clic alla fine della parte si apr e una finestra per salvare il file video. Scegliere il formato video e cliccare su “Salva”.
4. In un’ulteriore finestra scegliere la locazione di memoria e eventualmente la cartella e cliccare su OK.
Per chiudere la finestra cliccare su ANNULLA.
Per la riproduzione dei file video installare sul computer il programma “VideoPlayer…exe” (sul CD in dotazione).
Attivare / disattivare l’audio; con il regolatore a destra del simbolo impostare il volume Attivare la rappresentazione a schermo intero per il canale scelto (con cornice blu) 24h 2h 1h 30mScegliere il periodo per la scala dei tempi: 24 ore, 2 ore, 1 ora, 30 minuti *Eventualmente cliccare più volte sul simbolo 6) Per terminare la riproduzione e per ritornare al calendario della ricerca di registrazioni, fare un doppio clic con il tasto destro del mouse oppure cliccare con il tasto sinistro del mouse sulla × rossa in alto a destra.
7) Per cercare nel calendario una registrazione attivata per esempio da un movimento riconosciuto o da un allarme, cliccare sul simbolo in alto nel campo TIPO (preimpostazione “Tutto”). Dal menu pop-up scegliere una possibilità e a destra cliccare su “Ricerca”. Il resto della scelta e la riproduzione stessa seguono il procedimento decritto nei punti 1 a 4.
7.7.3 Aprire le immagini istantanee 1) Aprire il menu “Ricerca Video”: Premere il tasto sull’apparecchio/telecomando oppure con il tasto destro del mouse visualizzare la barra degli strumenti Fig. 7-17 Barra degli strumenti e cliccare sul simbolo di riproduzione . Appare il calendario delle registrazioni (Fig. 7-15).
2) Nel calendario cliccare su “Picture”.
> 30
i GeneraleBackup RicercaDATAPaffaggio15/ú2/2ú17
Tuttoúú:úú:úú 23:59:59
Ora–TuttoTIPO
No.1
3TIPO
NIDATA
12/ú2/2ú17
12/ú2/2ú17Ora 23:38:ú2
23:51:47DIME.
378KB
382KB
iproduzionPaffaggioCH3
CH1Picture Eventi ANNULLA
Backuf Parametri Ricerca úideo HDDSistema Avanzate Chiusura Fig. 7-18 Finestra per cercare immagini istantanee Voce del menuFunzione DATAData della richiesta di ricerca OraPeriodo della richiesta di ricerca PassaggioScelta dei canali TIPOMotivo che ha fatto scattare le immagini Tutto, Normale (temporizzato), Allarme, Motion, I O, Manual Ricerca Cercare immagini nel periodo scelto: Le immagini sono elencate secondo cronologia.
Per guardare un’immagine cliccare sulla sua data/ora e quindi sul simbolo . Per ritornare dall’immagine all’elenco fare un clic con il tasto destro del mouse.
BackupSalvare le immagini selezionate (davanti al loro numero mettere un simbolo di spunta ✓) su un disco rigido esterno o su una chiavetta USB
ANNULLAUscire dal menu
109
Italiano 7.8 Comandare una telecamera PTZ
Se sono collegate una o più telecamere con possibilità di comando remoto (orientamento, inclinazione, zoom, fuoco ecc.), possono essere comandate comodamente per mezzo del registratore.
1) Con il tasto sinistro del mouse cliccare sull’immagine dal vivo della telecamera da comandare. (In caso di rappresentazione singola, premere semplicemente il tasto sinistro del mouse.) Appare la barra di scelta rapida: Fig. 7-19 Barra di scelta rapida 2) Cliccare sul simbolo . Si apre la finestra di comando: Velocità: ZOOM
20CH1
+– fOCUS+– IúIS+– Fig. 7-20 Finestra per il comando PTZ
Voce del menu SimboloFunzione CH…Scelta del canale della telecamera FrecceOrientare, inclinare, orientare e inclinare contemporaneamente Funzione automatica Panorama-orientamento On / Off VelocitàVelocità di orientamento / inclinazione Avviare / fermare il movimento della telecamera Aprire la finestra per salvare le posizioni della telecamera per il movimento della stessa ZOOMFunzione zoom FOCUSRegolazione della messa a fuoco IRISRegolazione del diaframma 3) Per chiudere la finestra di comando, cliccare sull’immagine con il tasto destro del mouse.
7.9 Cancellare dati Se desiderate passare il registratore a terzi (p. es. per venderlo, prestarlo) o se lo volete smaltire, cancellate assolutamente tutte le registrazioni e le password, formattando il disco rigido e resettando il registratore sulle impostazioni della fabbrica.
Altrimenti con l’apparecchio comunicate agli esterni anche tutte le registrazioni, i dati personali e le password.
1) Visualizzare il menu principale. Premere il tasto MENU
sull’apparecchio / telecomando oppure con il mouse premere il tasto destro del mouse oppure portare il cursor del mouse nel centro del bordo inferiore dell’immagine per visualizzare la barra degli strumenti.
Fig. 7-21 Barra degli strumenti Sulla barra degli strumenti cliccare tutto a sinistra sul simbolo MENU PRINCIPALE.
i Analog Channels Monitor UscitaRegistra RetePassaggioCH1
CH2
CH3
CH4Nofe CH1
CH2
CH3
CH4Abilita Abilita Abilita Abilita Abilita Telecamera IP
Prifacy Zone Salfa úNNULLú Parametri Ricerca Video HDD
Sistema úfanzate Chiusura únalog Channels Life ControlloImmagine Cattura úllarme CH1 CH2 CH3 CH4
Fig. 7-22 Menu principale 2) Sulla barra, cliccare in alto su HDD.
i HDD
Default Cloud Tempo 202Ora Libero/Totale 891f/931f Stato OK
úo.
1*SEL.
Sovrascrivi AUTOFormatta HDD
PTZ
Salva ANNUffA
Parametri úicerca Video HDD
Sistema Avanzate Chiusura Fig. 7-23 Menu HDD, sottomenu HDD
3) Scegliere il disco rigido: Nella colonna SEL cliccare sulla riga del disco (vedi cursor del mouse nell’illustrazione).
4) Cliccare sul pulsante “Formatta HDD”. Si apre la finestra “log in”.
i PTZHDD
Default Cloud Tempo 202Ora Libero/Totale 891f/931f Stato OK
úo.
1*SEL.
Sovrascrivi AUT1OFormatta HDD
Salva ANNUffA
Parametri úicerca Video HDD
Sistema Avanzate Chiusura log in úome Utente IadminPasswordlog inAúúULLA
Fig. 7-24 Finestra “log in” 5) Se è prevista una password, digitarla. Cliccare su “log in”.
Appare la seguente finestra per la conferma: OKANNULLA
Tutti i dati saranneo canceffati daf diseco rigido eSATA dopo fa úormattazieone!
Avviso Fig. 7-25 Finestra per confermare la formattazione 6) Cliccare sul pulsante OK. La procedura di formattazione viene visualizzata con la barra di avanzamento. Al termine della formattazione appare il messaggio: 100%OK
Formattazione termsinata Avviso Fig. 7-26 Disco rigido formattato 7) Cliccare su OK: Sono visualizzate la capacità disponibile e la durata disponibile della registrazione.
8) Per cancellare tutte le password e altri dati, eseguire un reset (vedi il capitolo seguente).
110
Italiano 7.10 Impostazione della fabbrica (Reset) Per resettare il registratore alle impostazioni della fabbrica: 1) Visualizzare il menu principale: Premere il tasto MENU sul registratore/telecomando oppure premere il tasto destro del mouse per visualizzare la barra degli strumenti, e quindi cliccare sul simbolo MENU PRINCIPALE.
2) Nella barra, cliccare in alto su “Avanzate”.
i Manutenzione Salva DefaultANNULLA
Utente di defaultadminAuto RiavvioAbilitaRiavviareOfni settima. Domúú:úúAffiornamentoCarica parametri IPC Carica DefaultCarica Default Salva parametriIPC Riavvio Affiornamento Cam Eventi farametri Riúerúa Video HDDSistema Avanzate Chiusura Fig. 7-27 Menu “Avanzate” 3) Cliccare sul campo “Carica Default”.Carica Default Monitor Registra Rete AllarfeHDD
SIstefa Aúanzate Tutto Elifina Salúa ANNULLA
Fig. 7-28 Finestra impostazioni della fabbrica 4) Il reset alle impostazioni della fabbrica è possibile per tutti i settori o solo per determinati settori. I settori indicati corrispondono ai menu o sottomenu dello stesso nome. Per scegliere i settori, cliccare sui relativi campi.
Voce del menuFunzione (Monitor ecc.)Selezionare un determinato settore TuttoSelezionare tutti i settori EliminaDeselezionare tutti i settori selezionati SalvaResettare i settori selezionati alle impostazioni della fabbrica ANNULLAChiudere la finestra 7.11 Aprire l’elenco degli eventi Il registratore memorizza tutti gli eventi, come p. es. un segnale mancante della telecamera, accensione e spegnimento del registratore, registrazione manuale, riproduzione di una registrazione, modifiche delle impostazioni e tante altre cose.
Aprire il menu “Sistema” e cliccare sul sottomenu “Log”.
3030
> i Generale Info Log Utenti Backup fNNULLf Ricerca Start Date Tipo direfistro 15/0ú/ú01700:00:00Ora inizio:End Date 15/0ú/ú017
Tuttoú3:59:59Ora ne: TIPO
Sistema Allarme Allarme Allarme Allarme LaferunfRefistaConfOra 15/0ú/ú017 11:17:54
15/0ú/ú017 11:17:54
15/0ú/ú017 11:17:54
15/0ú/ú017 1ú:19:36
15/0ú/ú017 1ú:ú1:ú7
16/0ú/ú017 15:ú3:07
18/0ú/ú017 07:30:41
ú0/0ú/ú017 08:0ú:36CON.
Boot PERDITA VIDEO
PERDITA VIDEOMotion Inizio PERDITA VIDEO
No. 1 Format HDDRicerca Video one proframmazinoned ref Refistra NO
NO
NO
NO
YESproduzionPassaffiCH1
CHú CH3
CH4
Parametri úicerca Video HDDSistema fvanzate Chiusura Fig. 7-29 Elenco degli eventi per una ricerca Voce del menuFunzione Start DatePrimo giorno della ricerca End Date Ultimo giorno Ora inizioInizio Ora fineFine Tipo di registroScelta di un gruppo di eventi: Tutto, Sistema, Config, Allarme, Utenti, Registra, Memoria Il gruppo è indicato nella colonna degli elenchi TIPO.
RicercaAvviare la ricerca Backup Finestra per memorizzare l’elenco, p. es. su una chiavetta USB
ANNULLAChiudere la finestra Per rendere visibile nell’elenco degli eventi ogni manipolazione del registratore, l’elenco non può essere cancellato né con la formattazione del disco rigido né con il reset alle impostazioni della fabbrica.
7.12 Visualizzare informazioni sul sistema Modificare ID e nomi degli apparecchi Aprire il menu “Sistema” e cliccare sul sottomenu “Info”. ť scelto il settore “Info”: i Generale Info Info Info Canale Record Info Log UtentiID Periferica000000Nome Periferica1080P-HY0fNTipo PerifericaHY-DVúVersione HardwareDM-28fVersione SoftwareV7.1.0-20160719Versione Client IEV2.0.0.867Indirizzo IP192.168.1.159Indirizzo MAC00-23-63-63-Fú-A7Volume931GFormato VideoPAL
P2P IDúSV160700970782
Qú CodeP2P ID
falva ANNULLA
úarametri Ricerca Video HDD
fistema Avanzate Chiusura Fig. 7-30 Informazioni sul sistema Alla riga “ID Periferica” si può digitare un numero d’identificazione proprio, se p. es. si deve accedere a più registratori in una rete. Solo attraverso i numeri ID differenti è possibile accedere separatamente ai registratori.
Alla riga “Nome Periferica” si può digitare un altro nome per il dispositivo per poter distinguere meglio i registratori sulla base del loro nome.
Altri due settori visualizzano informazioni supplementari: “Info Canale”: Informazioni sui canali delle telecamere “Record Info”: Informazioni sulle impostazioni per le registrazioni Vedi anche Panoramica sui menu nel capitolo 6.5.
111
Italiano 7.13 Spegnimento Prima di azionare l’interruttore on /off, chiudere correttamente il registratore. Solo allora è esclusa la perdita di impostazioni e registrazioni in corso.
1) Visualizzare la barra degli strumenti: Premere il tasto destro del mouse oppure portare il cursor del mouse nel centro del bordo inferiore dell’immagine.
Fig. 7-31 Barra degli strumenti 2) Cliccare sul simbolo MENU PRINCIPALE.
3) In alto, a destra cliccare sul simbolo “Chiusura”. Appare la seguente informazione: Attenzione La registrazione è, stata fermata con, succensso, è fossible sfegnere il, disfositiúo Fig. 7-32 Messaggio che ora si può spegnere il registratore correttamente 4) Spegnere il registratore con l’interruttore a bascula sul retro.
N.B.: L’alimentatore collegato consuma un po’ di corrente anche con il registratore spento. Eventualmente spegnerlo per mezzo di una presa multipla con interruttore.
8 Visualizzazioni e messaggi di disturbi VisualizzazioneDisturbo H*Il disco rigido non è formattato se è visualizzato “non formattato”.
Il disco rigido è pieno se è visualizzato “Attenzione Pieno!”.
Formattare il disco rigido e quindi cancellare tutte le registrazioni: Aprire il menu HDD, nella colonna SEL scegliere il disco rigido e cliccare su “Formatta HDD”.
Cambiare il modo di sovrascrittura per poter sovrascrivere le registrazioni più vecchie: Aprire il menu HDD, nella colonna SEL scegliere il disco rigido e nel campo “Sovrascrivi” cambiare l’impostazione (p. es. da OFF a AUTO o meno giorni).
I *Uno degli ingressi allarme SENSOR (27) ha attivato un allarme.
Nessun HDD*Non è inserito nessun disco rigido.
PERDITA VIDEO *Manca il segnale video.
M *Nell’immagine della telecamera è stato riconosciuto un movimento.
RL’immagine della telecamera viene registrato.
* Contemporaneamente, il segnalatore acustico interno emette un segnale per la durata impostata nel menu “Parametri” opp. “Avanzate” (vedi Capitolo 6.8) 9 Sorveglianza remota e accesso remoto al registratore 9.1 Sorveglianza remota tramite cellulare e tablet Per mezzo dei cellulari e tablet con i sistemi operativi “Android” o “IOS”, la sorveglianza remota è facilissima.
1) Installare l’app “RXCamView” dall’”App Store” di Apple o dal “Play Store” di Google.
HD
Fig. 9-1 App “RXCamView” 2) Avviare l’app.
3) A sinistra, nella barra dei simboli scegliere “Config” (a) (Fig. 9-2).
4) In alto a destra alla riga “Device” cliccare sul segno positivo (b).
RXCamView Playback Create QR Code Record Image Config HelpLive Config Device Device Alarm Favorites Manual Adding Scan QR Code Online Device (a)(b) (c) Fig. 9-2 Finestra “Config” / “Device” 5) Nel menu pop-up che si apre cliccare su “Manual Adding” (c).
RXCamView Playback RecordImage Config HelpLive ConfigNew Devices Device Name DVR1
Login TypeDevice ID
9000
admin Please enter password Disconnected Please enter the DDNS IDDevice ID
Media Port User Name Password Channels8
Device Alarm Favorites Fig. 9-3 Finestra “New Devices” 6) Alla riga “Login Type” dovrebbe essere attivo “Device ID”.
Se necessario cambiare da “IP/ DOMAIN” a “Device ID”.
7) Cliccare sul simbolo QR Code alla riga “Device ID” e scansionare il QR Code sul lato superiore del contenitore del registratore oppure digitare alla riga il numero ID segnalato sul lato superiore del contenitore.
8) Alla riga “Password” digitare la password (dalla fabbrica, alla riga non è indicata nessuna password).
9) Alla fine, per il salvataggio, in alto alla riga “New Devices” cliccare sul simbolo del dischetto oppure su “Save”.
10) Per la sorveglianza remota, sulla barra dei simbolo a sinistra cliccare su “Live”.
112
ItalianoChannel 02
1/1RXCamView PlaybackRecordImage Confg HelpLive Live DVR1
Channel 01
Channel 02
Channel 03
Channel 04
IP Channel 01
IP Channel 02
IP Channel 03
IP Channel 04
×× Fig. 9-4 Sorveglianza dal vivo da uno smartphone 11) In alto a sinistra di fianco al nome del registratore cliccare sul triangolo “>” per visualizzare i canali del registratore.
12) In basso, sulla barra degli strumenti, cliccare sul simbolo per selezionare il numero delle finestre per i canali del registratore.
13) Tirare ognuno dei canali desiderati in una finestra dove si vedrà la relativa immagine della telecamera. Se per la sorveglianza sono disponibili più registratori, è possibile osservare le immagini delle telecamere di vari registratori in una visione.
14) Altre funzioni possono essere attivate attraverso gli altri simboli.
15) Un aiuto in inglese è disponibile alla voce “Help”.
9.2 Accesso remoto attraverso un computer Con l’estensione del programma “ActiveX”, da un computer è possibile l’accesso remoto al registratore. L’estensione è memorizzata nel registratore e può essere installata sul computer tramite la rete (rete locale / Internet).
1) Il registratore deve essere acceso e collegato con la rete.
2) Sul computer, aprire il web-browser e digitare l’indirizzo IP
e il web-port del registratore (vedi menu del registratore: Parametri Rete Rete), p. es.: http: // 192.186.001.178:00080
Se il computer è collegato con la rete, partono ora automaticamente il download e l’installazione di “ActiveX”.
N.B.: Se il download di “ActiveX” non ha avuto successo, controllare se le impostazioni di sicurezza del browser e della firewall non sono troppo alte.
3) Dopo l’installazione di “ActiveX”, digitando l’indirizzo IP
del registratore nel web-browser, si può accedere al registratore. Dapprima si apre una finestra per registrarsi: Username admin Password Client Port 9000Bitrate Sub stream Language LoginReset Remember Pwd Open All Channels PreviewEnglish User login Fig. 9-5 Login per l’accesso remoto Voce del menuFunzione UsernameNome utente (dalla fabbrica: admin) PasswordPassword (dalla fabbrica: nessuna password) Client PortPort-Nr. del registratore, vedi anche menu Parametri Rete Rete BitrateTrasmissione dati (dalla fabbrica “Main stream” per Intranet, “Sub stream” per Internet) LanguageLingua del menu: inglese.
Voce del menuFunzione Remember PwdMemorizzare la password Open All Chan-nels PreviewAprire tutti i canali del registratore LoginEffettuare la connessione con il registratore ResetCancellare tutte le impostazioni 4) Dopo il Login, sul monitor appare la vista per la sorveglianza dal vivo: 0 1 2 3 4 5 6 7 8 9 10
11
CH01CH01
CH02
CH03
CH04
IP CH01
IP CH02
IP CH03
IP CH04
IP CH05
IP CH06
125 130 132 100
No Video No VideoNo Video No VideoNo Video No Video CH02
CH03CH04
LivePlaybackRemote SettingLocal SettingsLogout ZOOM
DefaultFOCUS
IRIS
Preset Cruise Fig. 9-6 Sorveglianza dal vivo da un computer Voce del menu SimboloFunzione in alto, settore delle funzioni LiveSorveglianza dal vivo PlaybackRiprodurre le registrazioni Remote SettingImpostazioni per il registratore Local SettingFissare i percorsi per le registrazioni sul computer LogoutLogout a sinistra, panoramica dei canali Dis- / attivare l’immagine dal vivo Avviare o fermare la registrazione dal vivo sul computer Memorizzare la registrazione istantanea sul computer in basso, simboli delle funzioni Dis- / attivare tutte le immagini dal vivo Scegliere il gruppo canali precedente / successivo Full Screen: Nascondere tutti gli elementi di comando; con il tasto “Esc” visualizzare tutti nuovamente Immagini dal vivo: proporzioni originali / estenderle secondo il formato Visualizzare / nascondere i simboli per la visualizzazione dal vivo a destra, comandi PTZ e impostazioni dell’immagine FresseOrientare, inclinare, orientare e inclinare contemporaneamente Funzione automatica Panorama-orientamento On / Off Velocità di orientamento / inclinazione ZOOM
Funzione zoom FOCUSRegolazione della messa a fuoco IRISRegolazione del diaframma PresetMemorizzare orientamento della telecamera Cruise Avviare / fermare movimento della telecamera Impostare tonalità Impostare luminosità Impostare contrasto Impostare saturazione DefaultReset dell’immagine alle impostazioni della fabbrica Con un clic del tasto destro del mouse su un’immagine dal vivo appare un menu pop-up per la scelta Main / SubStream.
113
Italiano 10 Dove trovo quali impostazioni e funzioni?
Impostazione / FunzioneMenuSottomenuSettore / FinestraVoce del menu Assistente d’installazione, attivare all’accensione: sď / noSistemaGeneraleGeneraleVisualizze wizard Audio per trasmissione rete on / offParametriRegistraMain Stream Sub-stream MobilestreamAudio Blocco tasti (blocco d’uso) password, attivare Buzzer allarme on / off AvanzateEventi— Buzzer ParametriAllarmeMotion Allarme Canali dove non è collegata nessuna telecamera, disattivareParametri MonitorAnalog Channels CH … Cloud per salvare immagini istantaneeHDDCloud—una varietà Comandi per telecamere PTZ, impostareHDDPTZ—una varietà Configurazione del registratore, salvare / aprireAvanzateManutenzione—Salva parametri / Carica parametri Data, impostareSistemaGeneraleGeneraleDATA
Data e ora, nascondereParametriMonitorLiveTempo LIVE
Diritti utente, determinareSistemaUtenti—Permission Disco rigido, formattareHDDHDD—Formatta HDD
Durata di rotazione delle immagini (funzione sequenza)Parametri MonitorUscitaTempo rotazione Durata di visualizzazione del menuSistemaGeneraleGeneraleMenu Timeout E-mail, invio automatico con allarmeParametriReteEmail Pianificazione Emailuna varietà Elenco degli eventi, aprireSistemaLog—Elencare eventi tramite “Ricerca” nel periodo scelto File, cancellare registrazioni, cancellare Immagine a schermo intero con movimento riconosciuto / con allarme dall’ingresso SENSORParametriAllarmeMotion AllarmePop-Up Impostazioni della fabbricaAvanzateManutenzione—Carica Default Ingressi allarme SENSOR, configurareParametriAllarmeAllarmeuna varietà Lingua del menuSistemaGeneraleGeneraleLingua Mascherare sezioni dell’immagineParametriMonitor Privacy Zoneuna varietà Menu per rete, uscireSistemaGeneraleGeneraleModalità: DVR
Nome del registratore, cambiareSistemaInfoInfoNome Periferica Nome delle telecamere, cambiareParametriMonitorLiveNome Numero ID del registratore, determinareSistemaInfoInfoDI Periferica Numero di Point to Point ID, visualizzare (anche come QR Code)Sistema InfoInfoP2P ID (tutto in basso) Ora e data, nascondereParametriMonitorLiveTempo Registra Ora, impostareSistemaGeneraleGeneraleOra Ora legale / solare, cambioSistemaGeneraleDSTuna varietà Ora di registrazione, modificareParametriRegistraPianificac Registrauna varietà Password, attivareSistemaUtentiModificaAbilita Password: Abilita Registrazioni, cancellareHDDHDD—Formatta HDD
Registrazioni, riprodurreRicerca VideoGenerale—Play Registrazioni, salvataggio esternaRicerca VideoGenerale— Play Registrazioni istantanee, permettereParametriCatturaCaptura + Scheduleuna varietà Registrazioni momentanee, permettereParametriCatturaCattura Scheduleuna varietà ResetAvanzateManutenzione—Carica Default Riavvio, automatico (giornaliero, settimanale, mensile)Avanzate Manutenzione—Riavviare Riavvio, manualeChiusura—ChiusuraRiavviare Riconoscimento movimento, impostareParametriAllarmeMotionuna varietà S
pegnere / chiudereChiusura—ChiusuraChiusura T
elecamera di rete, aggiungere / disattivareParametriMonitorTelecamera IPIP CH..
Assegnazione IP automatica Aggiungi Tutto Aggiunta personalizzata Trasparenza del menuParametriMonitorUscitaTransparenza Video dell’installazione (solo in tedesco) https ://youtu.be/13P1Y4PiBmk = impostare assolutamente = molto utile
114
Italiano 11 Domande frequenti In ordine alfabetico secondo i concetti Accesso remoto alle immagini delle telecamere Come posso accedere alle immagini delle telecamere per inserirle in una homepage o in un citofono con monitor?
L’accesso alle telecamere collegate è possibile tramite lo stream RTSP disponibile nel registratore AXR. Le informazioni esatte dell’indirizzo sono indicate nel menu rete del registratore alla voce RTSP.
Cellulare Come faccio a vedere le immagini sul mio cellulare?
Un breve video (solo in lingua tedesca) fa vedere come si installa l’accesso remoto a un registratore AXR tramite uno smartphone: https://youtu.be/13P1Y4PiBmk Cloud Posso salvare le immagini in un cloud?
I registratori AXR supportano degli alarm-upload nel cloud di DROPBOX. Nel caso di registrazioni di allarme da riconoscimento di movimento o da allarme I / O, le immagini JPEG
possono essere caricate nel cloud.
Datarate Quale datarate è disponibile complessivamente per le registrazioni?
ModelloAXR-104AXR-108AXR-116
Numero canali per telecamera analogiche4
816
Datarate per telecamere analogiche 16 Mbps*32 Mbps*64 Mbps* Canali supplementari per telecamere IP248
Datarate per telecamere IP
8 Mbps16 Mbps32 Mbps Totale datarate24 Mbps48 Mbps96 Mbps * 4 Mbps per telecamera Se si disattiva un canale per una telecamera analogica, in compenso si può usare una telecamera IP supplementare.
Durata delle registrazioni Quale durate di registrazione è possibile?
Come regola generale si può dire: 1 GB / h per telecamera collegata con segnale composito 4 GB / h per telecamere collegata con risoluzione Full HD
(1920 × 1080 p) Immagine mancante Perché non vedo nessun’immagine sul monitor collegato?
Controllate quali risoluzioni sono supportate dal monitor usato.
Con l’impostazione della fabbrica, la risoluzione all’uscita HDMI
del monitor è 1280 × 1024 pixel. L’AXR-… supporta le seguenti risoluzioni: 1024 × 768
1080 × 1024
1280 × 720
1440 × 900
1920 × 1080
Menu OSD di una telecamera AXC
Come posso aprire il menu OSD di una telecamera AXC
tramite il registratore AXR?
Il menu OSD della telecamera può essere aperto attraverso la consolle PTZ dell’AXR: 1) Nel menu principale, alla voce “HDD” / “PTZ” cambiare il protocollo PTZ da “Pelco-D” a “COAX1” (baudrate 9600).
2) Tramite la funzione “IRIS +” della consolle PTZ è ora possibile aprire il menu OSD della telecamera AXC.
3) La navigazione all’interno del menu avviene con i tasti freccia della consolle PTZ, la funzione “ENTER” anche con “IRIS +”.
Ripresa audio Come posso registrare l’audio?
I registratori AXR dispongono di ingressi audio con livello Line.
Per una registrazione con audio è richiesto quindi oltre a un microfono un piccolo preamplificatore per microfoni oppure un piccolo mixer.
Esempio per una configurazione: MPA-102 (preampli per microfoni) e ECM-302B (microfono ambientale) Sostituzione di telecamere più vecchie Quale telecamere posso utilizzare per sostituire telecamere vecchie?
Le telecamere della serie AXC (eccetto AXC-137NLC e AXC137PHC) con le due uscite per segnali TVI e AHD / CVBS sono interessanti non solo come sostituzione di sistemi di telecamere datate. Anche installazioni complesse si possono realizzare in modo elegante. Come esempio pratico può servire il controllo di una porta d’ingresso. Il segnale TVI può andare direttamente su un registratore e contemporaneamente il segnale CVBS su un piccolo monitor (p. es. TFT-800LED).
Telecamere IP
Quali telecamere IP si possono usare con i registratori AXR?
IOC-2812BV
IOC-2812DV
Sono supportati anche le seguenti telecamere IP, ma con limiti (p. es. niente registrazioni da allarme / nessun audio): Tutti i modelli della serie INC
nonché i modelli F-4215 e B-6220
115
Italiano 12 Dati tecnici ModelloAXR-104 / AXZ-2..AXR-108 / AXZ-408..AXR-116
Video Ingressi segnali per telecamere analogiche4 × BNC
8 × BNC16 × BNC
Canali per telecamere di rete2
48
Se si disattiva un canale per una telecamera analogica, in compenso si può usare una telecamera IP supplementare.
Datarate totale 24 Mb /s48 Mb /s96 Mb /s Uscita video per monitor1 × HDMI® 1 × VGA1 × HDMI
® 1 × VGA1 × HDMI
® 1 × VGA
Risoluzione1850 × 1080 pixel (25 fps)1850 × 1080 pixel (25 fps)1850 × 1080 pixel (25 fps) Compressione videoH.264H.264H.264
Registrazionemax. 100 imm./s (25 ogni telecamera)max. 200 imm./s (25 ogni telecamera)max. 400 imm./s (25 ogni telecamera) Modi di registrazionemanuale, timer, riconoscimento di movimento, allarmemanuale, timer, riconoscimento di movimento, allarmemanuale, timer, riconoscimento di movimento, allarme Nome telecameralibero, visibile nella visualizzazione dal vivolibero, visibile nella visualizzazione dal vivolibero, visibile nella visualizzazione dal vivo Segnalazione di un’interruzione videosi sisi Audio Ingressi audio4 × RCA8 × RCA8 × RCA
8 × DSub su 8 × RCA
Uscita audio1 × RCA1 × RCA1 × Cinch Allarme Ingressi allarme4816
Uscita allarme1 contatto relè potenza 30 V (⎓ ), 1 A
1 contatto relè potenza 30 V (⎓ ), 1 A
1 contatto relè potenza 30 V (⎓ ), 1 A
Segnalatore acustico integratointegratointegrato Dati generali SicurezzaProtezione con password attivabile Interfacce1 × RS485 per comandi PTZ
2 × USB 2.0 per comandi con mouse e salvataggio esterno delle registrazioni 1 × LAN (RJ 45) per connessione rete 1 × HDMI® per collegamento monitor Dischi rigidi AXR104: opzionale, max. 1 × 6 TB (SATA)AXR108: opzionale, max. 1 × 6 TB (SATA)opzionale, max. 2 × 6 TB (SATA) AXZ2..: 1 TB montato AXZ408..: 1 TB montato — RAIDLevel ( Redundant Array of Independent Disks)Single SingleSingle Ventilatore——si Alimentazione12 V (⎓ ) / 5 A tramite alimentatore in dotazione con 230 V/50 Hz Temperatura d’esercizio ammessa0 – 40 °C
Dimensioni (l × h × p)300 × 48 × 225 mm300 × 48 × 225 mm380 × 48 × 330 mm Peso (senza disco rigido)1,3 kg1,4 kg3 kg Con riserva di modifiche tecniche.
La MONACOR ® INTERNATIONAL GmbH & Co. KG si riserva ogni diritto di elaborazione in qualsiasi forma delle presenti istruzioni per l’uso. La riproduzione – anche parziale – per propri scopi commerciali è vietata.
A-1814.97.01.09.2017
MONACOR INTERNATIONAL GmbH & Co. KG ? Zum Falsch 36 ? 28307 Bremen ? Germany Copyright? by MONACOR INTERNATIONAL. All rights reserved.