€30.85
Priemerné hodnotenie:0/5(0x)
Vlastnosti a parametre výrobku
Skúsenosti užívateľov
Otázky a odpovede
Dokumentácia
Popis
Vlastnosti a parametre výrobku
| Vlastnosti autoalarmu | Možné použiť s mobilným telefónom |
|---|---|
| Farba | Žltá Čierna |
| Hmotnosť | 2.24 kg |
| Vonkajšia šírka | 23.7 cm |
| Vonkajšia výška | 7.2 cm |
| Vonkajšia dĺžka | 48.5 cm |
| Kategória výrobku | Papuča |
Skúsenosti a názory zákazníkov
- Skúsenosti užívateľov nie sú k dispozícii.
Otázky užívateľov
- Užívatelia k tomuto výrobku zatiaľ nemali žiadne otázky.
Dokumentácia
Podmienky používania dokumentácie
1
GB FR NL IT
Art.-Nr. 11896
Radkralle Inhalt 1. Bestimmungsgemäßer Gebrauch 1
2. Lieferumfang 1
3. Spezifikationen 1
4. Sicherheitshinweise 2
5. Bedienungsanleitung 2
5.1 Übersicht 2
5.2 Montage der Radkralle 2
5.3 Abnehmen der Radkralle 2
6. Wartung und Pflege 2
6.1 Wartung 2
6.2 Pflege 2
7. Hinweise zum Umweltschutz 3
8. Kontaktinformationen 3
WARNUNG
Lesen Sie die Bedienungsanleitung vor Inbetriebnahme sorgfältig durch und beachten Sie alle Sicherheitshinweise!
Nichtbeachtung kann zu Personenschäden, Schäden am Gerät oder Ihrem Eigentum führen!
Bewahren Sie die Originalverpackung, den Kaufbeleg sowie diese Anleitung zum späteren Nachschlagen auf! Bei der Weitergabe des Produkts geben Sie auch diese Anleitung weiter.
Prüfen Sie vor Inbetriebnahme den Inhalt der Verpackung auf Unversehrtheit und Vollständigkeit!
1.
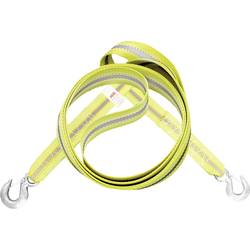
Bestimmungsgemäßer Gebrauch Die Radkralle schützt das Fahrzeug, den Wohnwagen oder Anhänger vor Diebstahl durch das Blockieren eines Rades.
Die Parkkralle ist nur zur Diebstahlsicherung erlaubt. Das Blockieren fremder Fahrzeuge ist vom Gesetzgeber untersagt.
Dieses Gerät ist nicht dafür bestimmt, durch Kinder und Personen mit eingeschränkten geistigen Fähigkeiten oder ohne erforderliches Fachwissen benutzt zu werden. Kinder sind von dem Gerät fernzuhalten.
Das Gerät ist nicht für den gewerblichen Einsatz bestimmt.
Zum bestimmungsgemäßem Gebrauch gehört auch die Beachtung aller Informationen in dieser Anleitung, insbesondere die Beachtung der Sicherheitshinweise. Jede andere Verwendung gilt als nicht bestimmungsgemäß und kann zu Sach- oder Personenschäden führen. Die EAL
GmbH übernimmt keine Haftung für Schäden, die durch nicht bestimmungsgemäßen Gebrauch entstehen.
2. Lieferumfang 1 x Radkralle mit zwei Schlüsseln 1 x Gebrauchsanleitung 3. Spezifikationen Dimensionen (L x B x H): 485 x 237 x 72 [mm] Gewicht: 2,240 kg Material: Stahl Reifenbreite: max. 285 mm
2
4. Sicherheitshinweise – Das Warndreieck kennzeichnet alle für die Sicherheit wichtigen Anweisungen. Befolgen Sie diese immer, anderenfalls könnten Sie sich verletzen oder das Gerät könnte beschädigt werden.
– Kinder dürfen nicht mit dem Gerät spielen.
– Reinigung und Benutzerwartung dürfen nicht von Kindern ohne Beaufsichtigung durchgeführt werden.
– Lassen Sie das Verpackungsmaterial nicht achtlos liegen. Dieses kann für Kinder zu einem gefährlichen Spielzeug werden!
– Benutzen Sie dieses Produkt nur für die dafür vorgesehene Verwendung!
– Manipulieren oder zerlegen Sie das Gerät nicht!
– Verwenden Sie zu Ihrer eigenen Sicherheit ausschließlich Zubehör oder Ersatzteile, die in der Anleitung angegeben sind, oder deren Verwendung durch den Hersteller empfohlen wird!
– Bewahren Sie den Reserveschlüssel an einem sicheren Ort auf.
– Unternehmen Sie niemals einen Fahrversuch mit angelegter Radkralle. Das Fahren mit angelegter Radkralle verursacht Schäden an Ihrem Fahrzeug.
5. Bedienungsanleitung 5.1 Übersicht 1 Loser Teil der Radkralle 2 Fester Teil der Radkralle 3 Schloss mit Schutzkappe 5.2 Montage der Radkralle Um die Radkralle an einem Fahrzeugrad zu montieren, müssen Sie sie zuerst öffnen. Dazu stecken Sie den Schlüssel in das Schloss (Position 3 in der Übersicht) und drehen den Schlüssel um 90° gegen den Uhrzeigersinn, Bild 2. Die Verriegelung wird freigegeben. Drehen Sie den Schlüssel zurück und ziehen Sie ihn ab, Bild 3.
Ziehen Sie nun den festen (Position 2 in der Übersicht) und den losen Teil (Position 1 in der Übersicht) der Radkralle auseinander, Bild 4.
Legen Sie die beiden Hälften der Radkralle am Rad des zu sichernden Fahrzeugs an. Fügen Sie die beiden Hälften wieder ineinander und schieben Sie sie zusammen. Drücken Sie mit einer Hand das Schloss herunter, während Sie den losen Teil der Radkralle soweit wie möglich in den festen Teil hineinschieben, bis die Verriegelung einrastet und sich das Schloss ganz herunter drücken lässt. Das Fahrzeug ist nun gesichert, Bild 5. Stecken Sie die Schutzkappe auf das Schloss.
Bringen Sie einen gut sichtbaren Warnhinweis über das Vorhandensein einer Radkralle am Fahrzeug an. Z. B. Zettel auf dem Lenkrad oder am Anhänger an der Kupplung.
5.3 Abnehmen der Radkralle Schließen Sie die Radkralle auf und lösen Sie die Verriegelung. Ziehen Sie die Hälften der Radkralle auseinander und entfernen Sie sie vom Rad des Fahrzeugs.
6. Wartung und Pflege 6.1 Wartung Schmieren Sie das Schloss regelmäßig mit einem harzfreien Öl.
Bild 2: Schloss öffnenBild 3: Verriegelung freigebenBild 4: Radkralle öffnenBild 5: Fahrzeug gesichert
3
6.2 Pflege Reinigen Sie die Radkralle mit einem nur leicht feuchten, weichen Tuch und einem milden Reinigungsmittel. Verwenden Sie keine scharfen Reinigungsmittel, Lösemittel oder Benzin. Stellen Sie sicher, dass keine Reinigungsmittel oder Flüssigkeiten in die Rohre der Radkralle eindringen.
Bewahren Sie die Radkralle an einem trockenen Ort auf.
7. Hinweise zum Umweltschutz Entsorgen Sie dieses Gerät über die Wertstofftonne oder die öffentlichen/kommunalen Sammelstellen.
Die Materialien sind recycelbar. Durch Recycling, stoffliche Verwertung oder andere Formen der Wiederverwendung von Altgeräten leisten Sie einen wichtigen Beitrag zum Schutz unserer Umwelt!
8. Kontaktinformationen EAL GmbH
Otto-Hausmann-Ring 107
42115 Wuppertal Deutschland Telefon: +49 (0)202 42 92 83 0
Telefax: +49 (0)202 42 92 83 160
Internet: www.eal-vertrieb.com E-Mail: info@eal-vertrieb.com
4
Item Nr. 11896
Wheel Clamp Contens 1. Proper use of the product 4
2. Scope of delivery 4
3. Specifications 4
4. Safety precautions 5
5. Operating instructions 5
5.1 Overview 5
5.2 Attaching the wheel clamp 5
5.3 Removing the wheel clamp 5
6. Maintenance and care 5
6.1 Maintenance 5
6.2 Care 6
7. Notes regarding environmental protection 6
8. Contact information 6
WARNING
Read the operating instructions through carefully prior to initial use and observe all of the safety notes!
Not observing any of the above may lead to personal injury, damage to the device or to your property!
Store the original packaging, the receipt and these instructions so that they may be consulted at a later date! When passing on the product, please include these operating instructions as well.
Before commissioning, please check the contents of package for integrity and completeness prior to use!
1.
Proper use of the product The wheel clamp protects cars, caravans or trailers from theft by blocking a wheel.
The wheel clamp is only permitted as anti-theft device. The clamping of vehicles that do not belong to you is prohibited by the law.
This device is not designed to be used by children or persons with limited mental abilities, or without experience and/or lack of required specialist knowledge. Keep children away from the device.
The device is not designated for commercial use.
Use according to the intended purpose also includes the observance of all information in these operating instructions, particularly the observance of the safety notes. Any other utilisation is considered to be contrary to the intended purpose and may lead to material damage or personal injuries. EAL GmbH assumes no liability for damage resulting from improper use.
2. Scope of delivery 1 x wheel clamp with two keys 1 x operating instructions 3. Specifications Dimensions (L x W x H): 485 x 237 x 72 [mm] Weight: 2240 kg Material: Steel Tyre width: max. 285 mm
5
4. Safety precautions – The warning sign indicates all instructions which are important for safety.
Always follow these instructions, otherwise you could injure yourself or damage the device.
– Children may not play with the device.
– Cleaning and user maintenance may not be carried out by children without supervision.
– Do not treat packaging material carelessly. This may become a dangerous plaything for a child!
– Only use this product for its designated purpose!
– Do not manipulate or disassemble the device!
– For your own safety, only use accessories and spare parts that are stated in these instructions or that are recommended by the manufacturer!
– Store the spare key in a safe place.
– Never attempt to drive with the clamp fitted. Driving with the clamp fitted will damage your car.
5. Operating Instrucions 5.1 Overview 1 Loose part of wheel clamp 2 Fixed part of wheel clamp 3 Lock with protective cap 5.2 Attaching the wheel clamp In order to attach the wheel clamp to a wheel, you must open it first. To do this, put the key in the lock (Position 3 in the overview) and turn the key 90° anticlockwise, as in Figure 2. The lock will be released. Turn the key back and remove it, as in Figure 3.
Now pull the fixed (Position 2 in the overview) and loose (Position 1 in the overview) parts of the wheel clamp apart, as in Figure 4.
Place both halves of the wheel clamp on the wheel of the vehicle which needs securing. Join both halves again and slide them together. Press the lock down with one hand, while you slide the loose part of the clamp into the fixed part as far as possible, until the lock engages and is pressed all the way down. The vehicle is now secured, as in Figure 5. Place the protective cap on the lock.
Attach a warning sign to announce that a wheel clamp is in use, and make sure it is in a place which is easy to see. e.g. a note on the steering wheel, or on the coupling of a trailer.
5.3 Removing the wheel clamp Unlock the wheel clamp and release the lock. Pull the halves of the clamp apart and remove them from the wheel of the vehicle.
6. Maintenance and care 6.1 Maintenance Regularly lubricate the lock with a resin-free oil.
Figure 2: Opening the lockFigure 1: Overview Figure 3: Releasing the lockFigure 4: Opening the wheel clampFigure 5: Vehicle secured
6
6.2 Care Clean the wheel clamp with a lightly moistened, soft cloth and a mild cleaning agent. Do not use aggressive cleaning agents, solvents or petrol.
Ensure that no cleaning agents or liquids enter the tubes of the wheel clamp. Store the wheel clamp in a dry location.
7. Notes regarding environmental protection Please dispose of this device via the recycling bin, or the public/municipal collection points.
The materials are recyclable. You make an important contribution to protecting our environment by recycling, material utilisation or other forms of reusing waste equipment!
8. Contact informations EAL GmbH
Otto-Hausmann-Ring 107
42115 Wuppertal Germany Telephone: +49 (0)202 42 92 83 0
Telefax: +49 (0)202 42 92 83 160
Internet: www.eal-vertrieb.com E-Mail: info@eal-vertrieb.com
7
N° d‘art. 11896
Sabot de Denver Sommaire 1. Utilisation conforme 7
2. Matériel fourni 4
3. Spécifications 4
4. Consignes de sécurité 5
5. Notice d‘utilisation 5
5.1 Vue d‘ensemble 5
5.2 Montage du sabot de Denver 5
5.3 Retrait du sabot de roue 5
6. Entretien et nettoyage 5
6.1 Entretien 5
6.2 Nettoyage 6
7. Remarques relatives à la protection de l‘environnement 6
8. Données de contact 6
AVERTISSEMENT
Lisez attentivement la notice d‘utilisation avant la mise en service et respectez toutes les consignes de sécurité !
Tout non-respect de ces consignes peut entraîner des dommages corporels, endommager l‘appareil ou vos biens !
Conservez l‘emballage d‘origine, le justificatif d‘achat et la présente notice pour vous y référer ultérieurement ! Si vous revendez ou remettez l‘appareil à des tiers, veuillez également leur remettre cette notice d‘utilisation.
Avant la mise en service, veuillez contrôler le contenu de l‘emballage quant à l‘absence de dommages et vérifier si toutes les pièces sont présentes !
1.
Utilisation conforme Le sabot de roue protège le véhicule, le camping-car ou la remorque du vol en bloquant une roue.
Le sabot de stationnement n‘est autorisé que comme protection anti-vol. Le blocage d‘autre véhicule est interdit par le législateur.
Cet appareil n‘est pas destiné à être utilisé par des enfants ou des personnes aux capacités mentales limitées ou ne disposant pas de l‘expérience ou des connaissances nécessaires. Les enfants doivent rester à distance de cet appareil.
L‘appareil n‘est pas destiné à une utilisation industrielle ou commerciale.
L‘utilisation conforme aux prescriptions implique également le respect de toutes les informations contenues dans cette notice d‘utilisation, en particulier le respect des consignes de sécurité. Toute autre utilisation est considérée comme non conforme et peut entraîner des dommages matériels ou corporels. La société EAL GmbH décline toute responsabilité en cas de dommages découlant d’une utilisation non conforme à l’emploi prévu.
2. Matériel fourni 1 x Sabot de roue avec deux clés 1 x Mode d’emploi 3. Spécifications Dimensions (L x l x h) : 485 x 237 x 72 [mm] Poids : 2,240 kg Matériau : acier Largeur de pneu : max. 285 mm
8
4. Consignes de sécurité – Le triangle de signalisation indique toutes les instructions relatives à la sécurité. Respectez-les à tout moment car vous risqueriez sinon de vous blesser ou l‘appareil risquerait d‘être endommagé.
– Les enfants ne doivent pas jouer avec l‘appareil.
– Les tČches de nettoyage et d‘entretien à effectuer chez soi ne doivent pas être exécutées par des enfants qui ne sont pas sous surveillance.
– Ne laissez pas traîner le matériel d‘emballage. Il pourrait devenir un jouet dangereux pour les enfants !
– N‘utilisez cet appareil qu‘aux fins pour lesquelles il a été prévu !
– Ne manipulez ni ne démontez jamais l‘appareil !
– Pour votre propre sécurité, utilisez exclusivement les accessoires ou pièces de rechange qui sont indiqué(e)s dans la notice d‘utilisation ou dont l‘utilisation est conseillée par le fabricant !
– Rangez la clé de réserve dans un endroit sûr.
– N‘entreprenez jamais un test de conduite avec un sabot de roue posé. Conduire avec le sabot de roue attaché endommage votre véhicule.
5. Notice d‘utilisation 5.1 Vue d‘ensemble 1 Pièce détachée du sabot de roue 2 Pièce fixe du sabot de roue 3 Serrure avec capuchon de protection 5.2 Montage du sabot de Denver Pour monter le sabot sur une roue de véhicule, vous devez d‘abord l‘ouvrir. Pour ce faire, insérez la clé dans la serrure (position 3 dans la vue d’ensemble) et tournez la clé de 90° dans le sens antihoraire, Fig. 2. Le mécanisme de verrouillage est relČché. Tournez la clé à nouveau et la retirez-la, Fig. 3.
Retirez maintenant la partie fixe (position 2 dans la vue d‘ensemble) et la partie détachée (position 1 dans la vue d‘ensemble) du sabot de roue, Fig. 4.
Placez les deux moitiés du sabot de roue sur la roue du véhicule à immobiliser. Remontez les deux moitiés et glissez-les l’une vers l’autre.
Appuyez d‘une main sur le verrou tout en poussant la partie détachée du sabot de roue dans la partie fixe jusqu’à ce que le verrou s‘enclenche et que la serrure soit complètement enfoncée. Le véhicule est maintenant sécurisé, Fig. 5. Insérez le capuchon de protection sur la serrure.
Fixez un avertissement bien visible quant à la présence d‘un sabot de roue sur le véhicule. Par exemple, en posant une note sur le volant ou sur la remorque sur l‘attelage 5.3 Retrait du sabot de roue Ouvrez le sabot de roue et relČchez le verrouillage. Détachez les deux moitiés du sabot de roue et retirez-les de la roue du véhicule.
6. Entretien et nettoyage 6.1 Entretien Appliquez de l‘huile sans résine régulièrement sur le cadenas.
Figure 2 : Serrure ouverteFigure 1 : Vue d’ensemble Figure 3 : Verrouillage ouvertFigure 4 : Sabot de roue ouvertFigure 5 : Véhicule sécurisé
9
6.2 Nettoyage Nettoyez le sabot de roue avec un chiffon doux très légèrement humide et avec un nettoyant non agressif. N‘utilisez ni nettoyants agressifs, ni solvants, ni essence. Assurez-vous qu‘aucun nettoyant ni liquide ne pénètre dans le sabot de roue. Conservez le sabot de roue dans un endroit sec.
7. Remarques relatives à la protection de l‘environnement Veuillez vous débarrasser de cet appareil dans des conteneurs pour matériaux recyclables ou auprès des services de collecte publics/communaux/cantonaux. Les matériaux sont recyclables. Par le recyclage, la récupération des matières ou d’autres formes de réutilisation d’anciens appareils, vous contribuez activement à la protection de notre environnement !
8. Données de contact EAL GmbH
Otto-Hausmann-Ring 107
42115 Wuppertal Allemagne Téléphone : +49 (0)202 42 92 83 0
Fax : +49 (0)202 42 92 83 160
Internet : www.eal-vertrieb.de Courriel : info@eal-vertrieb.com
10
Art.nr. 11896
Wielklem Inhoud 1. Reglementair gebruik 7
2. Leveringsomvang 4
3. Specificaties 4
4. Veiligheidsinstructies 5
5. Gebruiksaanwijzing 5
5.1 Overzicht 5
5.2 De wielklem monteren 5
5.3 De wielklem verwijderen 5
6. Onderhoud en verzorging 5
6.1 Onderhoud 5
6.2 Verzorging 6
7. Informatie over de bescherming van het milieu 6
8. Contactinformatie 6
WAARSCHUWING
Lees voorafgaand aan de ingebruikname de gebruiksaanwijzing aandachtig door en neem alle veiligheidsvoorschriften in acht!
Het niet-naleven hiervan kan letsel, schade aan het product of aan uw eigendom veroorzaken!
Bewaar de oorspronkelijke verpakking, het aankoopbewijs en deze gebruiksaanwijzing om later te kunnen raadplegen! Geef bij doorgeven van het apparaat eveneens deze gebruiksaanwijzing door.
Controleer voor de ingebruikname eerst de inhoud van de verpakking op beschadigingen en volledigheid!
1.
Reglementair gebruik De wielklem beschermt de auto, caravan of aanhanger tegen diefstal door het blokkeren van een wiel.
De wielklem is uitsluitend toegestaan om diefstal te voorkomen. Het blokkeren van andere voertuigen is bij de wet verboden.
Dit apparaat mag niet worden gebruikt door kinderen, personen met beperkte geestelijke vermogens of personen zonder de vereiste deskundigheid. Kinderen moeten uit de buurt van het apparaat worden gehouden.
Het apparaat is niet bedoeld voor bedrijfsmatig gebruik.
Tot het reglementair gebruik behoort ook het in acht nemen van alle informatie in deze handleiding, in het bijzonder van de veiligheidsvoorschriften. Elk ander gebruik geldt als niet-reglementair en kan materiďle schade of persoonlijk letsel veroorzaken. EAL GmbH is niet aansprakelijk voor schade als gevolg van niet-reglementair gebruik.
2. Leveringsomvang 1 x wielklem met 2 sleutels 1 x gebruiksaanwijzing 3. Specificaties Afmetingen (L x B x H): 485 x 237 x 72 [mm] Gewicht: 2,240 kg Materiaal: staal Bandbreedte: max. 285 mm
11
4. Veiligheidsinstructies – Deze waarschuwingsdriehoek geldt als aanduiding van alle voor de veiligheid belangrijke aanwijzingen. Neem deze te allen tijde in acht, anders kan lichamelijk letsel of schade aan het apparaat het gevolg zijn.
– Kinderen mogen niet met het apparaat spelen.
– Reiniging en onderhoud mag niet zonder toezicht door kinderen worden uitgevoerd.
– Laat het verpakkingsmateriaal niet achteloos rondslingeren. Dit kan voor kinderen gevaarlijk speelgoed worden!
– Gebruik dit product uitsluitend voor het beoogde doel!
– Manipuleer of demonteer het apparaat niet!
– Gebruik voor uw eigen veiligheid uitsluitend toebehoren of reserveonderdelen die in de gebruiksaanwijzing staan vermeld of waarvan het gebruik door de fabrikant wordt aanbevolen!
– Bewaar de reservesleutel op een veilige plaats.
– Probeer nooit weg te rijden met bevestigde wielklem. Rijden met een gemonteerde wielklem veroorzaakt schade aan uw voertuig.
5. Gebruiksaanwijzing 5.1 Overzicht 1 Los deel van de wielklem 2 Vast deel van de wielklem 3 Slot met beschermkap 5.2 De wielklem monteren Om de wielklem op een voertuigwiel te monteren, moet u de klem eerst openen. Steek de sleutel in het slot (positie 3 in het overzicht) en draai de sleutel 90° tegen de klok in, afb. 2. De vergrendeling wordt vrijgegeven. Draai de sleutel terug en trek hem eruit, afb. 3.
Trek nu het vaste deel (positie 2 in het overzicht) en het losse deel (positie 1 in het overzicht) van de wielklem uit elkaar, afb. 4.
Plaats de twee helften van de wielklem op het wiel van het te beveiligen voertuig. Breng de twee helften weer bij elkaar en duw ze samen.
Duw het slot met één hand naar beneden terwijl u het losse gedeelte van de wielklem zo ver mogelijk in het vaste gedeelte schuift, totdat de vergrendeling vastklikt en het slot volledig kan worden neergedrukt. Het voertuig is nu beveiligd, afb. 5. Plaats de beschermkap op het slot.
Zorg voor een goed zichtbare waarschuwing voor de aanwezigheid van een wielklem op het voertuig. Bijvoorbeeld een notitie op het stuurwiel of op de aanhanger aan de koppeling.
5.3 De wielklem verwijderen Ontsluit de wielklem en maak de vergrendeling los. Trek de helften van de wielklem uit elkaar en verwijder ze van het wiel van het voertuig.
6. Onderhoud en verzorging 6.1 Onderhoud Smeer het slot regelmatig met harsvrije olie.
Afb. 2: slot openenAfb. 1: Overzicht Afb. 3: vergrendeling vrijgegevenAfb. 4: wielklem openenAfb. 5: voertuig beveiligd
12
6.2 Verzorging Reinig de wielklem met een enigszins vochtige, zachte doek en een mild reinigingsmiddel. Gebruik geen agressieve reinigingsmiddelen, oplosmiddelen of benzine. Zorg ervoor dat er geen reinigingsmiddelen of vloeistoffen in de wielklem binnendringen.
Bewaar de wielklem op een droge plaats.
7. Informatie over de bescherming van het milieu Lever dit product aan het einde van de levensduur in bij een openbare/gemeentelijke inzamelplaats of deponeer het in een bak voor recyclebaar materiaal.
De materialen kunnen worden gerecycled. Door recycling of andere vormen van hergebruik van oude producten levert u een belangrijke bijdrage aan de bescherming van ons milieu!
8. Contactinformatie EAL GmbH
Otto-Hausmann-Ring 107
42115 Wuppertal Duitsland Telefoon: +49 (0)202 42 92 83 0
Telefax: +49 (0)202 42 92 83 160
Internet: www.eal-vertrieb.de E-mail: info@eal-vertrieb.com
13
Art.nr. 11896
Ganascia blocca ruota Indice 1. Uso conforme 7
2. Volume di consegna 4
3. Specifiche 4
4. Avvertenze di sicurezza 5
5. Istruzioni per l‘uso 5
5.1 Panoramica 5
5.2 Montaggio della ganascia blocca ruota 5
5.3 Smontaggio della ganascia blocca ruota 5
6. Manutenzione e pulizia 5
6.1 Manutenzione 5
6.2 Pulizia 6
7. Avvertenze sulla tutela ambientale 6
8. Come contattarci 6
AVVERTENZA
Leggere attentamente le istruzioni per l‘uso prima della messa in funzione e osservare tutte le avvertenze di sicurezza!
La mancata osservanza di queste istruzioni può provocare lesioni personali, danni al prodotto o alla vostra proprietà!
Conservare la confezione originale, la prova d‘acquisto e queste istruzioni come riferimento futuro! In caso di cessione del prodotto, consegnare anche le presenti istruzioni.
Verificare l‘integrità e la completezza del contenuto della confezione prima di utilizzare il prodotto!
1.
Uso conforme La ganascia blocca ruota protegge il veicolo, il caravan o il rimorchio contro il furto bloccandone una ruota.
La ganascia blocca ruota è consentita solo come antifurto. Il blocco di veicoli estranei è proibito dal legislatore.
Questo dispositivo non è destinato all‘uso da parte di bambini e persone con capacità mentali limitate o che non siano in possesso delle necessarie conoscenze. Tenere il dispositivo lontano dalla portata dei bambini.
Questo dispositivo non è destinato all‘impiego industriale.
Dell’uso appropriato fa parte anche il rispetto di tutte le informazioni fornite in queste istruzioni, soprattutto delle avvertenze sulla sicurezza.
Ogni altro utilizzo viene considerato improprio e può causare danni a persone o cose. EAL GmbH non risponde dei danni derivanti da un uso improprio.
2. Volume di consegna 1 x ganascia blocca ruota con due chiavi 1 x istruzioni per l‘uso 3. Specifiche Dimensioni (L x l x h): 485 x 237 x 72 [mm] Peso: 2,240 kg Materiale: acciaio Larghezza del pneumatico: max. 285 mm
14
4. Avvertenze di sicurezza – Il triangolo di segnalazione identifica tutte le istruzioni importanti per la sicurezza. Rispettare sempre queste istruzioni, per evitare il pericolo di lesioni personali o danni al dispositivo.
– I bambini non devono giocare con l‘apparecchio.
– Non affidare pulizia e manutenzione ai bambini se non sorvegliati.
– Non lasciare il materiale d‘imballaggio in giro con noncuranza. Questo può diventare un giocattolo pericoloso per i bambini!
– Utilizzare questo prodotto solo per lo scopo previsto!
– Non manomettere né smontare il prodotto!
– Per la propria sicurezza, utilizzare solo gli accessori e i pezzi di ricambio indicati nelle istruzioni o consigliati dal produttore!
– Conservare la chiave di riserva in un luogo sicuro.
– Non cercare mai di usare la vettura con la ganascia blocca ruota applicata. La guida con la ganascia blocca ruota applicata causa danni al veicolo.
5. Istruzioni per l‘uso 5.1 Panoramica 1 Parte mobile della ganascia blocca ruota 2 Parte fissa della ganascia blocca ruota 3 Serratura con cappuccio di protezione 5.2 Montaggio della ganascia blocca ruota Per montare la ganascia su una ruota del veicolo, deve essere dapprima aperta. A tal fine inserire la chiave nella serratura (posizione 3 nella panoramica) e girarla di 90° in senso antiorario, figura 2. Il bloccaggio viene sbloccato. Riportare la chiave nella posizione iniziale e toglierla, figura 3.
Ora separare la parte fissa (posizione 2 nella panoramica) da quella mobile (posizione 1 nella panoramica) della ganascia blocca ruota, figura 4.
Applicare le due metà della ganascia sulla ruota del veicolo da bloccare. Riunire le due metà. Con una mano spingere verso il basso la serratura inserendo il più possibile la parte mobile in quella fissa, finché il bloccaggio scatta in posizione e la serratura può essere abbassata completamente. Ora il veicolo è bloccata, figura 5. Applicare il cappuccio di protezione sulla serratura.
Applicare in modo ben visibile un avviso che indica la presenza di una ganascia blocca ruota sul veicolo. P.es. biglietto sul volante o sul gancio di traino del rimorchio 5.3 Smontaggio della ganascia blocca ruota Aprire la ganascia blocca ruota con la chiave e sbloccare il bloccaggio. Staccare le metà della ganascia blocca ruota e toglierle dalla ruota del veicolo 6. Manutenzione e pulizia 6.1 Manutenzione Lubrificare regolarmente la serratura con un olio non resinoso.
Figura 2: Apertura della serraturaFigura 1: Panoramica Figura 3:Bloccaggio sbloccatoFigura 4:Apertura della ganascia blocca ruotaFigura 5:Veicolo bloccato
15
6.2 Pulizia Pulire la ganascia blocca ruota con un panno morbido e solo leggermente umido e un detergente delicato. Non utilizzare detergenti aggressivi, solventi o benzina. Assicurarsi che né il detergente né altri liquidi penetrino nei tubi della ganascia blocca ruota.
Conservare la ganascia blocca ruota in un luogo asciutto.
7. Avvertenze sulla tutela ambientale Smaltire questo prodotto gettandolo nel bidone per il riciclo o consegnandolo ai punti di raccolta pubblici/comunali.
I materiali sono riciclabili. Con il riciclo, il recupero del materiale e altre forme di riutilizzo di prodotti usati si fornisce un contributo importante per la protezione dell‘ambiente!
8. Données de contact EAL GmbH
Otto-Hausmann-Ring 107
42115 Wuppertal Germania Telefono: +49 (0)202 42 92 83 0
Fax: +49 (0)202 42 92 83 160
Internet: www.eal-vertrieb.de E-mail: info@eal-vertrieb.com
16
© EAL GmbH, 11896 05.2018