
€19.65
Priemerné hodnotenie:0/5(0x)
Vlastnosti a parametre výrobku
Skúsenosti užívateľov
Otázky a odpovede
Dokumentácia
Popis
Vlastnosti a parametre výrobku
| Prevádzkové napätie | 230 V |
|---|---|
| Počet žiaroviek | 1 |
| Typ osvetlenia | LED |
| Druh pätice | Pevne zabudované LED osvetlenie |
| Výkon svetelného zdroja | 20 W |
| Príkon | 20 W |
| Farba svetla (kelvin) | 6500 K |
| Farba svetla | Denné svetlo |
| Svetelný tok (lumen) | 1650 lm |
| Celkový svetelný tok | 1650 lm |
| Vlastnosti svietidlá | Možná montáž na stenu Hodí sa pre statív Výkyvné |
| Vyžarovací uhol | 100 ° |
| Spôsob ochrany | IP65 |
| Farba | Biela |
| Materiál | Zinkový tlakový odlitek |
| Hmotnosť | 520 g |
| Vonkajšia dĺžka | 14.54 cm |
| Vonkajšia výška | 12.02 cm |
| Vonkajšia šírka | 6.47 cm |
| Kategória výrobku | LED vonkajšie osvetlenie |
Skúsenosti a názory zákazníkov
- Skúsenosti užívateľov nie sú k dispozícii.
Otázky užívateľov
- Užívatelia k tomuto výrobku zatiaľ nemali žiadne otázky.
Dokumentácia
Podmienky používania dokumentácie
Betriebsanleitung User manual Mode d‘emploi Istruzioni per l‘uso LED Flutlicht mit oder ohne Bewegungsmelder LED Flood Light with or without motion detector Lumière crue de LED avec ou sans détecteur de mouvementLuce LED Flood con o senza rilevatore di movimento
3
BETRIEBSANLEITUNG BETRIEBSANLEITUNG …3
USER MANUAL …13
MODE D‘EMPLOI …23
ISTRUZIONI PER L‘USO …33
Inhalt 1 Sicherheitshinweise …4
1.1 Allgemeines …4
1.2 Warnstufen …4
2 Beschreibung und Funktion …5
2.1 Produkt …5
2.2 Produktteile …5
2.3 Lieferumfang …
5
2.4 Allgemeine technische Daten …5
2.5 SpezifischetechnischeDaten …6
3 Bestimmungsgemäßer Gebrauch …7
4 Vorbereitung …7
5 Montage …7
5.1 Flutlichter für die Bodenmontage (Art. 59004) …7
5.2 Flutlichter für die Wandmontage …7
5.3 Flutlichter mit Standfuß …8
5.4 Flutlichter mit Stativ …9
6 Installation …9
6.1 Modelle mit Schutzkontaktstecker …9
6.2 Modelle zur Festinstallation …10
7 Einstellungen vornehmen …11
8 Wartung,Pflege,LagerungundTransport …11
9 Haftungshinweis …11
10 Entsorgungshinweise …11
11 EU-Konformitätserklärung …12
Betriebsanleitung
4
1 Sicherheitshinweise 1.1 AllgemeinesDie Betriebsanleitung ist Bestandteil des Produktes und enthält wichtige Hinweise zum korrekten Gebrauch.
>> Betriebsanleitung vollständig und sorgfältig vor Gebrauch lesen.
Die Betriebsanleitung muss bei Unsicherheiten und Weitergabe des Produktes verfügbar sein.
>> Betriebsanleitung aufbewahren.
>> Installations-, Demontage-, Wartungs- und Reparaturarbeiten nur von ausgebildetem Elektro-Fachpersonal ausführen lassen.
Stromschlaggefahr >> Vor Arbeiten am Produkt spannungsfrei schalten, Sicherung abschalten und gegen Wiedereinschalten sichern.
>> Vor Arbeiten am Produkt Spannungsfreiheit sicherstellen und prüfen.
>> ProduktundZubehörnichtmodifizieren.
Heiße Oberfläche >> Nicht während und unmittelbar nach Gebrauch berühren.
>> NähezuentflammbarenOberflächenvermeiden.
Hitzestau >> Produkt nicht abdecken.
>> Nicht in abgedichteten Umgebungsbedingungen verwenden.
>> Extreme Belastungen wie Hitze und Kälte, Nässe und direkte Sonneneinstrahlung, Mikrowellen sowie Vibrationen und me chanischen Druck vermeiden.
Bewegungsmelder sind nicht als Komponente für Alarmanlagen im Sinne des Verbandes der Sachversicherer (VdS) geeignet. Sie können Fehlalarme auslösen, wenn der Montageort ungünstig gewählt wurde.
>> Nur EN 60998-2-1 und EN 60998-2-2 geprüfte Anschlussklem men benutzen.
>> Örtliche Installations- und Bauvorschriften befolgen.
>> Bei Fragen, Defekten, mechanischen Beschädigungen, Störun gen und anderen nicht durch die Begleitdokumentation be hebbaren Problemen, an Händler oder Hersteller wenden.
>> Produkt, Produktteile und Zubehör nur in einwandfreiem Zu stand benutzen.
>> Montagematerial entsprechend der Untergrundbeschaffenheit und des Produktgewichtes wählen.
>> Regelmäßig den festen Sitz des Produktes/dessen Schrauben kontrollieren.
>> Schrauben nicht zu fest anziehen.
Gewinde können beschädigt werden.
1.2 Warnstufen Warnung vor Gefahren, die bei Missachtung der Sicherheitshinweise zu Tod oder schweren Verlet zungen führen können.
Warnung vor Gefahren, die bei Missachtung der Sicherheitshinweise zu Verletzungen führen können.
Warnung vor Gefahren, die bei Missachtung der Hin weise zu Sachschäden führen können.
5
2 Beschreibung und Funktion 2.1 ProduktDieses Produkt ist ein LED-Flutlicht, einige Modelle sind zusätzlich mit integriertemInfrarot-Bewegungsmelderausgestattet.Objektewerdenim Erfassungsbereich vom Sensor erkannt. Bei Bewegungsänderungen wird das angeschlossene LED-Flutlicht ausgelöst.
Nicht dimmbar.
2.2 Produktteile 1
2
3
4
5
6
Fig. 1: Produktteile1Reflektor 2LEDs 3Glasscheibe 4Montagebügel 5 IR-Sensor 6 Standfuß / Stativ 2.3 LieferumfangLED-Flutlicht mit oder ohne Bewegungsmelder, Betriebsanleitung 2.4 Allgemeine technische Daten Eingangsspannung220-240 V~ 50 Hz Betriebsbedingungen-25~+40°C,≤93%RH
Leistungsfaktor>0.8
Betriebsanleitung
6
Schaltzyklen>15000
LED Lebensdauer (h)30000
CRI>65
Farbtemperatur (K)6500
Schutzklasse1 (nur Modelle mit Schutzkontaktstecker) Tab. 1: Allgemeine technische Daten 2.5 SpezifischetechnischeDaten Artikel59001 / 5908559002 / 5908659003 / 5908759004
5900559006
Leistung (W)102030202030
Maße (mm)110 x 108 x 62.2145.4 x 120.2 x 64.7195 x 172 x 76.7332 x 145 x 57325 x 230 x 205390 x 260 x 250
Gewicht (g)33052087082011901770
Lichtstrom (±10 lm)83016502500165016502500
SchutzartIP65
AnschlussartTerminalSchutzkontaktstecker Farbe Artikel58998 / 5908258999 / 5908359000 / 5908459007
5900859009
Leistung (W)102030203040
Maße (mm)158 x 110 x 84184 x 145 x 84222 x 195 x 92
670-1260
x 630 x 540940-1850
x 950 x 830740-1560 x 781 x 680
Gewicht (g)380580980187025403500
Lichtstrom (±10 lm)83016502500165025003300
SchutzartIP44IP65
Erfassungswinkel (°)100Reichweite (m)10
Ausschaltverzögerung 10±5 s ~ 10±2 min.
AnschlussartTerminalSchutzkontaktstecker Installationshöhe (m)1.8-2.5FarbeTab. 2: SpezifischetechnischeDaten
7
3 Bestimmungsgemäßer GebrauchEine andere Verwendung als in den Kapiteln „Beschreibung und Funktion“ sowie in den „Sicherheitshinweisen“ beschrieben, ist nicht zugelassen.
IP44 Dieses Produkt ist gegen Spritzwasser und Berührung durch Fremdkörper≥Ø1mmgeschützt.
IP65 Dieses Produkt ist staubdicht gegen Berührung und gegen Strahlwasser geschützt.
4 Vorbereitung – TechnischeDatenallerzuverwendendenGerätevergleichenum Kompatibilität sicher zu stellen.
– Lieferumfang auf Vollständigkeit kontrollieren und Unversehrtheit sicherstellen.
5 Montage Absturzgefahr/ Quetschgefahr – Hilfsmittel sicher platzieren und benutzen.
– Gliedmaßen nicht zwischen Scherteile halten.
– Verlegen Sie die Kabel sicher.
5.1 Flutlichter für die Bodenmontage (Art. 59004) 1. Stecken Sie die Einzelteile zusammen.
2. Stecken Sie die Gartenlampe gerade und vorsichtig in den Boden.
Achten Sie dabei auf sichere Kabelverlegung.
5.2 Flutlichter für die Wandmontage Fig. 2: Montageort 1. Wählen Sie den Montageort nach folgenden Kriterien aus: – DieOberflächemussstabilsein.
– EsdürfensichkeinebrennbarenGegenständeinderNähebefinden.
– Das Produkt muss absolut gerade befestigt werden.
Nur Modelle mit Bewegungssensor: – Lüftungsöffnungen dürfen nicht in der Nähe sein.
– Pflanzen,Straßenbeleuchtungen,reflektierendeFlächenodersich willkürlichbewegendenObjektedürfensichnichtimErfassungsbe reichbefinden.
Betriebsanleitung
8
Fig. 3: Flutlichter für die Wandmontage – Reichweite 2. Wählen Sie geeignetes Montagematerial entsprechend der gewählten OberflächeunddesProduktgewichts.
Montagematerial ist nicht im Lieferumfang enthalten.
3. Markieren Sie den Bohrlochabstand X und die Kabeldurchführung Y
mittels Montagebügel und geeignetem Stift.
X
Y
Fig. 4: Flutlichter für die Wandmontage – Montage ArtikelnummerXY
59085, 59001, 59082, 58998
55 mmØ5,5mm 58999, 59083Ø6,5mm 59002, 5908680 mm 59003, 59087, 59000, 5908490 mm Tab. 3: Bohrlochabstand X und Kabeldurchführung Y
4. Bohren Sie die Befestigungslöcher mit geeignetem Werkzeug.
5. Befestigen Sie das Flutlicht (mit Bewegungsmelder).
5.3 Flutlichter mit StandfußDie Flutlichter sind größtenteils vormontiert.
– Montieren Sie die Einzelteile wie dargestellt.
– Stellen Sie das Flutlicht nur auf ebene, rutschfeste und nicht brennbare Oberflächen.
9
Fig. 5: Flutlichter mit Standfuß – Montage 5.4 Flutlichter mit Stativ1. Montieren Sie die Stative wie abgebildet.
2. Befestigen Sie den Bügel (3) mittels Schraube (4) auf dem Stativ.
3. Befestigen Sie das Flutlicht (1) mittels Schrauben (2) am Bügel (3).
4. Stellen Sie das Flutlicht nur auf ebene, rutschfeste und nicht brennbare Oberflächen.
Fig. 6: Flutlichter mit Stativ – Montage 6 Installation 6.1 Modelle mit SchutzkontaktsteckerModelle mit montiertem Schutzkontaktstecker müssen nicht installiert werden.
– Schließen Sie diese an eine freie und gut zugängliche Steckdose an.
Die Schutzart IP44 ist nur bei Verwendung von IPX4 Steckdosen gegeben.
Betriebsanleitung
10
6.2 Modelle zur Festinstallation Stromschlaggefahr – OffeneKabelendenNURvonerfahrenerElektro fachkraft anschließen lassen.
– Vor Arbeiten am Produkt spannungsfrei schalten, Sicherung abschalten und gegen Wiedereinschalten sichern.
– Vor Arbeiten am Produkt Spannungsfreiheit sicher stellen und prüfen.
Modelle ohne montiertem Schutzkontaktstecker müssen fest am Stromnetz installiert werden.
Die verwendeten Stromkabel müssen einen Mindestquerschnitt von 1,0 mm² besitzen. Litzen müssen mit Aderendhülsen versehen werden. Folgende Anschlüsse werden an der Lüsterklemme des Produkts vorgenommen: 6 mm 15 mm N
L
GND
1 2 3
4 5 6
Fig. 7: Festinstallation 1. Schalten Sie die Sicherung ab.
2. Öffnen Sie die Anschlussmuffe durch Drehen gegen den Uhrzeigersinn bis der Anschlussblock wie in Bild 7 – 2 freigelegt ist.
3. Isolieren Sie die Kabel wie in Bild 7 – 3 abgebildet.
4. SchiebenSiedieinBIld7-4gezeigtenTeilederAnschlussmuffeüber das Anschlusskabel.
5. Schrauben Sie die Netzkabel wie in Bild 7 – 5 mittels Schraubendreher fest.
6. Schließen Sie die Anschlussmuffe durch Drehen im Uhrzeigersinn fest, wie in Bild 7 – 6 gezeigt.
11
7 Einstellungen vornehmen Nur Flutlichter mit Bewegungsmelder: Tab. 4: Einstellungen (Flutlichter mit Bewegungsmelder) SENS: SENS stellt die Reichweite des PIR-Sensors ein. Diese beträgt minimal 4 m, maximal 10 m.
TIME: TIMEstelltdieAusschaltverzögerungzwischenmin.10±5sund 10±2 Minuten ein.
LUX: LUXstelltdieEmpfindlichkeitderPhotozelleeinunderkenntdie UmgebungshelligkeitzwischenAuslösungbeiTagundNacht und nur bei Nacht .
8 Wartung,Pflege,LagerungundTransportDie Produkte sind wartungsfrei.
Sachschäden – NureintrockenesundweichesTuchzumReinigenverwenden.
– Keine Reinigungsmittel und Chemikalien verwenden.
– Kühl und trocken lagern.
– Produkt bei längerem Nichtgebrauch für Kinder unzugänglich und in trockener und staubgeschützter Umgebung lagern.
– OriginalverpackungfürdenTransportaufhebenundverwenden.
9 Haftungshinweis Druckfehler und Änderungen an Produkt, Verpackung oder Produkt dokumentation behalten wir uns vor.
– Beachten Sie unsere Garantiebedingungen. Diese können Sie in aktueller Form unter den genannten Kontaktdaten anfragen.
10 Entsorgungshinweise Elektrische und elektronische Geräte dürfen nach der europäischen WEEE Richtlinie nicht mit dem Hausmüll entsorgt werden. Deren Bestandteile müssen getrennt der Wiederverwertung oder Entsor gung zugeführt werden, weil giftige und gefährliche Bestandteile bei unsachgemäßer Entsorgung die Gesundheit und Umwelt nachhaltig schädigen können.
Betriebsanleitung
12
SiesindalsVerbrauchernachdemElektrogesetz(ElektroG)verpflichtet elektrische und elektronische Geräte am Ende ihrer Lebensdauer an den Hersteller, die Verkaufsstelle oder an dafür eingerichtete, öffentliche Sammelstellenkostenloszurückzugeben.Einzelheitendazuregeltdasjeweilige Landesrecht. Das Symbol auf dem Produkt, der Betriebsanleitung oder/ und der Verpackung weist auf diese Bestimmungen hin. Mit dieser Art der Stofftrennung, Verwertung und Entsorgung von Altgeräten leisten Sie einen wichtigen Beitrag zum Schutz unserer Umwelt.
WEEE Nr.: 82898622
11 EU-KonformitätserklärungMit dem CE Zeichen erklärt Goobay®, eine registrierte Marke der Wentronic GmbH, dass das Produkt die grundlegenden Anforderungen und Richtlinien der europäischen Bestimmungen erfüllt.
13
USER MANUAL
BETRIEBSANLEITUNG …3
USER MANUAL
…13
MODE D‘EMPLOI …23
ISTRUZIONI PER L‘USO …33
Content 1 Safety instructions …14
1.1 In general …14
1.2 Warning levels …14
2 Description and Function …15
2.1 Product …15
2.2 Product parts …
15
2.3 Scope of Delivery …15
2.4 Generalspecifications …15
2.5 Specificspecifications …16
3 Intended Use …17
4 Preparation …17
5 Mounting …17
5.1 Floodlightforfloormounting(Art.59004) …17
5.2 Floodlights for wall mounting …17
5.3 Floodlights with stand …18
5.4 Floodlights with tripod …19
6 Installation …19
6.1 Models with protective contact plug …19
6.2 Modelsforfixedinstallation …20
7 Make settings …21
8 Maintenance,Care,StorageandTransport …21
9 Liability notice …21
10 Disposal Instructions …21
11 EU Declaration of Conformity …22
User manual
14
1 Safety instructions 1.1 In generalThe user manual is part of the product and contains important information for correct use.
>> Read the user manual completely and carefully before use.
The user manual must be available for uncertainties and passing the product.
>> Keep this user manual.
>> Installation, assembly, maintenance and repair work must be carried out only by trained electrical specialists.
Risk of electric shock >> Cut off power supply before any work on the product, switch off safety fuses and secure against reconnection.
>> Assure and check the absence of voltage before any work on the product.
>> Do not modify product and accessories.
Hot surfaces >> Do not touch in or immediately after use.
>> Avoidproximitytoflammablesurfaces.
Heat storage >> Do not cover the product.
>> Do not use in sealed environments.
>> Avoid stresses such as heat and cold, moisture and direct sun light, vibration and mechanical pressure.
Motion detectors are not suitable as a component of alarm systems within the meaning of the Association of Property Insurers (VdS). They can trigger false alarms if the installation place has been chosen unfavorably.
>> OnlyuseEN60998-2-1andEN60998-2-2testedterminals.
>> Follow local installation and building regulations.
>> In case of questions, defects, mechanical damage, trouble and other problems, non-recoverable by the documentation, contact your dealer or producer.
>> Use product, product parts and accessories only in perfect condition.
>> Choose mounting hardware according to the substrate condi tions and the product weight.
>> Regularly check the tightness of product/screws.
>> Do not over-tighten the screws.
Threads can be damaged.
1.2 Warning levels Warnings against hazards that may result in serious injuries or death in case of nonobservance.
Warnings against hazards that may result in injuries in case of non-observance.
Warnings against hazards that may result in material damage in case of non-observance.
15
2 Description and Function 2.1 ProductThisproductisaLEDfloodlight,somemodelsareadditionallyequippedwith integratedinfraredmotiondetector.Objectsarerecognizedbythesensor in the detection area. In case of movement changes, the connected LED
floodlightistriggered.
Not dimmable.
2.2 Product parts 1
2
3
4
5
6
Fig. 8: Product parts 1reflector 2LEDs 3glasspane 4Mountingbracket 5IRsensor 6Stand/Tripod 2.3 Scope of DeliveryLEDfloodlightwithorwithoutmotiondetector,operatinginstructions 2.4 Generalspecifications input voltage220-240 V~ 50 Hz operating conditions-25~+40°C,≤93%RH
power factor>0.8
switching cycles>15000
User manual
16
LED life (hrs)30000
CRI>65
Color temperature (K)6500
protection class1 (only models with safety plug) Tab. 5: Generalspecifications 2.5 Specificspecifications Article59001 / 5908559002 / 5908659003 / 5908759004
5900559006
Power (W)102030202030
Dimensions (mm)110 x 108 x 62.2145.4 x 120.2 x 64.7195 x 172 x 76.7332 x 145 x 57325 x 230 x 205390 x 260 x 250
Weight (g)33052087082011901770
Luminousflux(±10lm)83016502500165016502500
protection levelIP65
ConnectionTerminalSafety plug Colour Article58998 / 5908258999 / 5908359000 / 5908459007
5900859009
Power (W)102030203040
Dimensions (mm)158 x 110 x 84184 x 145 x 84222 x 195 x 92
670-1260
x 630 x 540940-1850
x 950 x 830740-1560 x 781 x 680
Weight (g)380580980187025403500
Luminousflux(±10lm)83016502500165025003300
protection levelIP44IP65
Detection angle (°)100Range (m)10
Switch-off delay10±5 s ~ 10±2 min.
ConnectionTerminalSafety plug Installation height (m)1.8-2.5Colour Tab. 6: Specificspecifications
17
3 Intended UseAny use other than those described in the chapter „Description and Function“ and „Safety Instructions“ is not permitted.
IP44Thisproductisprotectedagainstsplashingwaterandcontactby foreign bodies ≥Ø1mm.
IP65Thisproductisdust-proofagainsttouchandprotectedagainstwater jets.
4 Preparation – Comparethespecificationsofalluseddevicestoensurecompatibility.
– Check the scope of delivery for completeness and integrity.
5 Mounting Risk of falling / Risk of crushing – Place and use tools safely.
– Do not keep limbs between shearing parts.
– Attend to safe cable laying.
5.1 Floodlightforfloormounting(Art.59004)1. Put the single parts together.
2. Insert the garden lamp straight and carefully into the ground.
Ensure safe cable routing.
5.2 Floodlights for wall mounting Fig. 9:Mounting location 1. Select the mounting location according to the following criteria: – Thesurfacemustbestable.
– Theremustbenoflammableobjectsinthevicinity.
– Theproductmustbeabsolutelystraight.
Only models with motion sensor: – Ventilation openings must not be close.
– Plants,streetlighting,reflectingsurfacesorobjectsthatmoveat random may not be within the detection range.
User manual
18
Fig. 10: FlFloodlights for wall mounting – Reach 2. Select suitable mounting material according to the selected surface and the product weight.
Mounting material is not included.
3. Mark the mounting hole spacing X and grommet Y by using the mounting bracket and a suitable pen.
X
Y
Fig. 11: Floodlights for wall mounting – Mounting Article NumberXY
59085, 59001, 59082, 58998
55 mmØ5.5mm 58999, 59083Ø6.5mm 59002, 5908680 mm 59003, 59087, 59000, 5908490 mm Tab. 7: Mounting hole spacing X and grommet Y
4. Drill the mounting holes with a suitable tool.
5. AttachtheLEDfloodlightmotionsensor.
5.3 Floodlights with standThefloatersarelargelypre-assembled.
– Mount the parts as shown.
– Onlyplacethefloodlightoneven,non-slippingandnon-flammable surfaces.
19
Fig. 12: Floodlights with stand – Mounting 5.4 Floodlights with tripod1. Mount the tripods as shown.
2. Attach the bracket (3) to the stand using the screw (4).
3. Attachthefloodlight(1)tothebracket(3)usingscrews(2).
4. Onlyplacethefloodlightoneven,non-slippingandnon-flammable surfaces.
Fig. 13: Floodlight with tripod – Mounting 6 Installation 6.1 Models with protective contact plugModels with the protective contact plug installed do not have to be installed.
– Connect these to a free and easily accessible socket.
Protection class IP44 is only available when using IPX4 sockets.
User manual
20
6.2 Modelsforfixedinstallation Risk of electric shock – LetopencableendsONLYassemblebyexperienced electrician.
– Cut off power supply before any work on the product, switch off safety fuse and secure against reconnection.
– Assure and check the absence of voltage before any work on the product.
Models without a mated protective contact plug must be permanently installed on the power supply.
Thepowercablesusedmusthaveaminimumcross-sectionof1.0mm².
Strandsmustbeprovidedwithwireendferrules.Thefollowingconnections are made at the luster terminal of the product: 6 mm 15 mm N
L
GND
1 2 3
4 5 6
Fig. 14: Fixed installation 1. Turnoffthefuse.
2. Opentheconnectionsleevebyturningitcounter-clockwiseuntilthe connection block is released as shown in Fig. 7 – 2.
3. Insulate the cables as shown in Fig. 7 – 3.
4. Slide the parts of the connection sleeve shown in Figs. 7 – 4 over the connection cable.
5. Screw the power cables as shown in Fig. 7 – 5 using a screwdriver.
6. Close the connector by turning it clockwise, as shown in Figure 7 – 6.
21
7 Make settings Only floodlights with motion sensor: Tab. 8: Adjustments(Floodightswithmotionsensors) SENS: SENSadjuststherangeofthePIRsensor.Thisisaminimumof4m maximum of 10 m.
TIME: TIMEsetstheswitch-offdelaybetweenmin.10±5sand10±2
minutes.
LUX: LUXadjuststhesensitivityofthephotocellanddetectstheambient brightness between day and night and night only .
8 Maintenance, Care, Storage and TransportTheproductismaintenance-free.
Material Damage – Onlyuseadryandsoftclothforcleaning.
– Do not use detergents or chemicals.
– Store cool and dry.
– Store the product out the reach of children and in a dry and dust-protected ambience when not in use.
– Keep and use the original packaging for transport.
9 Liability notice We reserve the right to printing errors and changes to product, packaging or product documentation.
– Seeourtermsofwarranty.Theseareavailableintheircurrentform under the given contact details.
10 Disposal Instructions According to the European WEEE directive, electrical and elec tronic equipment must not be disposed with consumers waste. Its components must be recycled or disposed apart from each other.
Otherwisecontaminativeandhazardoussubstancescanpolluteour environment.
User manual
22
As a consumer, you are committed by law to dispose electrical and electronic devices to the producer, the dealer, or public collecting points at the end of thedeviceslifetimeforfree.Particularsareregulatedinnationalright.The symbol on the product, in the user`s manual, or at the packaging alludes to these terms. With this kind of waste separation, application, and waste disposal of used devices you achieve an important share to environmental protection.
WEEE No: 82898622
11 EU Declaration of ConformityWith the CE sign Goobay®, a registered trademark of the Wentronic GmbH ensures, that the product is conformed to the basic standards and directives.
23
MODE D‘EMPLOI
BETRIEBSANLEITUNG …3
USER MANUAL
…13
MODE D‘EMPLOI …23
ISTRUZIONI PER L‘USO …33
Contenu 1 Consignes de sécurité …
24
1.1 En général …24
1.2 Niveaux d‘alerte …24
2 Description et fonction …25
2.1 Produit …25
2.2 Pièces et accessoires …25
2.3 Contenu de la livraison …25
2.4 Spécificationsgénérales …25
2.5 Spécificationsspécifiques …26
3 Utilisation prévue …27
4 Préparation …27
5 Montage …27
5.1 Projecteurspourfixationausol(Art.59004) …27
5.2 Projecteurspourmontagemural …27
5.3 Projecteursavecsupport …29
5.4 Projecteursavectrépied …29
6 Installation …30
6.1 Modèles avec bouchon de sécurité …30
6.2 Modèlespourl‘installationfixe …30
7 Fairedesajustements …
31
8 Maintenance,Entretien,StckageetTransport …31
9 Clause de responsabilité …31
10 Instructions pour l’élimination …32
11 UE Déclaration de conformité …32
Mode d?emploi
24
1 Consignes de sécurité 1.1 En généralLe mode d‘emploi fait partie intégrante du produit et comprend d‘importantes informations pour une bonne installation et une bonne utilisation.
>> Lisez le mode d‘emploi attentivement et complètement avant de l‘utiliser.
Le mode d‘emploi doit être disponible à des incertitudes et transfert du produit.
>> Conservez soigneusement ce mode d‘emploi.
>> L‘installation, le montage, la maintenance et les réparations moût être effectuées que par des spécialistes formés électriques.
Risque de choc électrique >> Éteindre l‘alimentation avant de travailler sur le produit, les fusibles de sécurité et protéger cette contre la reconnexion.
>> Garantir et de contrôler l‘absence de tension avant que le travail sur le produit.
>> Nemodifiezpasproduitetlesaccessoires.
Heiße Oberfläche >> Ne pas toucher pendant ou immédiatement après l‘utilisation.
>> Éviterlaproximitédesurfacesinflammables.
Accumulateur de chaleur >> Ne couvrez pas le produit.
>> Ne pas utiliser dans des environnements fermés.
>> Éviter des conditions extrêmes, telles que la chaleur extrême et froid, l‘humidité et de la lumière directe du soleil, ainsi que microondes, des vibrations et de la pression mécanique.
Les détecteurs de mouvement ne sont pas appropriés en tant que composant des systèmes d‘alarme dans le sens de l‘Association des Assureurs (VdS).
Vous pouvez déclencher de fausses alarmes si le site de l‘installation a été choisi de façon défavorable.
>> Seulement utiliser EN 60998-2-1 et EN 60998-2-2 testé terminaux.
>> Respecter les règlements d‘installation et de construction locaux.
>> En cas de questions, les défauts, les dommages mécaniques, des ingérences et d‘autres problèmes, non récupérables par la documentation, contactez votre revendeur ou le producteur.
>> Utilisez le produit, pièces et accessoires des produits unique ment en parfait état.
>> Choisissez le matériel de montage en fonction des conditions de substrat et le poids du produit.
>> Vérifiezrégulièrementl‘étanchéitéduproduit/duvis.
>> Serrer pas les vis pas trop.
Les fils peuvent être endommagés.
1.2 Niveauxd‘alerte Mises en garde contre les dangers pouvant entraîner des blessures graves ou la mort en cas de non respect.
Mises en garde contre les dangers pouvant entraîner des blessures en cas de non respect.
Mises en garde contre les dangers pouvant entraîner les dommages matériels.
25
2 Description et fonction 2.1 ProduitCeproduitestunprojecteuràLED,certainsmodèlessontenoutreéquipés d‘undétecteurdemouvementinfrarougeintégré.Lesobjetssontdétectés dans la zone du capteur. Avec les changements en mouvement la lumière crue de LED connecté est déclenchée.
Pas de variateur.
2.2 Pièces et accessoires 1
2
3
4
5
6
Fig. 15: Pièces et accessoires 1réflecteur 2LEDs 3verre 4supportdemontage5IR-capteur 6 stand / trépied 2.3 Contenu de la livraisonLumière crue de LED avec / sans détecteur de mouvement, Mode d‘emploi 2.4 Spécificationsgénérales tension d'entrée220-240 V~ 50 Hz conditions de fonctionnement-25~+40°C,≤93%RH
facteur de puissance>0.8
cycles de commutation>15000
Mode d?emploi
26
La vie de LED (h)30000
CRI>65
La température de couleur (K)6500
classe de protection1 (modèles avec bouchon de sécurité) Tab. 9: Spécificationsgénérales 2.5 Spécificationsspécifiques Article59001 / 5908559002 / 5908659003 / 5908759004
5900559006
Puissance (Watts)102030202030
Dimensions (mm)110 x 108 x 62.2145.4 x 120.2 x 64.7195 x 172 x 76.7332 x 145 x 57325 x 230 x 205390 x 260 x 250
Poids (g)33052087082011901770
Flux lumineux (lm ± 10)83016502500165016502500
Niveau de protectionIP65
LienTerminalBouchon de sécurité Couleur Article58998 / 5908258999 / 5908359000 / 5908459007
5900859009
Puissance (Watts)102030203040
Dimensions (mm)158 x 110 x 84184 x 145 x 84222 x 195 x 92
670-1260
x 630 x 540940-1850
x 950 x 830740-1560 x 781 x 680
Poids (g)380580980187025403500
Flux lumineux (lm ± 10)83016502500165025003300
Niveau de protectionIP44IP65
Angle de détection (°)100Gamme (m)10
Arrêt10±5 s ~ 10±2 min.
LienTerminalBouchon de sécurité Hauteur de montage (m)1.8-2.5Couleur Tab. 10: Spécificationsspécifiques
27
3 Utilisation prévueDécrit un usage autre que dans les sections «Description et fonctionnement» et dans les «Consignes de sécurité», est interdite.
IP44 Ce produit est protégé contre les éclaboussures et le contact avec desobjetsétrangers≥Ø1mm.
IP65Ceproduitestétancheàlapoussièrecontrelecontactetcontreles jetsd‘eau.
4 Préparation – Comparerlescaractéristiquesdetousleséquipementsàutiliseret pour assurer la compatibilité.
– VérifiezleContenudelivraisonpourl‘exhaustivitéetl‘intégrité.
5 Montage Risquedechute/Risqued‘écrasement – Placez et outils d‘utiliser en toute sécurité.
– Ne gardez pas membres entre parties en cisaillement.
– Placez les cČbles correctement.
5.1 Projecteurspourfixationausol(Art.59004)1. Mettez les éléments ensemble.
2. Insérezdroitetavecprécautionlalampedejardindanslesol.
Faites attention à la pose des cČbles.
5.2 Projecteurs pour montage mural Fig. 16: Place du montage 1. Sélectionnez l‘installation selon les critères suivants: – La surface doit être stable.
– Neplacezpasd‘objetsinflammablesàproximité.
– Le produit doit être absolument attaché directement.
Seuls les modèles avec capteur de mouvement: – Les ouvertures d‘aération ne doivent pas être proches.
– Lesplantes,l‘éclairagedesrues,dessurfacesréfléchissantesou desobjetsenmouvementarbitrairenedoitpassetrouverdansla plage de détection est.
Mode d?emploi
28
Fig. 17:Projecteurspourmontagemural-atteindre 2. Sélectionner les raccords de montage appropriés en fonction de la surface sélectionnée et le poids du produit.
Le matériel de montage ne sont pas inclus.
3. Sélectionnez la distance du trou de forage X et Y l‘oeillet au moyen de support de montage et un stylet adapté.
X
Y
Fig. 18: Montage Numéro d‘articleXY
59085, 59001, 59082, 58998
55 mmØ5,5mm 58999, 59083Ø6,5mm 59002, 5908680 mm 59003, 59087, 59000, 5908490 mm Tab. 11: TroudeforageespacementXetaupasse-cČbleY
4. Percerdestrousdefixationavecunoutilapproprié.
5. Fixezlesprojecteurs(avecdétecteurdemouvement).
29
5.3 Projecteurs avec supportLesprojecteurssontengrandepartiepré-assemblés.
– Monter les éléments comme illustré.
– Réglezlesprojecteurssurunemêmeantidérapanteetlessurfacesnon inflammables.
Fig. 19:Fig.5:Projecteursavecsupport-Montage 5.4 Projecteurs avec trépied1. Installez les supports comme indiqué.
2. Fixer le support (3) au moyen de vis (4) sur le support.
3. Fixerleprojecteur(1)aumoyendevis(2)surlesupport(3).
4. Définissezlesprojecteurssurunemêmeantidérapanteetlessurfaces noninflammables.
Fig. 20:Projecteursavectrépied-Montage Mode d?emploi
30
6 Installation 6.1 Modèles avec bouchon de sécuritéLes modèles avec prise antichocs montés ne doivent pas être installés.
– Connectez-leàunepriselibreetfaciled‘accès.
protection IP44 est donnée que lorsque vous utilisez les prises IPX4.
6.2Modèlespourl‘installationfixe Risquedechocélectrique – Laissez assembler extrémité de cČbles ouvertes UNIQUEMENTparunélectricienexpérimenté.
– Éteindre l‘alimentation avant de travailler sur le produit, les fusibles de sécurité et protéger cette contre la reconnexion.
– Garantir et de contrôler l‘absence de tension avant que le travail sur le produit.
Modèles sans bouchon de sécurité monté doivent être installés fermement au réseau électrique.
Le cČble d‘alimentation utilisé doit avoir une section minimale de 1.0 mm².
Brins doivent être munis d‘embouts. Les connexions suivantes sont effectuées sur le bornier du produit: 6 mm 15 mm N
L
GND
1 2 3
4 5 6
Fig. 21:Installationfixe1. Éteignez le fusible.
2. Ouvrirentournantdanslesensantihorairejusqu‘àcequeleblocde connexiontelquereprésentésurlafigure7-2,lemanchonderaccorde ment.
3. Bandecommelemontrelafigure7-3,lecČblemappétroisième.
31
4. Faireglissersurlafigure7-4partiesdumanchond‘accouplementsur les cČbles présentés.
5. Visser le cordon d‘alimentation comme représenté sur la Figure 7 – 5
tournevis permanent.
6. Fermerlefilderaccordemententournantdanslesenshoraire,comme représentésurlafigure7-6.
7 Faire des ajustements Uniquement projecteurs avec le mouvement: Tab. 12: Faire des adjustments SENS: SENS règle la plage du détecteur PIR. Ceci est d‘au moins 4 m, au maximum 10 m.
TIME: Letempsesthorsentremin.10±5set10±2minutes.
LUX: LUXajustelasensibilitédelacellulephotoetdétectelaluminosité ambianteentrevoyageparjouretlanuit et seulement la nuit .
8 Maintenance, Entretien, Stckage et TransportLes produits sont sans entretien.
Dommages matériels – Produit Nettoyez uniquement avec un chiffon doux et sec.
– Ne pas utiliser de produits chimiques et de nettoyage.
– Endroit frais et sec.
– Conserver le produit hors de la portée des enfants et dans une ambiance sèche et protégé de la poussière lorsqu‘il ne est pas en cours d‘utilisation.
– Conserver et utiliser l‘emballage d‘origine pour le transport.
9 Clause de responsabilité Nous nous réservons le droit des erreurs d‘impression et des chan gementsàproduit,l‘emballageoudeladocumentationduproduit.
– S‘il vous plaît voir nos conditions de garantie. Ceux-ci sont maintenant disponibles dans leur forme actuelle, conformé mentauxcoordonnéesfigurant.
Mode d?emploi
32
10 Instructions pour l’élimination Selon la directive européenne DEEE, la mise au rebut des appareils électriques et électroniques avec les déchets domestiques est strictement interdite. Leurs composants doivent être recyclés ou éliminés de façon séparée. Autrement les substances contaminées et dangereuses peuvent polluer notre environnement.
Vous,entantqueconsommateur,êtescommisparlaloiàlamiseaurebut des appareils électriques et électroniques auprès du fabricant, du distributeur,oudespointspublicsdecollecteàlafindeladuréedeviedes dispositifs, et ce de façon gratuite. Les détails sont réglementés dans le droit national. Le symbole sur le produit, dans le manuel d‘utilisation, ou sur l‘emballagefaitréférenceàcestermes.Aveccegenredeséparationdes déchets, d‘application et d‘élimination des déchets d‘appareils usagés, vous réalisez une part importante de la protection de l‘environnement.
No DEEE : 82898622
11 UE Déclaration de conformitéEn utilisant le marquage CE, Goobay®, nom commercial déposé de Wentronic GmbH, déclare que l‘appareil est conforme aux conditions et directives de base de la réglementation européenne.
33
ISTRUZIONI PER L‘USO
BETRIEBSANLEITUNG …3
USER MANUAL
…13
MODE D‘EMPLOI …23
ISTRUZIONI PER L‘USO …33
Contenuto 1 Istruzioni per la sicurezza …34
1.1 Generalmente …34
1.2 Livelli di allarme …34
2 Descrizione e Funzione …35
2.1 Prodotto …35
2.2 Parti di prodotto …35
2.3 Scopo della consegna …35
2.4 Specifichegenerali …35
2.5 Datitecnicispecifici …36
3 Scopo d‘utilizzo …37
4 Preparazione …37
5 Montaggio …37
5.1 Proiettoriperfissaggioaterra(art.59004) …37
5.2 Proiettori per montaggio a parete …37
5.3 Proiettori con supporto …38
5.4 Proiettori con treppiede …39
6 Installazione …39
6.1 Modelli con spina di sicurezza…39
6.2 Modelliperinstallazionefissa …40
7 Modificaimpostazioni …41
8 Manutenzione, cura, conservazione e trasporto …41
9 Avvisodiresponsabilità…41
10 Note per lo smaltimento …41
11 UEDichiarazionediconformità …42
Istruzioni per l?uso
34
1 Istruzioni per la sicurezza 1.1 GeneralmenteLe instruzioni per l‘uso è parte integrante del prodotto e contiene importanti informazioni per un uso corretto.
>> Leggere attentamente e completamente le istruzioni prima dell‘uso.
Le istruzioni per l‘uso essere disponibile per le incertezze e trasferimento del prodotto.
>> Conservare questo istruzioni per l‘uso.
>> L‘installazione, montaggio, manutenzione e riparazione devono essere eseguite esclusivamente da elettricisti specializzati addestrati.
Pericolo di scossa elettrica >> Toglieretensioneprimadiqualsiasiinterventosulprodotto spegnere i fusibili di sicurezza e per evitare reinserimenti.
>> Assicurareeverificarel‘assenzaditensioneprimadiqualsiasi intervento sul prodotto.
Superfici calde >> Nontocattarevetroriflettoresubitodopoomentrel‘uso.
>> Evitarelavicinanzadisuperficiinfiammabili.
Accumulo di calore >> Non coprire il prodotto.
>> Non usare in ambienti chiusi.
>> Evitare condizioni estreme, calore estremo e ispezionata la freddezza,umiditàelucedirettadelsole,cosďcomefornia microonde, vibrazioni e pressione meccanica.
Rilevatori di movimento non sono adatti come componente di sistemi di allarme, ai sensi dell ‚Associazione della Proprietà assicuratori (VdS). ť possibile attivare falsi allarmi se il luogo di installazione è stato scelto sfavorevole.
>> Utilizzare solo EN 60998-2-1 e EN 60998-2-2 testato terminali.
>> Seguire le norme di installazione e di costruzione locali.
>> In caso di domande, difetti, danni meccanici, interferenze e altri problemi, non recuperabili per la documentazione, rivolger si al rivenditore o produttore.
>> Lasciate eseguire lo smontaggio, la manutenzione e le riparazi onisolodapersonalequalificato.
>> Utilizzare il prodotto, le parti del prodotto e gli accessori solo in perfette condizioni.
>> Scegliere hardware di montaggio in base alle condizioni del substrato e il peso del prodotto.
>> Controllare regolarmente la tenuta del prodotto/vite.
>> Non stringere le viti troppo stretto.
Le discussioni possono essere danneggiati.
1.2 Livelli di allarme Avvisi relativi a pericoli che possono tradursi in lesioni gravi o morte in caso di inosservanza.
Avvisi relativi a pericoli che possono tradursi in lesioni in caso di inosservanza.
Avvisi relativi a pericoli che possono tradursi in danni materiali in caso di inosservanza.
35
2 Descrizione e Funzione 2.1 ProdottoQuesto prodotto è un proiettore LED, alcuni modelli sono inoltre dotati di un rilevatore di movimento integrato a infrarossi. Gli oggetti vengono rilevati all‘interno dell‘area del sensore. Con i cambiamenti in movimento della luce di inondazione del LED collegato viene attivato.
Il prodotto non è dimmerabile.
2.2 Parti di prodotto 1
2
3
4
5
6
Fig. 22: Parti di prodotto 1Riflettore 2LED 3Vetro4Staffa5IR-sensore 6 Stand / treppiede 2.3 Scopo della consegnaLuce di inondazione LED con o senza rilevatore di movimento, istruzioni per l‘uso 2.4 Specifichegenerali Tensionediingresso220-240 V~ 50 Hz Condizioni di esercizio-25~+40°C,≤93%RH
Fattore di potenza>0.8
Cicli di commutazione>15000
Istruzioni per l?uso
36
Vita del LED (h)30000
CRI>65
Temperaturadicolore(K)6500
Classe di protezione1 (solo modelli con tappo di sicurezza) Tab. 13: Specifichegenerali 2.5 Datitecnicispecifici Articolo59001 / 5908559002 / 5908659003 / 5908759004
5900559006
Potenza (W)102030202030
Dimensioni (mm)110 x 108 x 62.2145.4 x 120.2 x 64.7195 x 172 x 76.7332 x 145 x 57325 x 230 x 205390 x 260 x 250
Peso (g)33052087082011901770
Flusso luminoso (lm ± 10)83016502500165016502500
ProtezioneIP65
CollegamentoTerminaleSpina di sicurezza Colore Articolo58998 / 5908258999 / 5908359000 / 5908459007
5900859009
Potenza (W)102030203040
Dimensioni (mm)158 x 110 x 84184 x 145 x 84222 x 195 x 92
670-1260
x 630 x 540940-1850
x 950 x 830740-1560 x 781 x 680
Peso (g)380580980187025403500
Flusso luminoso (lm ± 10)83016502500165025003300
ProtezioneIP44IP65
Angolo di rilevamento (°)100Range (m)10
Switch-off10±5 s ~ 10±2 min.
CollegamentoTerminaleSpina di sicurezza Altezza di installazione (m)1.8-2.5Colore Tab. 14: Datitecnicispecifici
37
3 Scopo d‘utilizzoDescritto un uso diverso da quello nelle sezioni „Descrizione e funzionamento“ e nelle „Istruzioni di sicurezza“, non è consentito.
IP44 Questo prodotto è protetto contro spruzzi e il contatto con corpi estranei≥Ø1mm.
IP65 Questo prodotto è a prova di polvere e dal contatto contro l‘acqua del getto.
4 Preparazione – Confrontarelespecifichedituttiidispositiviutilizzatipergarantirela compatibilità.
– Controllareforniturasiacompletaegarantirel‘integrità.
5 Montaggio Pericolo di caduta / Pericolo di schiacciamento – Posizionare e utilizzare gli strumenti in modo sicuro.
– Non tenere membra tra le parti di taglio.
– Posare il cavo in modo sicuro.
5.1 Proiettoriperfissaggioaterra(Art. 59004)1. Mettere gli elementi insieme.
2. Inserire la lampada da giardino dritto e con attenzione nel terreno.
Prestare attenzione alla posa dei cavi di sicurezza.
5.2 Proiettori per montaggio a parete Fig. 23: Sito di montaggio 1. Selezionare l‘installazione in base ai seguenti criteri: – Lasuperficiedeveesserestabile.
– Noninserireoggettiinfiammabilinellevicinanze.
– Il prodotto deve essere assolutamente diritto attaccato.
Solo i modelli con sensore di movimento: – Le aperture di ventilazione non devono essere vicini.
– Impianti,illuminazionestradale,superficiriflettentiooggettiarbitrari amente in movimento non devono trovarsi nel campo di rilevamento è.
Istruzioni per l?uso
38
Fig. 24: Proiettore montaggio a parete – raggiungere 2. Selezionareraccordidimontaggioadattoinbaseallasuperficieselezio nata e il peso del prodotto.
Materiale di montaggio non è incluso.
3. Selezionare la distanza foro X e la guarnizione Y mediante staffa e una pennaadeguatofissaggio.
X
Y
Fig. 25: Montaggio Codice articoloXY
59085, 59001, 59082, 58998
55 mmØ5,5mm 58999, 59083Ø6,5mm 59002, 5908680 mm 59003, 59087, 59000, 5908490 mm Tab. 15: Drill distanza tra i fori X e gommino Y
4. Praticare i fori di montaggio con un attrezzo adatto.
5. Fissare i proiettori (con movimento).
5.3 Proiettori con supportoI proiettori sono in gran parte pre-assemblati.
– Montare gli elementi come illustrato.
– Impostareiriflettorisuunancora,antiscivoloesuperficinoninfiammabili.
39
Fig. 26:Fig. 5: Proiettori con supporto – montaggio 5.4 Proiettori con treppiede1. Installare le basi come illustrato.
2. Fissare la staffa (3) tramite la vite (4) sul supporto.
3. Fissare il proiettore (1) mediante viti (2) sulla staffa (3).
4. Impostareiriflettorisuunancora,antiscivoloesuperficinoninfiammabili.
Fig. 27: Proiettori con treppiede – montaggio 6 Installazione 6.1 Modelli con spina di sicurezza Modelli con spina antiurto montate non devono essere installati.
– Collegare ad una presa di corrente libera e facilmente accessibile.
Protezione IP44 è data solo quando si utilizzano le prese IPX4.
Istruzioni per l?uso
40
6.2 Modelliperinstallazionefissa Pericolo di scossa elettrica – LasciateestremitàdeicaviassemblareSOLO
da un elettricista esperto.
– Toglieretensioneprimadiqualsiasiinterventosul prodotto, spegnere i fusibili di sicurezza e per evitare reinserimenti.
– Assicurareeverificarel‘assenzaditensioneprimadi qualsiasi intervento sul prodotto.
Modelli senza spina di sicurezza montate devono essere installati saldamente alla rete elettrica.
Il cavo di alimentazione utilizzato deve avere sezione minima di 1,0 mm².
Trefolidevonoesseredotatidipuntali.Iseguenticollegamentivengonoeffettuati alla morsettiera del prodotto: 6 mm 15 mm N
L
GND
1 2 3
4 5 6
Fig. 28:Installazionefissa 1. Spegnere il fusibile.
2. Aprireruotandoinsensoantiorariofinchéilbloccoconnettorecome mostratoinfigura7-2,ilmanicottodicollegamento.
3. Strisciailcavocomemostratoinfigura7-3.
4. Scorrevole in Figura 7 – 4. Parti del manicotto d‘innesto sui cavi.
5. Avvitare il cavo di alimentazione come illustrato nella Figura 7 – 5
cacciavite permanente.
6. Chiudereilfiloconnessioneruotandoinsensoorario,comemostratoin Figura 7 – 6.
41
7 Modificaimpostazioni Solo proiettori con il movimento: Tab. 16:Modificaimpostazioni SENS: SENS regola la gamma del sensore PIR. Questo è un minimo di 4 m, un massimo di 10 m.
TEMPO: Seilritardoditempotrailchipmin.10±5s10±2minuti,ea.
LUX: LUXforniscelasensibilitàdellafotocellularilevalaluceambien tale e morire tra il giorno e la notte e muore solo di notte .
8 Manutenzione, cura, conservazione e trasportoIl prodotto è esente da manutenzione.
Danni alla proprietà – Utilizzare un panno asciutto e morbido solo per la pulizia.
– Non utilizzare detergenti e prodotti chimici.
– Conservare fresco e asciutto.
– Conservare il prodotto fuori dalla portata dei bambini e in un ambi ente asciutto e protetto dalla polvere quando non in uso.
– Conservare e utilizzare l‘imballaggio originale per il trasporto.
9 Avviso di responsabilità Ciriserviamoildirittodifarlod‘erroridistampaemodifichealpro dotto, imballaggio o documentazione del prodotto.
– Si prega di consultare i nostri termini di garanzia. Questi sono ora disponibili nella loro forma attuale sotto le date informazioni di cont atto.
10 Note per lo smaltimento InconformitàallaDirettivaEuropeaWEEE,leattrezzature elettriche ed elettroniche non devono essere smaltite insieme ai rifiutiurbani.Icomponentidevonoesserericiclatiosmaltitisepa ratamente. Diversamente le sostanze contaminanti e pericolose possono inquinare l’ambiente.
Istruzioni per l?uso
42
Il consumatore è obbligato per legge a portare le attrezzature elettriche ed elettroniche presso punti di raccolta pubblici oppure presso il rivenditore o il produttore al termine della loro durata utile. Devono anche essere osservate tutte le leggi e le normative locali. Il simbolo apposto sul prodotto, nel manuale o sulla confezione richiama l’attenzione su questi termini. Con questo tipo di raccolta differenziata e smaltimento dei prodotti usati si contribuisce in modo sostanziale alla protezione dell’ambiente.
WEEE No: 82898622
11 UE Dichiarazione di conformitàWith the CE sign Goobay®, a registered trademark of the Wentronic GmbH ensures, that the product is conformed to the basic standards and directives.
BetriebsanleitungUser manual Mode d‘emploi Istruzioni per l‘uso Art. 59001 10W LED FLOODLIGHT
59085 10W LED FLOODLIGHT WHITE
59002 20W LED FLOODLIGHT
59086 20W LED FLOODLIGHT WHITE
59003 30W LED FLOODLIGHT
59087 30W LED FLOODLIGHT WHITE
59004 20W LED FLOODLIGHT WITH SINGLE SPIKE
59005 20W Portable LED worklight with stand S type 59006 30W Portable LED worklight with stand S type 58998 10W LED FLOODLIGHT WITH SENSOR
59082 10W LED FLOODLIGHT WITH SENSOR WHITE
58999 20W LED FLOODLIGHT WITH SENSOR
59083 20W LED FLOODLIGHT WITH SENSOR WHITE
59000 30W LED FLOODLIGHT WITH SENSOR
59084 30W LED FLOODLIGHT WITH SENSOR WHITE
59007 20W Portable LED worklight with Tripod 59008 30W Portable LED worklight with Tripod 590092x20WPortableLEDworklightwithTripod Goobay®by Wentronic GmbH
Pillmannstraße 12
38112 BraunschweigGermany Made in China © by Wentronic Deutschland Hotline: +49 (0180) 5005882E-Mail: info@goobay.deWeb: www.goobay.de LED Flutlicht mit oder ohne Bewegungsmelder LED Flood Light with or without motion detector Lumière crue de LED avec ou sans détecteur de mouvement Luce LED Flood con o senza rilevatore di movimento *(0,14 € / Minute aus dem deutschen Festnetz) (0.14 € / minute from German landline) (0,14€/minutedepuisunpostefixeallemand) (0,14€/minutodallaretefissatedesca) V 1.4
REV 2017-07-03
Podmienky používania dokumentácie produktu
Súvisiace produkty
-
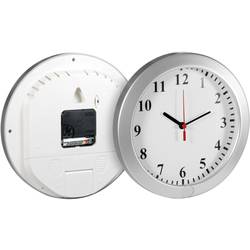
Bezpečnostná kamera v nástenných hodinách Technaxx 4218, 1280 x 720 pix, 32 GB
€76.83 Overiť cenu -
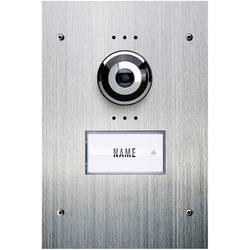
Káblový domové videotelefón m-e modern-electronics VDV 910, nerezová oceľ
€408.88 Overiť cenu -
Prepojovací konektor Rademacher Rademacher DuoFern DuoFern 9472 35001164
€72.97 Overiť cenu -

Vreckový alarm Smartwares SW SC03, 85 dB
€5.37 Overiť cenu