
€10.00
Priemerné hodnotenie:0/5(0x)
Vlastnosti a parametre výrobku
Skúsenosti užívateľov
Otázky a odpovede
Dokumentácia
Popis
Vlastnosti a parametre výrobku
| Séria (domáca technika) | Privest |
|---|---|
| Kategória výrobku | Rozšírenie bezdrôtového alarmu |
| Komponenty alarmu | Držiak na stenu |
Skúsenosti a názory zákazníkov
- Skúsenosti užívateľov nie sú k dispozícii.
Otázky užívateľov
- Užívatelia k tomuto výrobku zatiaľ nemali žiadne otázky.
Dokumentácia
Podmienky používania dokumentácie
5INPLBW8060
Deutsch English FRANÇAIS
Installationsanleitung Wand-/Deckenhalter Installation guide wall/ceiling swivel Instructions d’installation du support de Montage Vorbemerkung Bitte lesen Sie die Bedienungsanleitung vor der Installation sorgfältig durch. Diese ist eine Ergänzung zu der Anleitung der XEVOX-Bewegungsmelder. Mittels dieser Halterungen können Sie Ihre Melder vielfältig positionieren und ausrichten. Der Gehtest sollte – wie in der Bedienungsanleitung Ihres Melders beschrieben – erst nach der vollständigen Installation mit der entsprechenden Halterung vorgenommen werden, da jene einen Einfluss auf den Erfassungsbereich des Melders hat.
Zubehör der Wand- und Deckenhalter – Wandhalter (Fig. 2) mit Eckenadapter (Fig. 4) – Deckenhalter (Fig. 3) – Schrauben 1. Schritt: Montage Entfernen Sie die Platine aus dem Melderunterteil. Bohren Sie die Gehäusedurchbrüche Nr. 1 (ØA = 10mm) und Nr. 2 auf (Fig. 1).
Wand und Deckemontage Positionieren Sie den gewählten Melder an dem gewünschten Ort und markieren Sie die Befestigungslöcher für die beiden Schrauben. Bohren Sie die Löcher in die Wand (Fig. 2) bzw. Decke (Fig. 3) und versehen Sie diese mit Dübeln.
Eckmontage: Positionieren Sie den Eck-Adapter (Fig. 4) an dem gewünschten Ort und markieren Sie die Befestigungslöcher für die beiden Schrauben. Bohren Sie die Löcher und stecken Sie dort entsprechende Dübel hinein. Führen Sie das Kabel durch die große Hauptöffnung in Fig.
4 und befestigen Sie den Eckadapter mit zwei langen Schrauben an der Wand.
Stecken Sie das Kabel durch den Kabelkanal in die Halterung. Befestigen Sie die Halterung entweder mit der Wand/Decke über zwei lange Schrauben (Position B in Fig. 2 und Fig. 3) oder über zwei kurze Schrauben mit dem Eckenadapter. Bitte vermeiden Sie Beschädigungen, wenn Sie die untere Schraube für die Wandbefestigung, bzw. die dem Melder am nächsten liegende Schraube für die Deckenbefestigung, anziehen. Hierzu stehen Ihnen spezielle Löcher in der Anschlussplatte (Position F in Fig. 2 und Fig. 3) der Halterung zum Anziehen der Schrauben zur Verfügung. Wenn der Kabel entlang der Wand bzw. Decke geführt wird, sollte dieser durch die oberen Gehäusedurchbrüche an den Rändern der Halterung, in das Meldergehäuse gesteckt werden.
Nehmen Sie die Melderunterseite (Position E in Fig. 2 und Fig. 3) und verschrauben Sie diese mit dem Halter. Verwenden Sie hierzu die beiden im Lieferumfang befindlichen, kurzen Melderbefestigungsschrauben (Position D in Fig. 2 und Fig. 3).
Führen Sie das Kabel durch den Gehäusedurchbruch Nr.1 (Fig. 1). Richten Sie den Melder in die gewünschte Position aus und ziehen Sie die Befestigungsschraube der Halterung durch die Öffnung an. Befestigen Sie die Melderplatine wieder im Gehäuseunterteil. Verbinden Sie die einzelnen Leitungen mit den Klemmen (beachten Sie bitte hierzu die Bedienungsanleitung des XEVOX-Melders).
2. Schritt: Test Wenn die Position des Melders nicht korrekt ist, entfernen Sie bitte noch einmal die Melderplatine, lösen Sie die Befestigungsschraube der Halterung und richten Sie den Melder neu aus. Abschließend müssen Sie die Schraube wieder anziehen.
Versehen Sie den Melder wieder mit der Frontabdeckung und führen Sie entsprechend der Bedienungsanleitung des XEVOX-Melders einen Gehtest durch. Der Melder kann nun verwendet werden.
Maximale Winkeleinstellungen Horizontal: ±45
0
Vertical: +60 -17.5
0
Achtung: Diese Halterungen sind nicht für den XEVOX PET und XEVOX PET MW geeignet.
Before beginning Please read all the instruction carefully before beginning the installation.
These instructions are meant to supplement those provided with the detector. This accessory provides you with an extra degree of freedom in the positioning and aligning of the detector. However the swivel does affect the detector’s coverage pattern and so the walk test described in the installation instructions of the detector should be performed after installation with the swivel.
The wall/corner/ceiling mount accessory – wall swivel (Fig. 2) with corner adapter (Fig. 4) – ceiling swivel (Fig. 3) – screws Step 1: Assembly Remove the printed circuit from the base. Drill through the base holes/knockout no. 1 (ØA = 10mm) and no. 2 (see Fig. 1) For wall and ceiling applications: Position the swivel at the desired locations and mark the drilling locations for the two screws. Drill these two holes into the wall (Fig. 2) or ceiling (Fig. 3) and insert plastic anchors.
For Corner applications: Position the corner adaptor (Fig. 4) at the desired location and mark the drilling locations for the two screws. Drill these two holes and insert plastic anchors. Run the cable through the large central hole in Fig. 4 and attach the corner adapter to the wall with the two log screws.
Feed the cable through the cable channel in the swivel. Connect the swivel either to the wall/ceiling with two long screws (Position B in Fig. 2 and Fig. 3) or to the corner adapter with two short screws. Care should be taken to prevent damage to the swivel when inserting the lower screw (wall mounting) or the screw closest to the detector (ceiling mounting).
The two holes in the mounting plate (Position F in Fig. 2 and Fig. 3) allows easier access for tightening. If the cable is laid along the wall/ceiling, it should enter the swivel through one of the knockouts provided in the rim of the uppermost edge of the swivel.
Attach the detector base (Position E in Fig. 2 and Fig. 3) and tighten the two detector mounting screws which hold the swivel, see Position D in Fig.
2 and Fig. 3.
Feed the cable through the knockout no. 1 (Fig. 1) and tighten the swivels locking screw after the required position is achieved. Use the knockout for this as well. Replace the printed circuit board into the base.
Connect the cable wires to the detector terminal block as described in the detector’s installation instructions (XEVOX).
Step 2: Testing If the position of the detector is not correct please remove the PCB, loose the screw and change the position of the detector. Then tighten the locking screw again.
Replace the front cover. Perform the walk test as described in the detector installation instructions. The detector is now ready for use.
Maximum degree of adjustment: Horizontal: ±45
0
Vertical: +60 -17.5
0
Note: These swivels can not be used with XEVOX PET and XEVOX
PET MW.
Avant de commencer Veuillez lire attentivement toutes les instructions avant de commencer l’installation. Ces instructions sont destinées à compléter celles qui vous ont été fournies avec le détecteur. Cet accessoire vous donne une marge supplémentaire de manouevre dans le positionnement et l’alignement du détecteur.
Le pivot exercent toutefois une influence sur le champ de couverture du détecteur, le test de passage à pied décrit dans le mode d’installation du détecteur, ne doit être effectué qu’après avoir monté ce dernier avec le pivot.
Accessoires du support du mur et de toit – Support du mur (Schema.2) avec adaptateur de coin (Schema.4) – support de toit (Schema.3) – vis Etape 1: Montage Éloignez la carte du circuit intégré du détecteur.
Creuser les perforations Nr.1 (ØA = 10mm) et Nr.2 (schéma 2) Montage sur les murs et les toits Placez le pivot à l’endroit voulu et marquez les points de perçage de deux vis. Percez ces deux trous dans le mur (Schema.2) ou le toit (Schema.3) et introduisez les chevilles en plastique.
Applications en coin Placet l’adaptateur d’angle (Schema.4) à l’endroit voulu et marquez les points de perçage des deux vis. Perces ces deux trous dans le mur et introduisez les chevilles en plastique. Faites passer le cČble à travers le gros trou du milieu et fixes l’adaptateur d’angle au mur avec les deux longues vis à tête plate.
Enfilez le cČble à travers la gaine prévue à cet effet dans le pivot. Fixez le pivot à adaptateur en coin à l’aide des vis (Position B du schéma .2 ou du schéma 3) ou avec les vis courtes et avec précautions pour éviter de l’aimer en introduisant la vis inférieure. Nous vous prions d’éviter les endommagements, quand vous retirez la vis Du support du mur. Pour cela vous disposez des perforations convenables (Position F du schéma .2 ou du schéma 3).
Si le cČble de liaison est fixé sur le mur ou sur le toit, veuillez utiliser les perforations du support pour passer le cČble au boîtier du détecteur.
Fixez la base du détecteur et serrez les trois vis courtes qui le raccordent au pivot (Position F du schéma .2 ou du schéma 3).
Faites passer le cČble à travers la perforation Nr.1 (Fig2). Installez le détecteur dans la position souhaitée, et serrez la vis de fixation à travers la perforation.
Replacez la plaque du circuit imprimé sur la base. Branchez les fils du cČble au bloc terminal du détecteur en suivant les instructions du mode d’installation de ce dernier Etape 2: Test Si la position du détecteur n’est pas correcte, veuillez retirer la carte du circuit imprimé, desserrer la vis de fixation, placer le détecteur dans la position souhaitée, fixer la vis de fixation et ensuit replacez la carte du circuit imprimé.
Replacez le couvercle frontal. Effectuez le test de passage à pied selon les instructions détaillées dans le mode d’installation du détecteur. Le détecteur est maintenant prêt à l’emploi.
Degré maximum de réglage : Horizontal: ±45
0
Vertical: +60 -17.5
0
Remarque : le support n’est adapté pour les détecteurs suivants : XEVOX PET et XEVOX PET MW.
Fig. 1
Fig. 2
Fig. 4
Fig. 3
Podmienky používania dokumentácie produktu
Súvisiace produkty
-
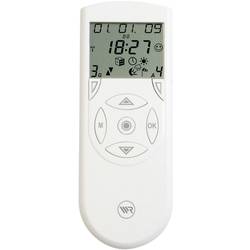
Diaľkové ovládanie Rademacher Rademacher DuoFern 9493 34810060, 9-kanálový
€154.05 Overiť cenu -
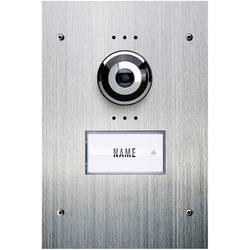
Káblový domové videotelefón m-e modern-electronics VDV 910, nerezová oceľ
€408.88 Overiť cenu -
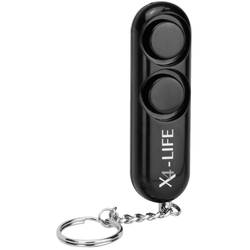
Vreckový alarm X4-LIFE 701149, 120 dB
€6.53 Overiť cenu -
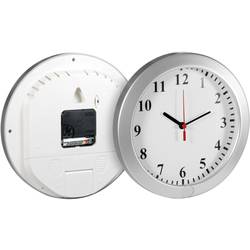
Bezpečnostná kamera v nástenných hodinách Technaxx 4218, 1280 x 720 pix, 32 GB
€76.83 Overiť cenu